Accelerated Mobile Pages – Loved by some, hated by others…
The Google AMP project has been one of the most controversial topics in the SEO community since its official launch, and to this day, it continues to divide webmasters into pro-AMP vs. anti-AMP camps.
No matter which side of the barricade you are on, one thing is for sure: AMP pages are still here, and they continue to be part of our mobile world. 📱
In this comprehensive guide, we will therefore take a look at:
- What is AMP exactly?
- How do AMP pages work?
- What are the pros and cons of AMP?
- How to implement and optimize AMP pages?
- How to check and measure the performance of AMP?
So without further ado, let’s dive deep into the AMP universe.
What is AMP in SEO?
AMP (Accelerated-Mobile-Pages) is an open-source HTML framework that creates lighter versions of regular web pages, stripped-down of all unnecessary HTML, CSS, and JavaScript elements.
The purpose of AMP is to improve the overall loading speed of the web page and provide a better user experience on mobile (and sometimes desktop) devices.
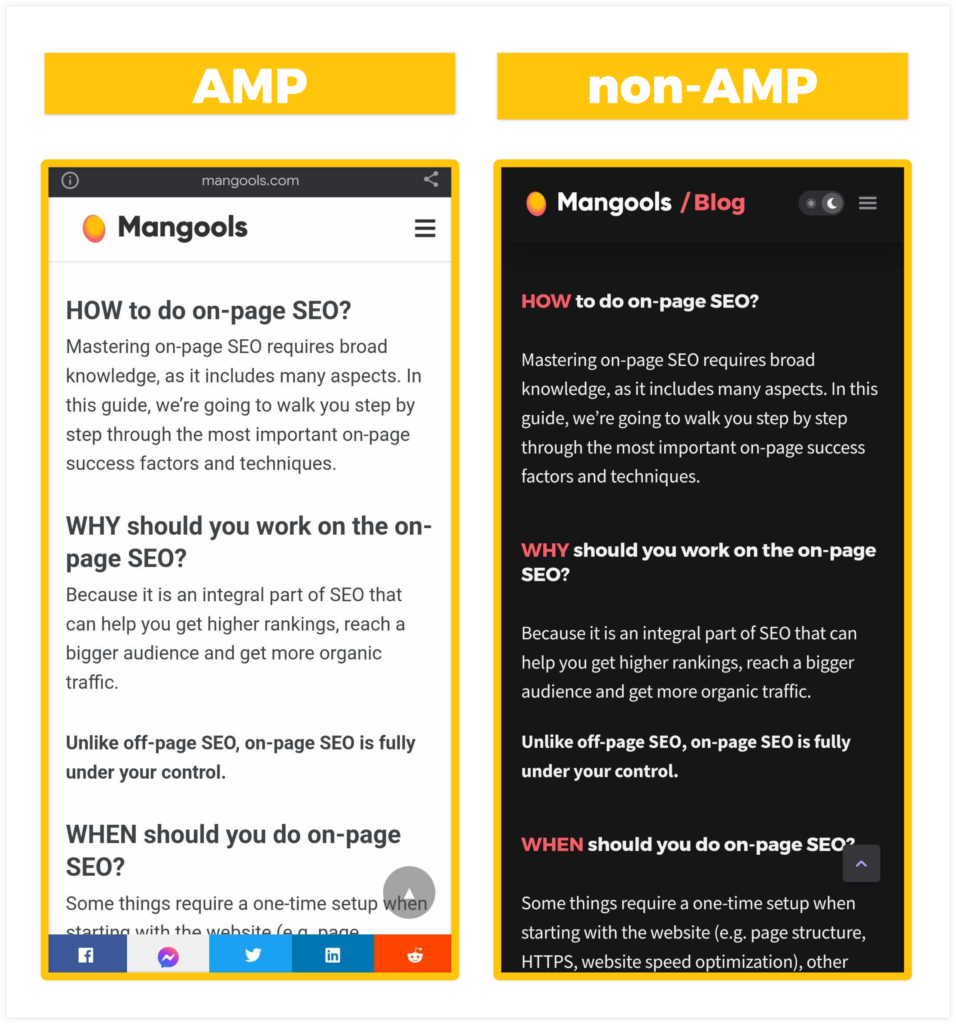
Here’s how an AMP and non-AMP version of the same web page can look side-by-side:
AMP pages were introduced by Google in 2015 (with the support of various major platforms such as WordPress, Twitter, LinkedIn, etc.) and were designed to help website publishers deliver their content to mobile users much faster.
How does AMP work?
AMP serves as an alternative version of the main (or canonical) web page, with technical restrictions that make the AMP page much smaller in size and therefore much faster to load.
Whenever Google detects AMP pages on the website, it will display them as search results to users who are using Google on their mobile devices.
The AMP consists of 3 major components:
- AMP HTML
- AMP JavaScript
- AMP Cache
Let’s break them down a little bit more.
a) AMP HTML
AMP HTML is a restricted document that can contain only a limited set of tags and attributes (or other elements) in order to make the AMP web page lightweight and quick to load.
Every AMP HTML document must contain:
<!doctype html>– it tells web browsers about the version of the HTML document.<html amp>or<html ⚡>tag – they inform search engines that the given page is the AMP version.<head>and<body>tags – they define the content of the web page (e.g.<title>and meta tags, headings, text, links, images, etc.).<meta charset="utf-8">tag – it specifies the character encoding of the AMP web page.<script async data-src="https://cdn.ampproject.org/v0.js"><script>tag – it adds extensions to the base library.<link rel="canonical" href="URL">tag – it points to the regular (canonical) version of the page (or to the AMP version itself if there is no regular version).<meta name="viewport" content="width=device-width">tag – it instructs web browsers how to display the AMP page on various devices.- The AMP boilerplate code (
head > style[amp-boilerplate]andnoscript > style[amp-boilerplate]) – they are necessary elements that have to be present in the<head>section of the AMP web page.
Note: If you would like to know more about HTML specifications for the AMP, make sure to check out the official AMP HTML documentation.
b) AMP JavaScript
AMP allows the usage of JavaScript language via amp-script element (instead of regular <script> tag) – it ensures that the AMP pages will still run smoothly and quickly without any excessive JavaScript and without third-party libraries.
It is important to understand though, that even amp-script has its own limits: JavaScript in AMP pages must not exceed 150KB in size.
For more information about how to use and implement custom JavaScript into AMP pages, make sure to visit this JS guide from amp.dev.
c) AMP Cache
AMP cache is a proxy-based CDN (Content-Delivery-Network) that pre-renders and preloads the AMP web page before the user even clicks on it (or requests it).
It is a secret sauce that makes AMP pages load with lightning speed, no matter from which place are users visiting them.
Whenever Google discovers an AMP page, it will cache its content into its own servers and make it ready to display instantly to users who click on it in the SERP.
If you would like to know more about how AMP cache works, check out this video:
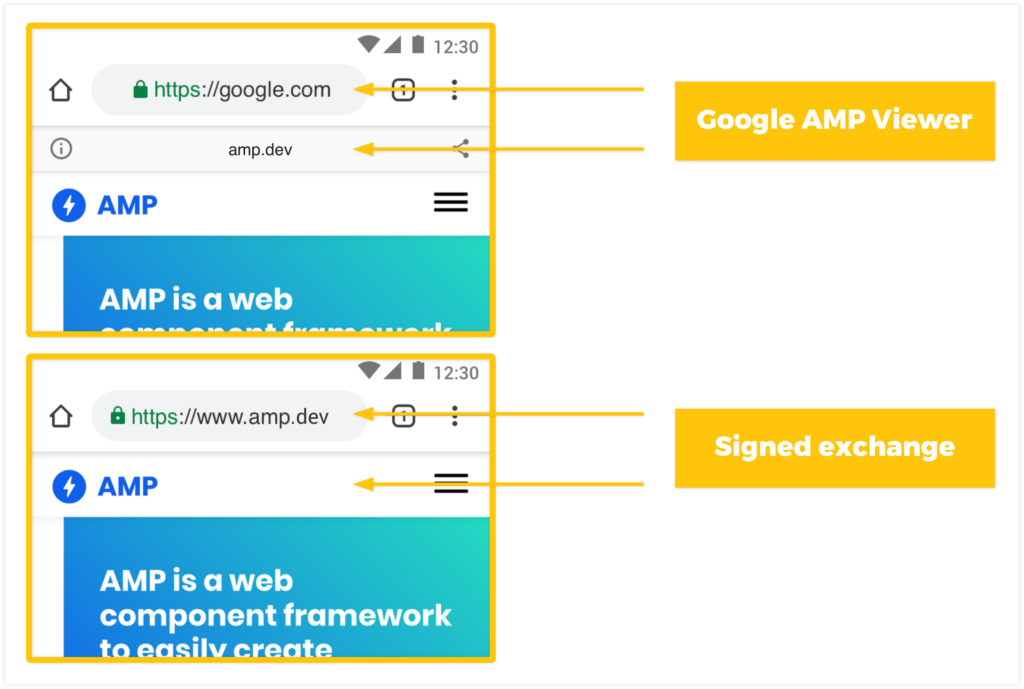
There are 2 ways how Google can display AMP pages to users who visit them from the SERP:
- Google AMP Viewer – the search engine will display the AMP page with a custom Google URL in the browser’s search bar. The original website’s domain will be then shown right underneath it.
- Signed exchange – the browser will display the original URL of the page in its search bar.
Tip: You can check out this simple course made by Google Codelabs and learn more about the foundations of Accelerated Mobile Pages!
Advantages & disadvantages of AMP
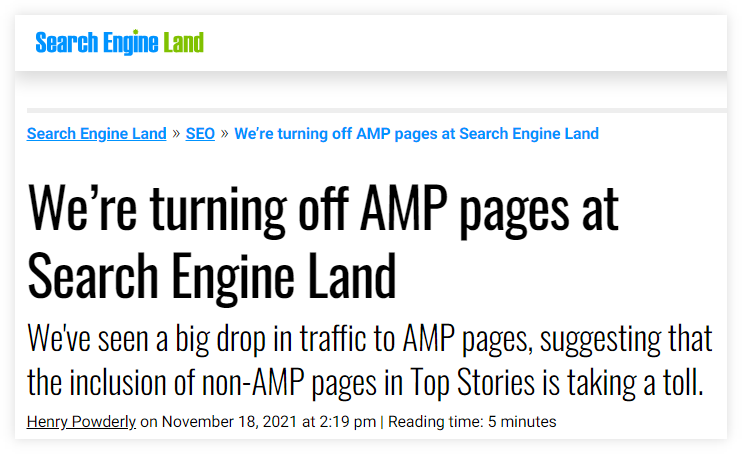
AMP pages are quite a controversial topic in the SEO community. Some website owners claim that AMP is dead, while others have even chosen to completely turn it off on their websites:
On the other hand, there are still some potential benefits that can come with AMP implementation.
Let’s check out what are the pros and cons of AMP pages.
1. AMP benefits
a) Improved page speed: Probably the most obvious benefit of AMP is that it makes web pages load almost instantly.
Since AMP pages are quite small (and are already stored in Google AMP Cache), they can be loaded and displayed to users ≈ 88% faster than traditional mobile pages.
In addition to that, page speed is a well-known Google ranking factor, which makes AMP quite attractive for some website owners – the median it takes for AMP pages to load from Google Search is less than 1 second.
b) Better UX (sometimes): Faster loading speed leads to happier users on mobile devices (and therefore to more conversions 😉).
Having nicely designed and fast AMP pages on your website also improves the overall page experience for users – which is part of Google’s core ranking system.
c) Relatively easy to build: The actual implementation of AMP into your website is quite an easy process since many major content platforms like WordPress, Drupal, Squarespace, etc., already support it:
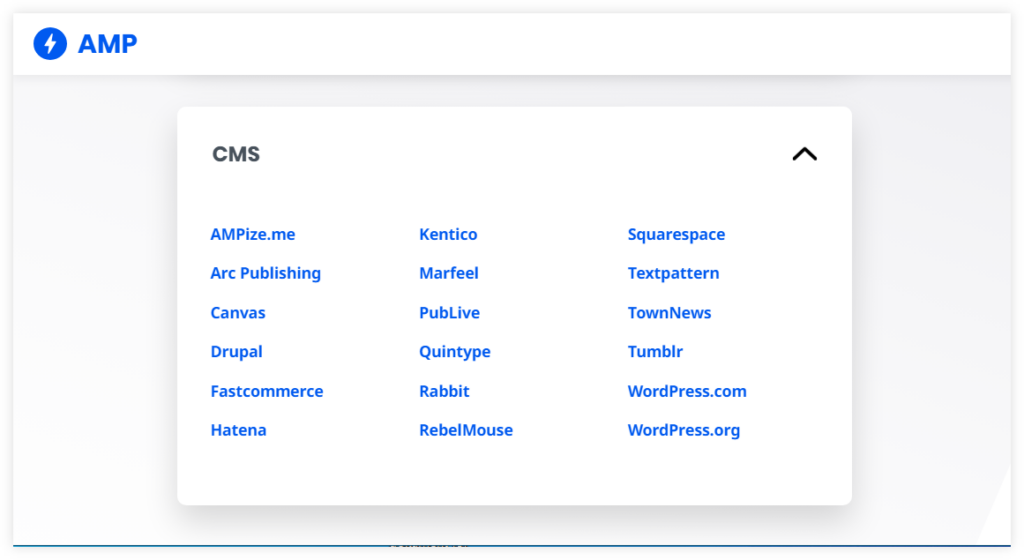
In other words – you do not have to be a skilled developer or some technical guru in order to build AMP pages for your website.
Note: In the past, AMP also carried 2 extra SEO benefits that convinced many website owners to create and use AMP pages for their sites:
⚡ AMP badge – AMP pages ranking in Google Search used to have a small AMP icon next to their URLs, meta descriptions, or in other areas of their organic snippets that were shown on mobile devices (which made them stand out from the regular mobile results a little bit more and potentially increase their CTR in SERPs):
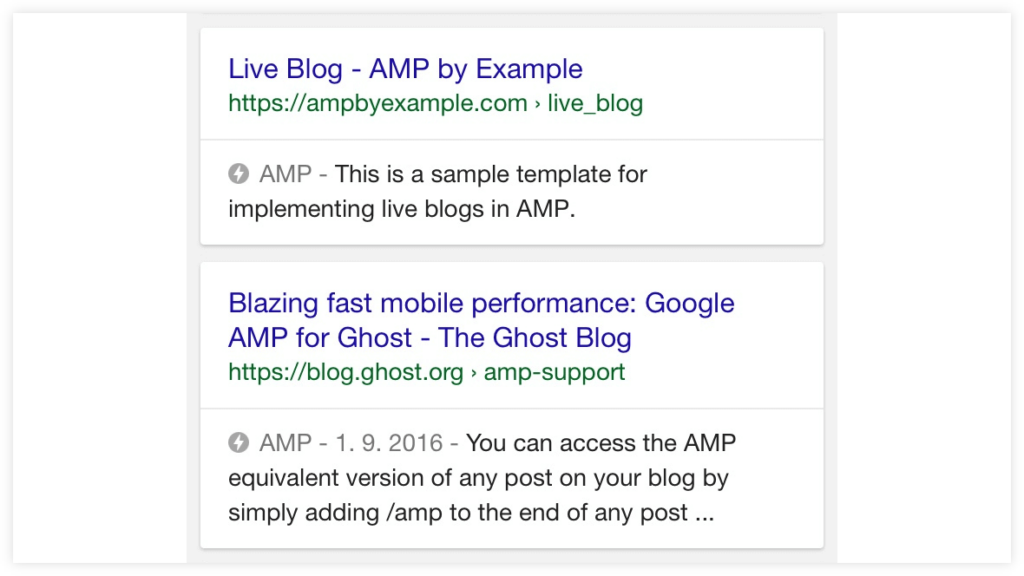
Unfortunately, Google discontinued AMP badges in 2021, making AMP and non-AMP pages look visually the same in mobile SERPs.
🔥 AMP in Top Stories – the Top Stories carousel is a section within Google SERP that usually appears for news-oriented search queries.
It is one of the most prominent spots for which many website owners try to optimize their pages (since it can bring them quite a lot of organic traffic) – and AMP was one of Google’s requirements that had to be fulfilled in order to be eligible for this spot:
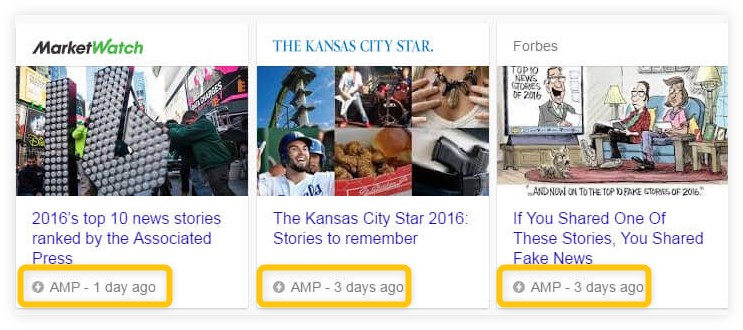
Similarly to AMP badges, however, Google removed the AMP requirement in May 2020 which allowed both, AMP and non-AMP websites, to be eligible for Top Stories carousels.
2. AMP drawbacks
a) Limited design: AMP, by nature, is based on a very restrictive framework that sacrifices visual design and functions for the sake of great page speed.
Although fast loading time on your website is always a nice thing to have, it is important to realize that you will have to give up a lot of nice and interactive elements in order to make your AMP pages eligible for Google Search.
AMP can look quite boring in terms of visual design, causing diluted brand identity or even resulting in a dramatic drop in the conversion rate.
In other words:
“Google AMP prefers efficiency over creativity.”
b) Crawl issues: Having AMP and non-AMP versions on your website forces web crawlers like Googlebot to visit every web page twice (in order to ensure content parity between those versions) and spend your crawl budget much faster.
Although crawl budget (the amount of URLs that Googlebot is willing to crawl within a given timeframe) might not be an issue for smaller websites that use AMP, an e-commerce online store or a large publishing platform with thousands of URLs might quickly spend its crawl budget just by implementing AMP to their system.
The reason is pretty simple – any website that contains hundreds or even thousands of pages will instantly double the amount of URLs that need to be crawled just by creating their AMP versions.
This can be quite an inconvenient issue, especially if you create and publish dozens of pages a day that need to be crawled, indexed, and ranked in Google Search as quickly as possible.
c) Extra technical burden: From the practical perspective, AMP creates a lot of extra work for website owners and developers since they have to take care of both – AMP and non-AMP – versions of your website individually, keep them technically sound, and synced with each other in terms of content and SEO.
An alternative to AMP-pages is to deliver mobile experiences via a dedicated app. Thanks to no-code platforms, brands can now build mobile apps with native features (push notifications, offline access, performance optimisation) without writing code. Products like AppMySite make it easy to build mobile apps without code, alongside your web presence.
Is AMP a Google ranking factor?
The short answer is no, AMP is not a ranking factor in Google’s algorithm.
This was clarified by Google as well as its representatives like John Mueller (Google Search Advocate) multiple times throughout the years.
On the other hand, AMP can sometimes significantly improve the loading performance of your website – which has a direct impact on your page speed and Core Web Vitals (as ranking factors).
How to create & optimize AMP pages
Creating and implementing AMP pages on your website can be done basically in 2 ways:
- Creating AMP pages manually
- Using an AMP plugin
Let’s take a look at both of these options.
a) Create AMP pages manually
Creating AMP web pages manually is a pretty straightforward (though time-consuming) process – you can start simply by preparing an AMP template that will be used as a reference for all of your pages.
Here’s what a simple AMP template can look like with all basic markups in place:
<!doctype html>
<html amp lang="en-US">
  <head>
    <meta charset="utf-8">
    <script async data-src="https://cdn.ampproject.org/v0.js"></script>
    <title>The title of your AMP web page!</title>
    <link rel="canonical" href="https://example/main-version/">
    <meta name="viewport" content="width=device-width,minimum-scale=1,initial-scale=1">
    <style amp-boilerplate>body{-webkit-animation:-amp-start 8s steps(1,end) 0s 1 normal both;-moz-animation:-amp-start 8s steps(1,end) 0s 1 normal both;-ms-animation:-amp-start 8s steps(1,end) 0s 1 normal both;animation:-amp-start 8s steps(1,end) 0s 1 normal both}@-webkit-keyframes -amp-start{from{visibility:hidden}to{visibility:visible}}@-moz-keyframes -amp-start{from{visibility:hidden}to{visibility:visible}}@-ms-keyframes -amp-start{from{visibility:hidden}to{visibility:visible}}@-o-keyframes -amp-start{from{visibility:hidden}to{visibility:visible}}@keyframes -amp-start{from{visibility:hidden}to{visibility:visible}}</style><noscript><style amp-boilerplate>body{-webkit-animation:none;-moz-animation:none;-ms-animation:none;animation:none}</style></noscript>
  </head>
  <body>
   <h1 id="hello">Main heading of your AMP web page!</h1>
  </body>
</html>
With an AMP template like this, you can start creating individual AMP pages with content that has to be identical to your main, canonical URLs.
When it comes to the actual content implementation, there are various special HTML tags that you must use in your AMP pages instead of the regular ones, such as:
<amp-img>tag – for images (instead of<img>tag).<amp-video>tag – for videos (instead of<video>tag).<style amp-custom>in the<head>section – a custom AMP tag that is used for CSS properties.<amp-script>– for using JavaScript frameworks (instead of<script>tag).
If you would like to learn more about AMP HTML tags (and see which ones you should use), make sure to check out this official AMP documentation.
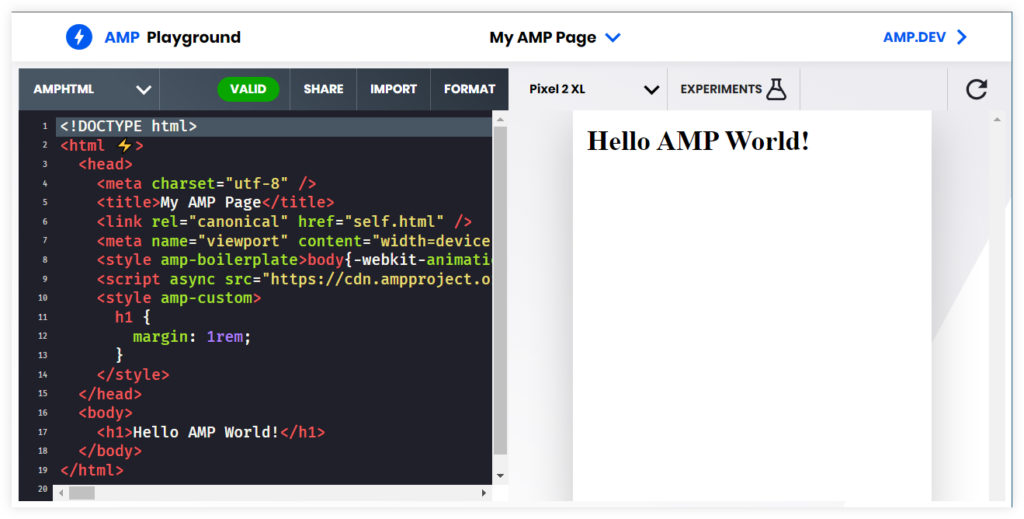
Tip: You can try, test and see your AMP pages before adding them to your website by using AMP Playground – a simple online tool where you can just copy/paste your AMP HTML code and see how your pages will actually look on various mobile devices:
b) Use CMS plugins
One of the easiest ways how to set up AMP for your website is just installing an AMP plugin to your CMS.
If you run your website on one of the popular CMS-es (e.g. WordPress, Joomla, Drupal, etc.), you can simply download and install the AMP plugin that suits you best and start creating AMP pages instantly.
For example, for the WordPress platform, you can download this Google WP plugin powered by AMP Project Contributors.
The process is pretty straightforward:
- Download, install, and activate the plugin on your site.
- Go to the “Appearance” tab in WordPress and select AMP.
The plugin will show you how your AMP pages might look on mobile devices – you can adjust their design, headers, colors, etc. to make them more visually appealing:
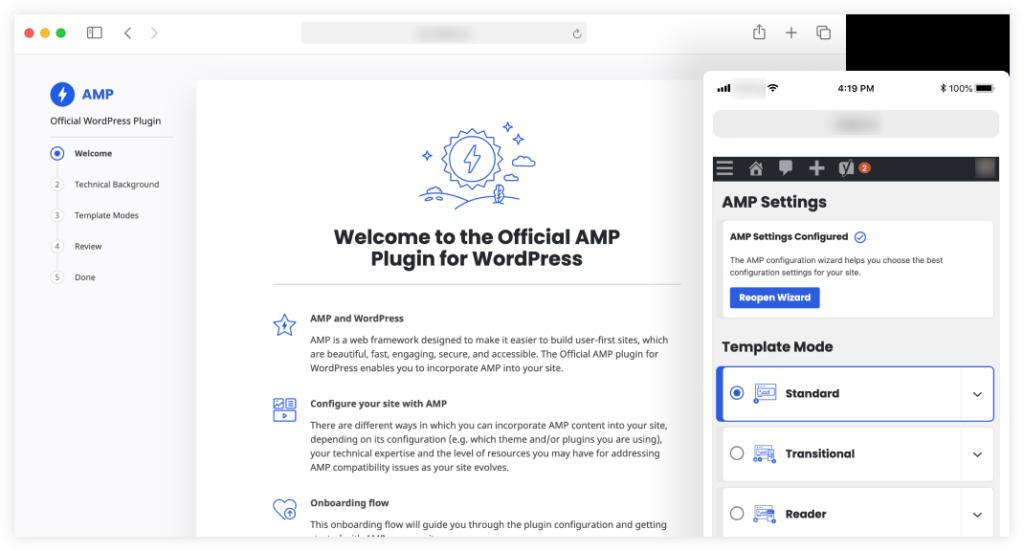
This WordPress AMP plugin comes with 3 different website modes:
- Standard – AMP will be the main framework for your website.
- Transitional – every web page on your site will have a canonical and an AMP version.
- Reader – AMP will be applied only to chosen posts and pages individually. Each selected web page will have a canonical and an AMP URL.
For more information about this AMP plugin, check out its WP documentation.
Tip: If you are new to web development, you can also visit this free AMP course made by amp.dev.
AMP best SEO practices
#1 Create SEO-friendly AMP URLs
AMP pages must have their own unique URL scheme with the “amp” variable somewhere in it.
There are multiple ways how you can structure your AMP URLs:
a) AMP as a parameter: https://www.example.com/example-url/?amp=1
b) AMP in the subdomain: https://amp.example.com/example-url/
c) AMP as front-end language: https://www.example.com/example-url.amp.html
d) AMP in the subfolder: https://www.example.com/example-url/amp
Although all of the options above work, Google recommends using the last 2 options.
#2 Canonicalize your AMP pages
Both AMP and non-AMP versions of the same web page must be pointing to each other with a proper tag in the sections of their HTML.
Generally speaking, you might want to have both – AMP and non-AMP – versions of the same page available to users (and search engines) and display them according to the device that users are having (e.g. non-AMP version for desktop and AMP version for mobile devices).
In order to do this, you have to let Google know that there are 2 versions of the same page by implementing the following tags:
- For the non-AMP version – add this special tag into the
<head>section, with the URL pointing to the AMP version of the page:
<link rel="amphtml" href="https://www.example.com/example-url/amp">
- For the AMP version – add the canonical tag into the
<head>section, with the URL pointing to the main, non-AMP version of the page:
<link rel="canonical" href="https://www.example.com/example-url/">
This will allow Google to understand the relationship between the AMP and non-AMP URLs and avoid potential duplicate content issues.
#3 Ensure on-page parity
Both AMP and non-AMP versions of the same page must be identical to each other or have very close “parity” in terms of content and on-page elements.
In order to do this, the AMP web page must be the same as the original canonical version in a few areas such as:
- Content (text, images, videos, etc.)
- On-page tags (headings, image alt texts, hreflang tags, links, etc.)
- Structured data
If the AMP version doesn’t match the canonical one, Google will simply ignore the AMP page and prevent it from appearing as a search result in SERPs (and send users to the non-AMP equivalent instead).
#4 Don’t add AMP URLs to sitemap or robots.txt
Make sure that you won’t add your AMP URLs into the XML sitemap – Google is capable to discover any AMP web page via rel=”amphtml” in its non-AMP equivalent.
In addition to that, don’t block your AMP pages in your robots.txt file (otherwise Google won’t be allowed to visit them).
Tip: If you decide at some point to redirect some page on your website to another destination, make sure to always redirect both – AMP and non-AMP – versions of the page into their new respective URLs.
For more information about how to redirect (or even remove) AMP pages, make sure to check out Google’s official documentation.
How to check & monitor AMP pages
Once you implemented AMP to your website, the next step is to check if they function properly and make them validated by Google.
Here are a few online tools that can help you with that.
1. Try Google AMP Test Tool
One of the easiest ways how to check and validate your AMP pages is to run them through Google’s AMP Test Tool.
Simply enter any AMP URL from your website into the tool and hit the “TEST URL” button – after a few seconds, you will see whether or not your AMP page is valid for Google:
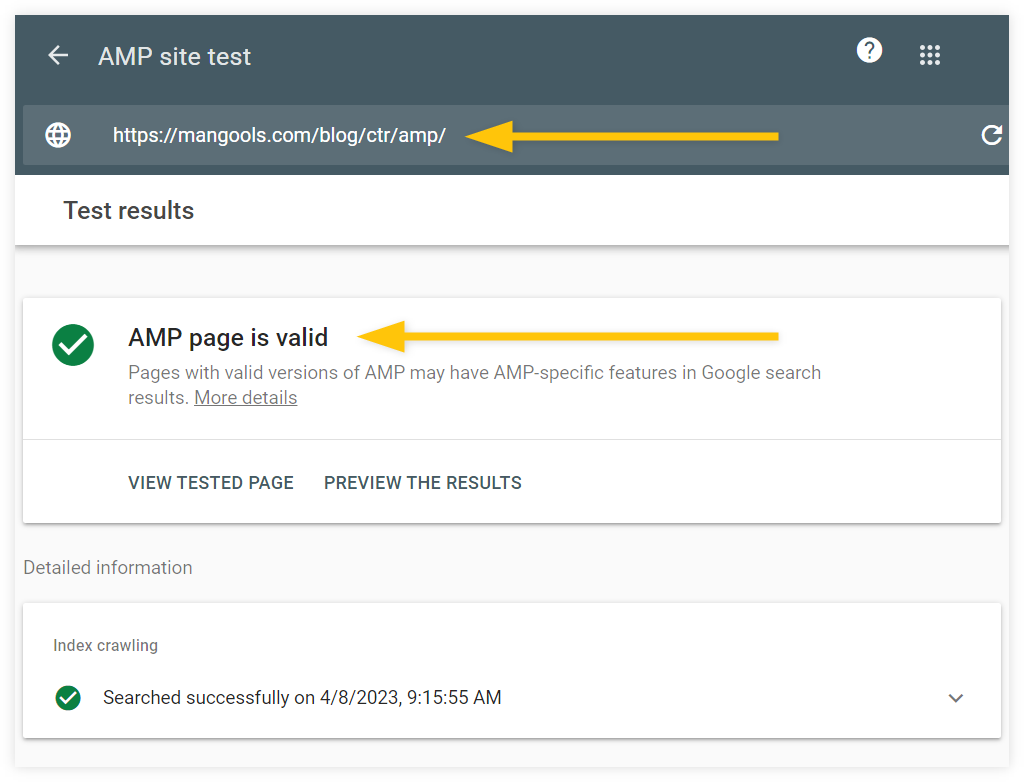
You can also enter the canonical, non-AMP version of your page to get even more comprehensive results about your AMP implementation.
Tip: If you would like to measure (and compare) the speed performance of your AMP pages, you can use our Mangools SEO extension. To do this, simply:
- Instal the extension into your browser.
- Open up your AMP URL and click on the extension.
- Select the “On-page SEO” tab → “Page Speed”.
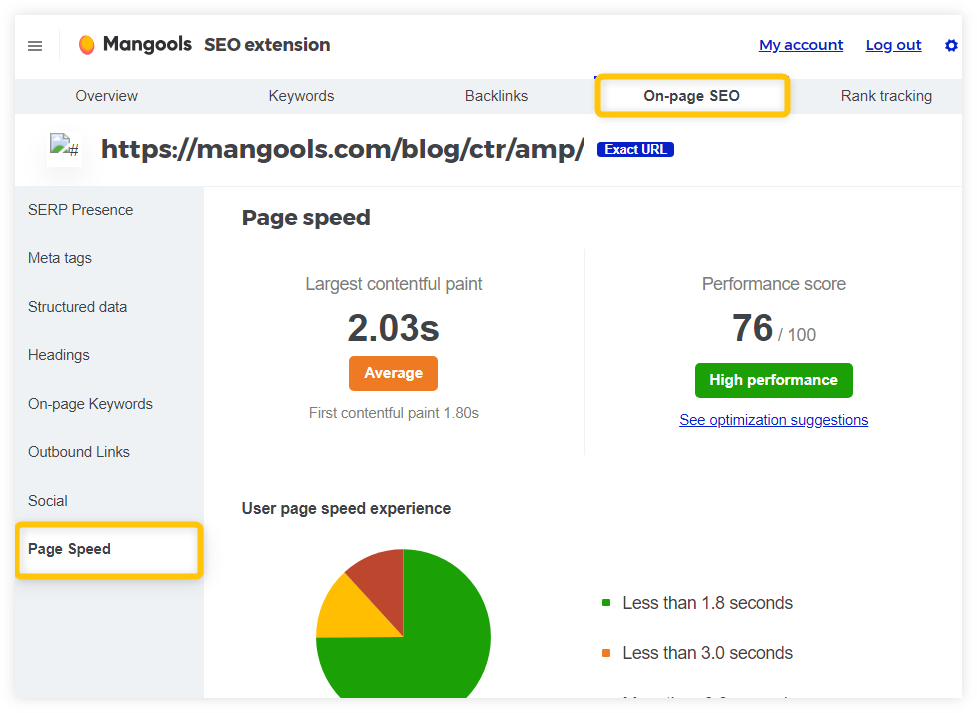
The extension will then measure your AMP page and display important information about its loading speed such as Performance score and Largest contentful paint along with further recommendations on how to improve the page performance.
2. Check AMP status report in GSC
For more comprehensive information about your AMP pages, you can use the AMP status report in Google Search Console:
- Open up your GSC account.
- Select the “AMP” tab in the “Enhancements” section.
Google Search Console will then show you whether or not your AMP URLs are valid and eligible to be crawled, indexed, and displayed in Google Search.
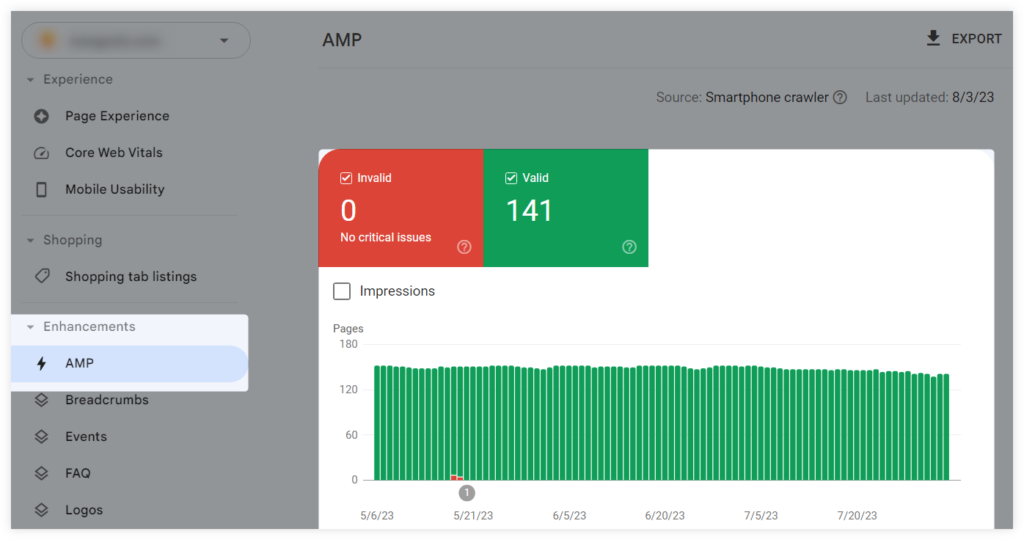
If you would like to know more about AMP status report (and what it can do), check out this useful Search Console Training video:
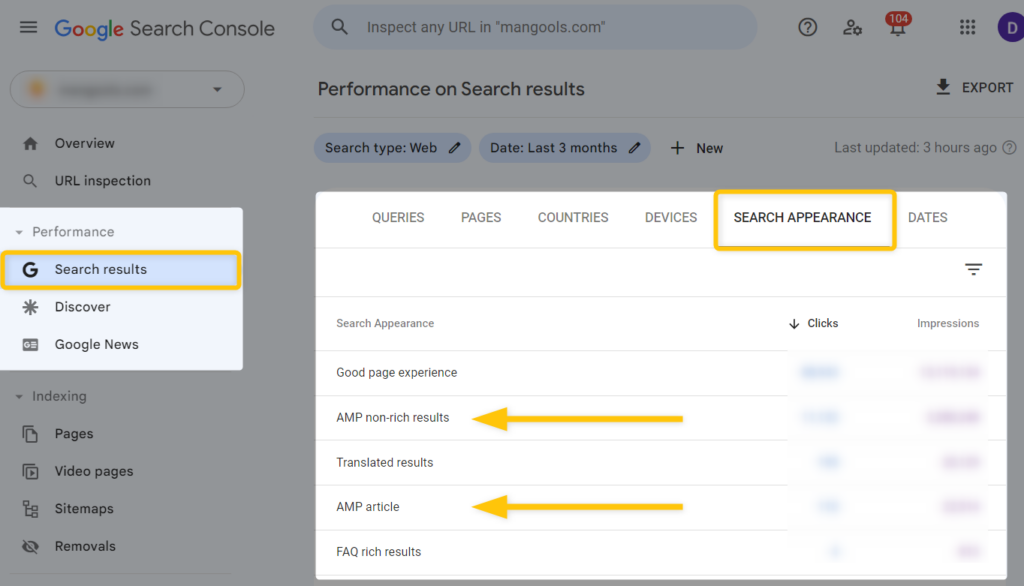
To see how your AMP pages are performing in Google SERPs, head over to the GSC Performance report:
- Click on the “Search results” in the “Performance” section.
- Select the “SEARCH APPEARANCE” tab.
You can then select various dimensions (e.g. AMP non-rich results, AMP article, etc.) in the “Search Appearance” section and see how many impressions or clicks are your AMP pages getting from Google:
To learn more about AMP validation, make sure to check out these AMP guidelines from Google Search Central.
3. Use SERPWatcher
With AMP properly set up on your website, it is time to measure its actual ranking performance for mobile Search!
You can use our SERPWatcher tool to monitor the rankings of your AMP pages for their focus keywords in Google:
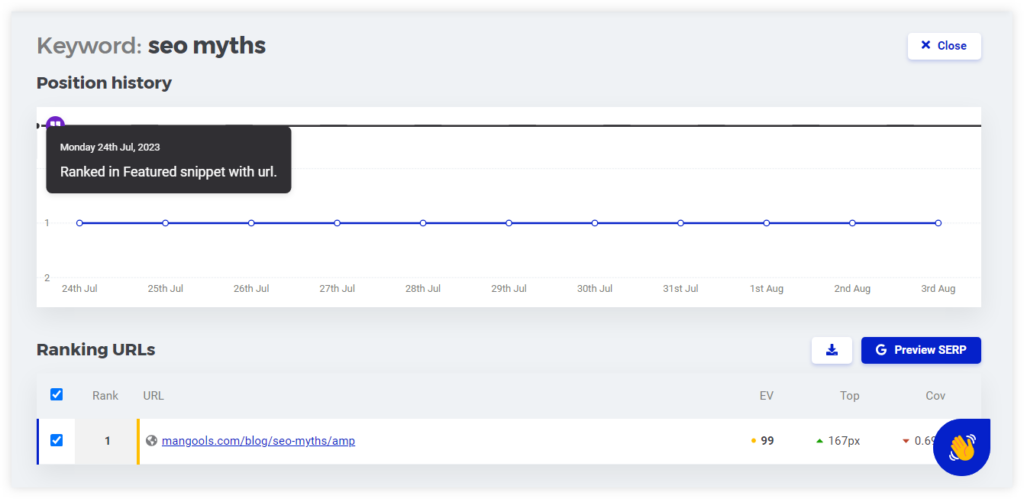
Simply create a Mangools account (if you haven’t already) and go to the SERPWatcher tool:
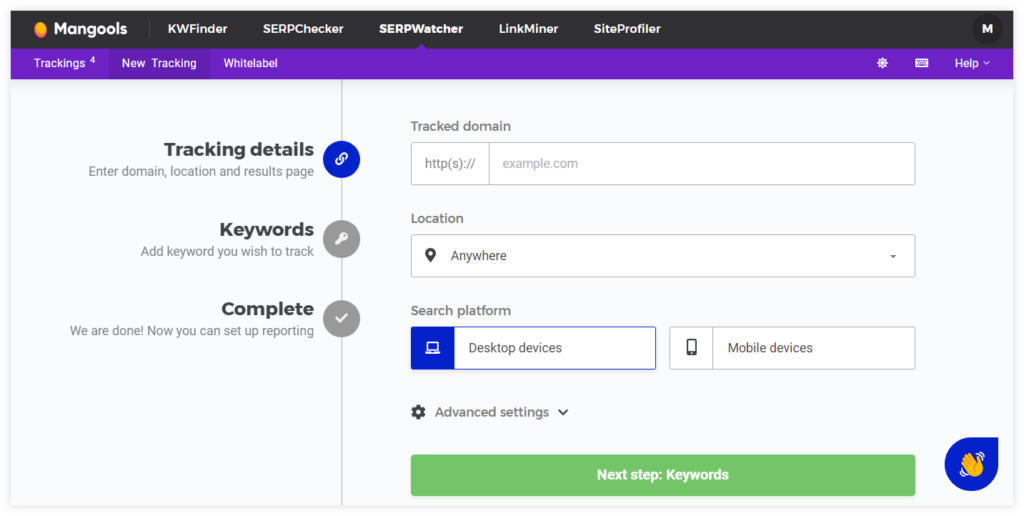
1. Select “New Tracking” and add tracking details (domain, location, etc.).
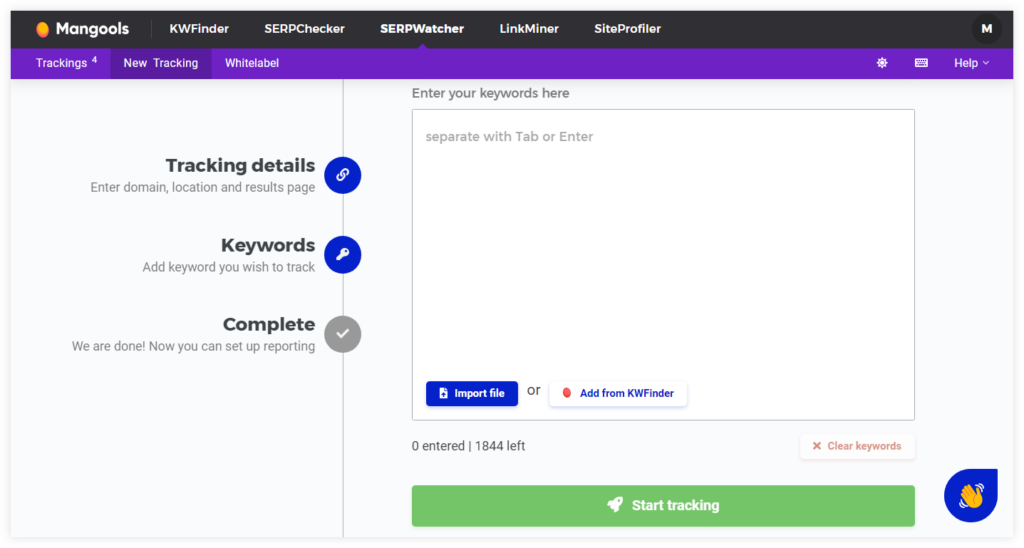
2. Add all keywords that you want to track for your website.
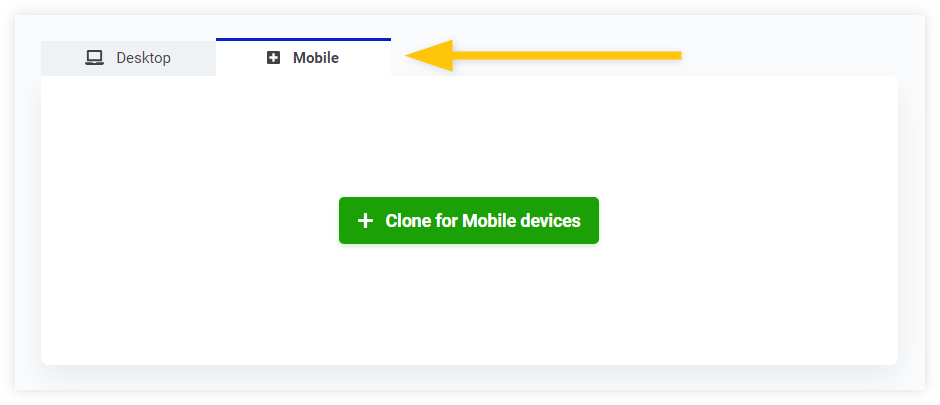
3. Click on the “+ Mobile” tab above your freshly created tracking.
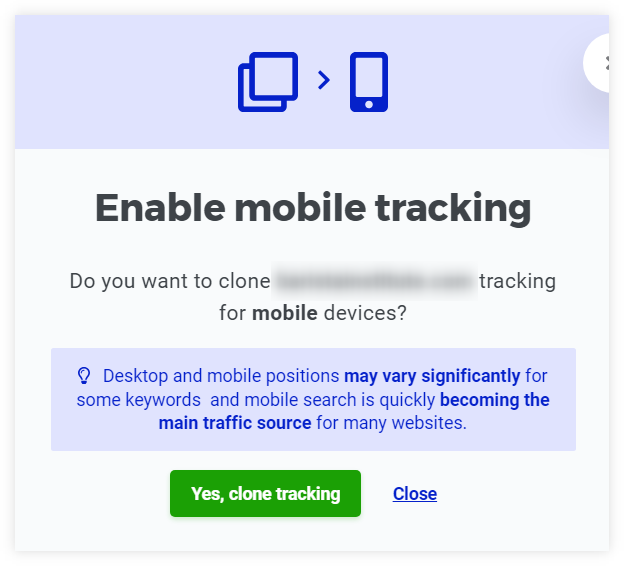
4. Enable and clone tracking for mobile devices (or just add your keywords manually).
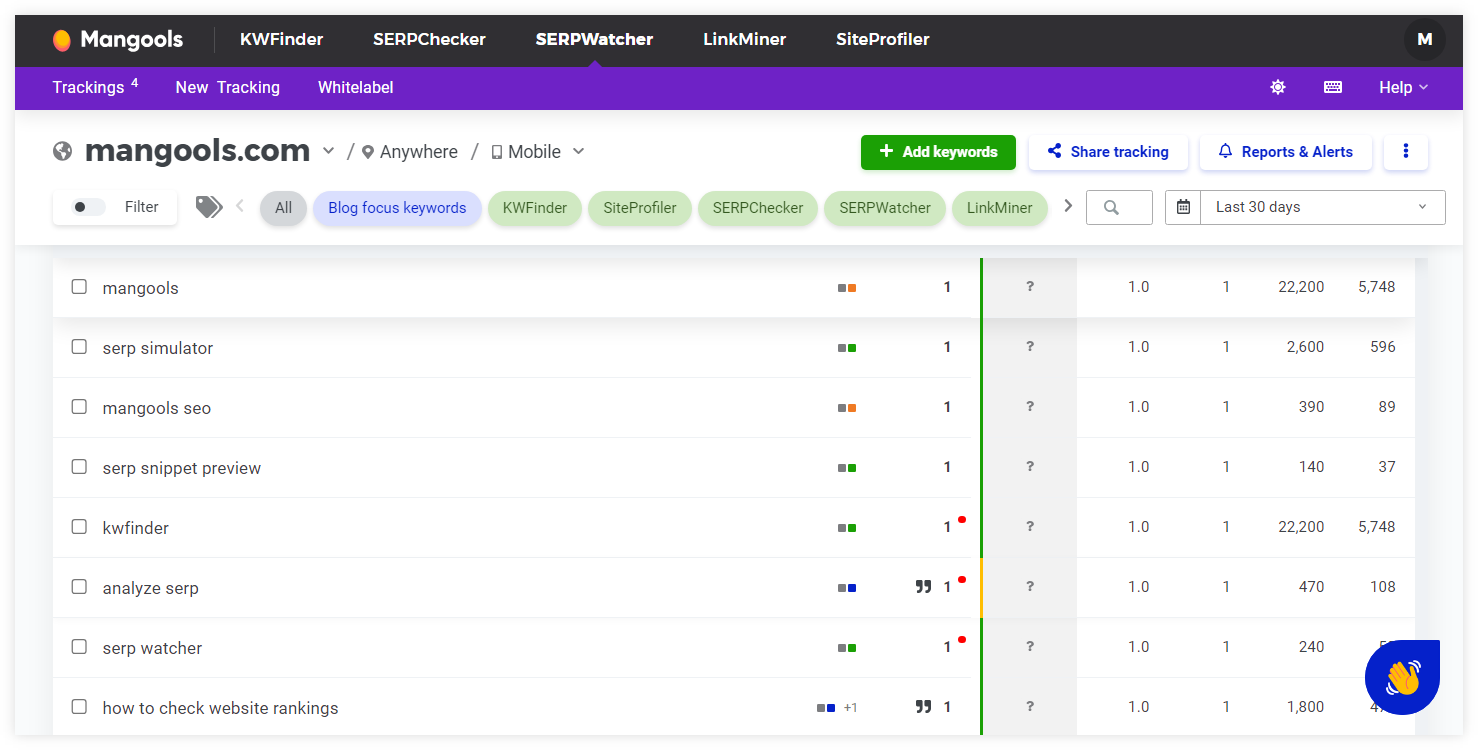
When SERPWatcher detects your AMP URLs ranking in mobile search, it will show you their ranking positions for their respective SERPs along with various useful data such as:
- Ranking changes over a selected time period
- Average (and best) ranking positions
- Search volumes of tracked keywords
- Visual positions of your AMP pages in SERPs
- Overall Performance Index and Visibility
- … and much, much more!
You can try and use SERPWatcher (along with our other Mangools SEO tools) completely for free – no credit card needed, no strings attached 😎
Final thoughts: Are AMP pages worth it?
If you ask any SEO specialist or website owner whether or not you should use AMP on your website, the most common answer will likely be:
“It depends.”
And we are no exception to that 🙃
The truth is that there is no completely right or wrong answer when it comes to AMP optimization – it all depends on what exactly you need AMP for (and what you hope to get from it).
If your website continuously fails to deliver content at an optimal loading speed on mobile devices, going AMP might be the right approach for you.
On the other hand, it is important to realize the practical limitations of AMP pages, along with the work that has to be put into them in order to make them even function properly.
Here are a few circumstances in which you might consider avoiding the use of AMP pages (or removing them altogether) on your website:
1. Your pages already reach a decent loading time – there is no point to create AMP alternatives for mobile users if your page speed is close to 2.5 seconds (or less).
2. Your website just needs to be better optimized – you can often achieve a decent loading speed simply by optimizing your website better (e.g. by using CDN, file-caching, lazy loading, image optimization, etc.).
3. Your pages are JavaScript-heavy or use a lot of 3rd-party tools – if your website relies heavily on scripts and CSS files to function properly, it’ll be probably better to avoid AMP completely. Otherwise, you will have to sacrifice quite a lot of visual features and functions.
4. Your customers come primarily from desktop search – creating AMP pages just for a few extra organic visitors per month is simply not worth the effort.
5. You don’t have the capacity for AMP maintenance – having AMP pages on your website is a never-ending commitment. If you don’t have enough time or resources to take care of those pages on a regular basis, it’s better to just not implement them.
6. You expect some ranking boost from AMP – Accelerated-Mobile-Pages alone won’t help you achieve better rankings in Google Search.


