

Welcome to a step-by-step guide to the ranking tool SERPWatcher. We’ll cover both the very basics and advanced features including how to set up your first tracking, how to read the metrics or easily share interactive reports.
We’ll go through these parts:
- Basics
- Trackings
- Dashboard
- Keyword rankings
- Metrics
- Filter
- Tags
- Share tracking
- Reports and alerts
- Whitelabel
- Google Looker Studio connector
- Map pack
- Featured snippet NEW
- Shortcuts
Quick tip: Don’t forget to check all SERPWatcher features and videos to see how they help you in rank tracking.
Basics
SERPWatcher is a ranking tracking tool that focuses on aggregate data to track the overall progress.
We update the rankings daily so the tool can show you the following data:
- Daily desktop/mobile rankings
- Performance Index
- Estimated visits
- Top gainers and losers
- Keyword position flow and distribution
- Interactive shared reports
- Scheduled email reports and alerts
You can track:
- 10 keywords in the 10-day FREE trial
- 200 keywords in the Basic plan
- 700 keywords in the Premium pan
- 1500 keywords in the Agency plan
You can split the keywords into an unlimited number of domains.
When you track keywords added to both trackings (desktop and mobile), they are counted as 2 keywords. This is caused by fetching 2 different SERPs.
Don’t forget to create your free trial in case you haven’t done so yet. It includes access to all 5 Mangools SEO tools.
Quick tip: Are you new to this topic? Check our article: What is rank tracking?
Trackings
The Trackings tab differs depending on whether you created a tracking project before or not.
Set up first tracking
Once you land in the SERPWatcher web app, you’ll be automatically redirected to a tab which lets you create your first tracking.
The tracking creation consists of two parts:
- Tracking details
- Adding keywords
1. Tracking details:
You need to fill in the following information:
- Domain
- Location
- Search platform
In the advance settings, you can find the Map pack tracking feature (described further)
2. Adding keywords
You can add the keywords in multiple ways:
- Drag & drop a TXT or CSV file (one keyword per line)
- Add from a TXT or CSV file (one keyword per line)
- Import them from your existing KWFinder keyword list
- Copy/paste them from anywhere
- Write them manually
- Add keywords you already rank for (imported from KWFinder’s Search by domain feature)
Trackings tab
You’ll see all your trackings on this page. The page includes how many keywords you already track and tabs that show the basic information including the Performance Index chart.
To visit the section, click on “Trackings” in the menu bar of the app. To open a tracking, click anywhere on the white tab area.
It’s basically an overview of all tracked domains with options to clone or delete the tracking by clicking on the three dots menu in the upper-right corner of each tracking tab. You can switch between desktop and mobile views here as well.
To create a new tracking, click on the green button “Add new tracking” at the bottom of the page.
Do you have a lot of trackings? Use the search form in the top-right corner.
Quick tip: If you want to change the order of the trackings, hover your mouse over the crossed arrows icon and drag & drop the tab anywhere you want.
Dashboard
SERPWatcher is designed to display all the data on one screen. It has two columns:
- Keyword rankings table on the left.
- Metrics on the right.
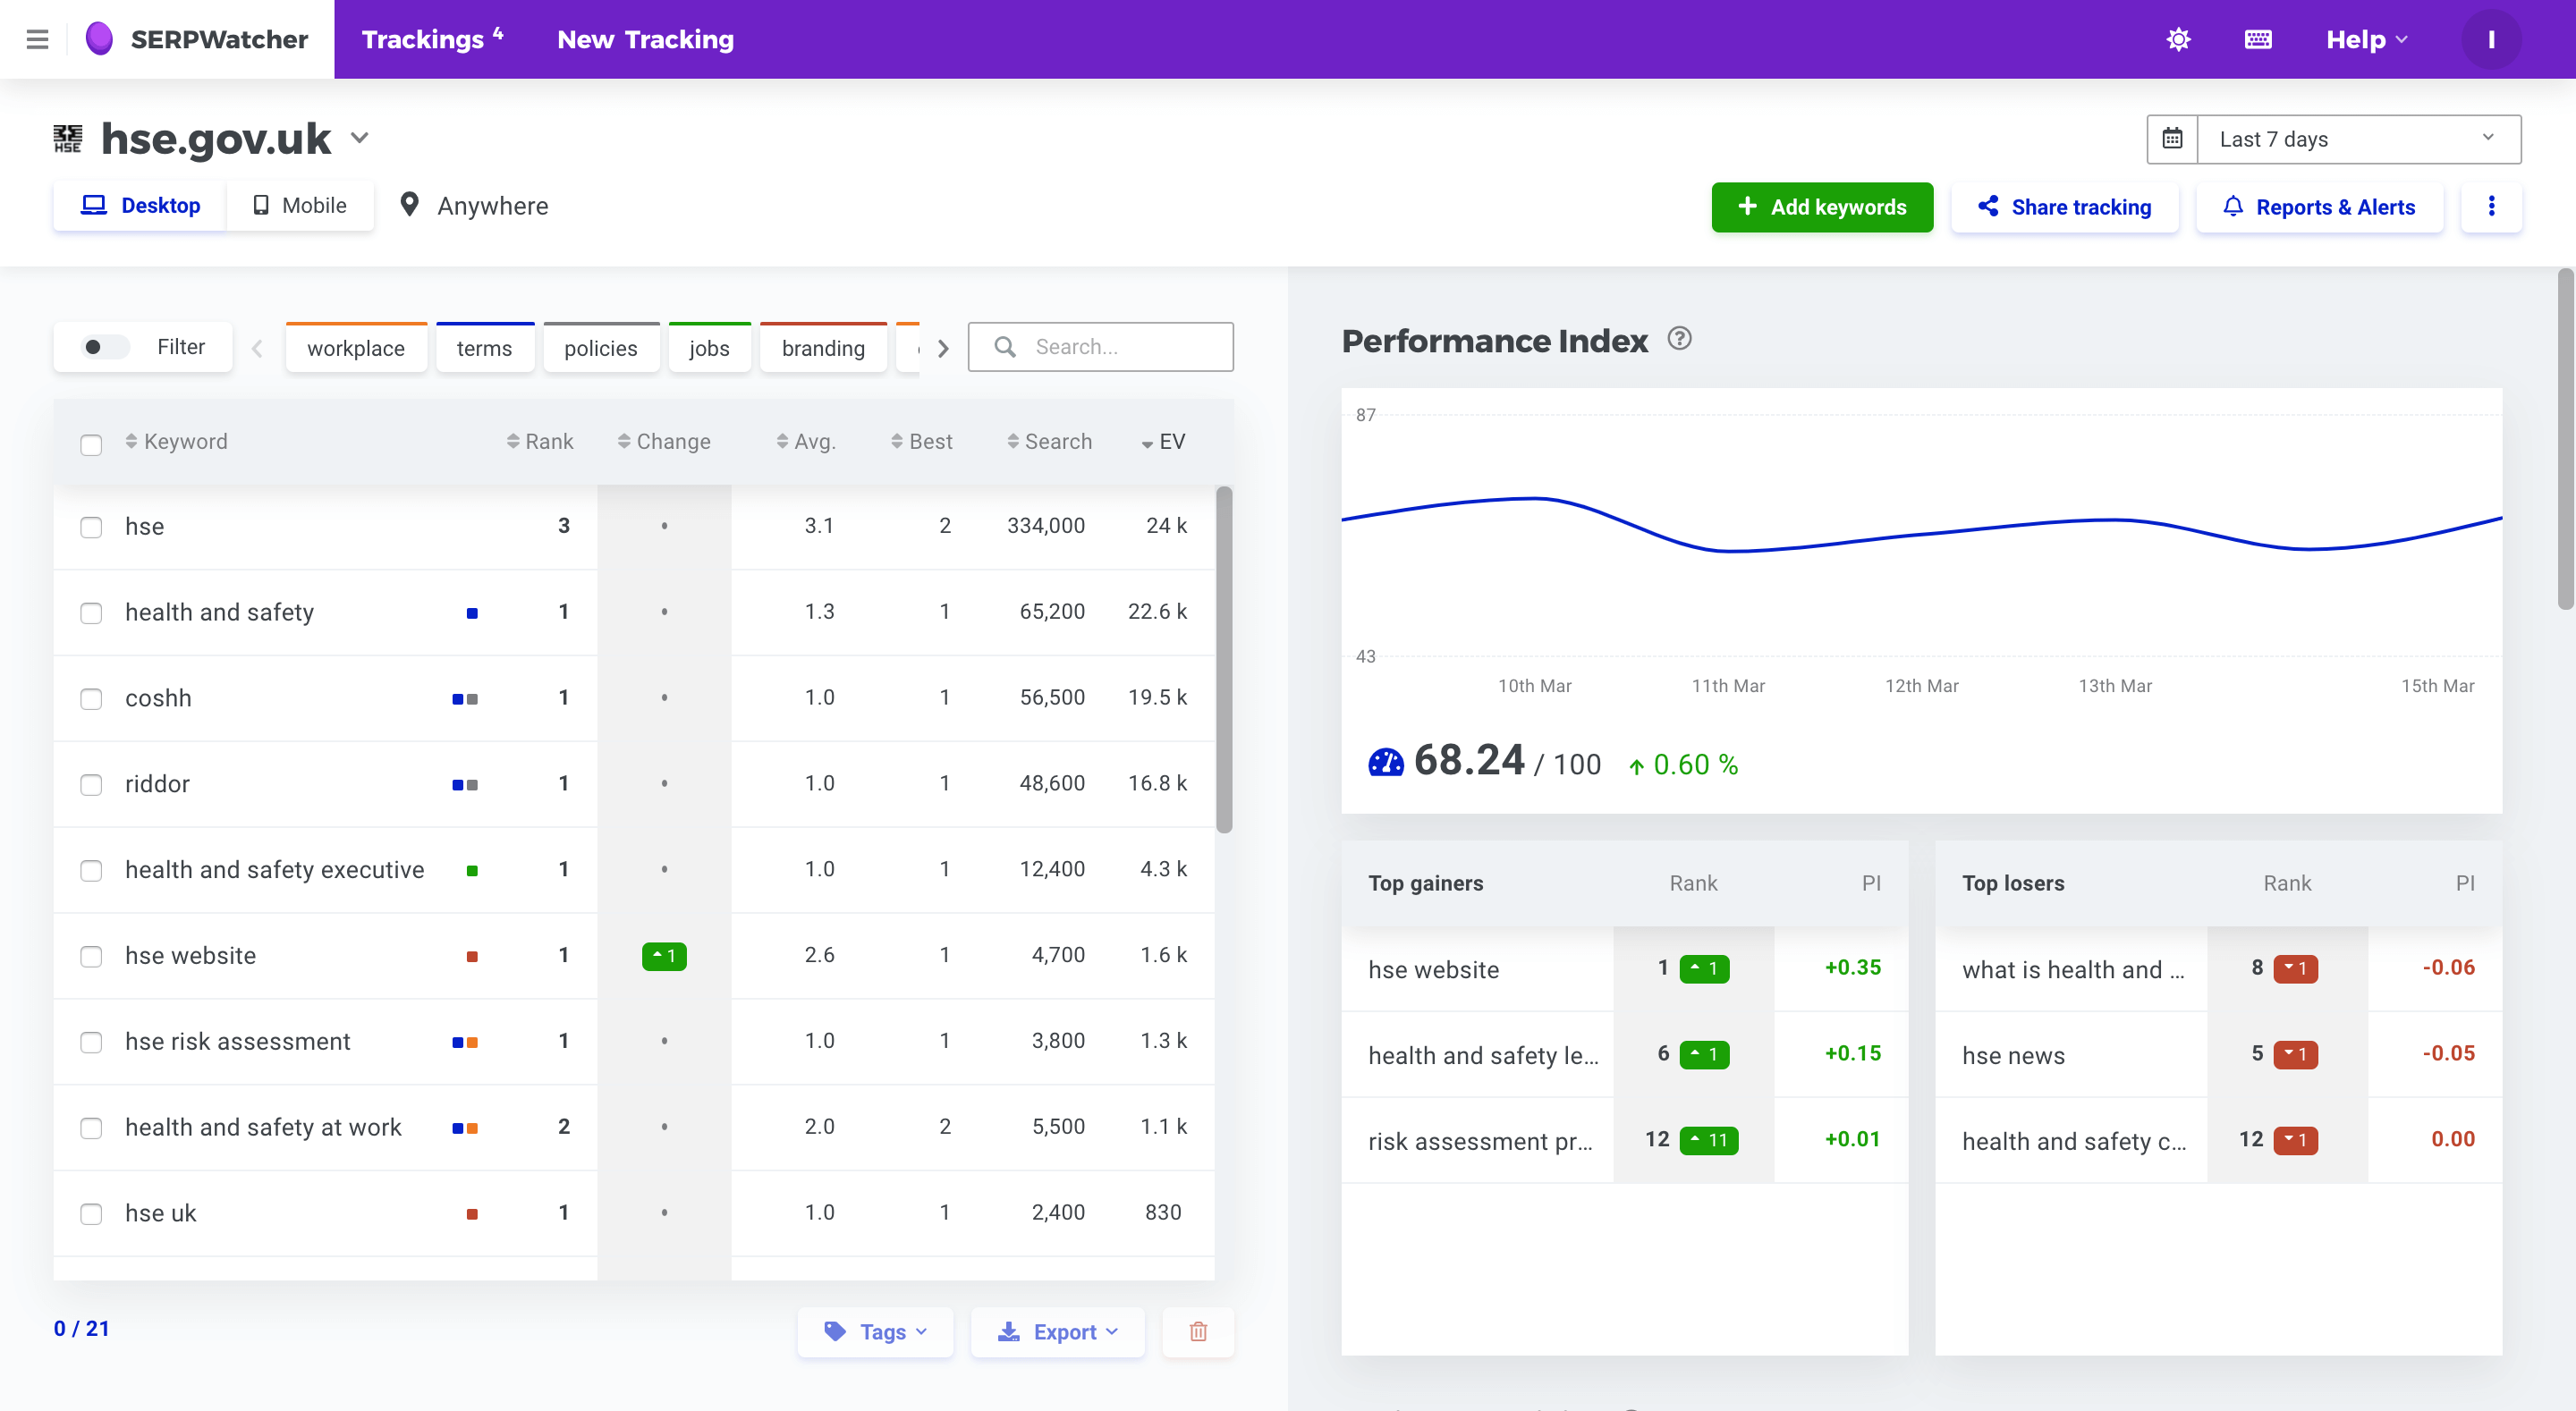
You’ll find a couple of other features above the two columns. Let’s take a look at them.
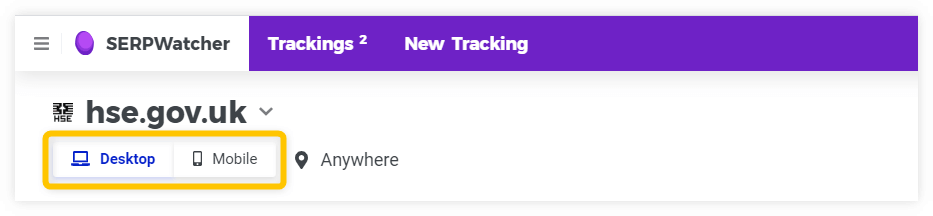
Desktop/mobile switcher
Quickly jump from rankings and metrics based on one search platform to another… and if you don’t track both, we’ll notify you via modal window so you can “clone” it.
Tracking selector
Click on the domain or the arrow to search for any of your tracking in a dropdown menu.
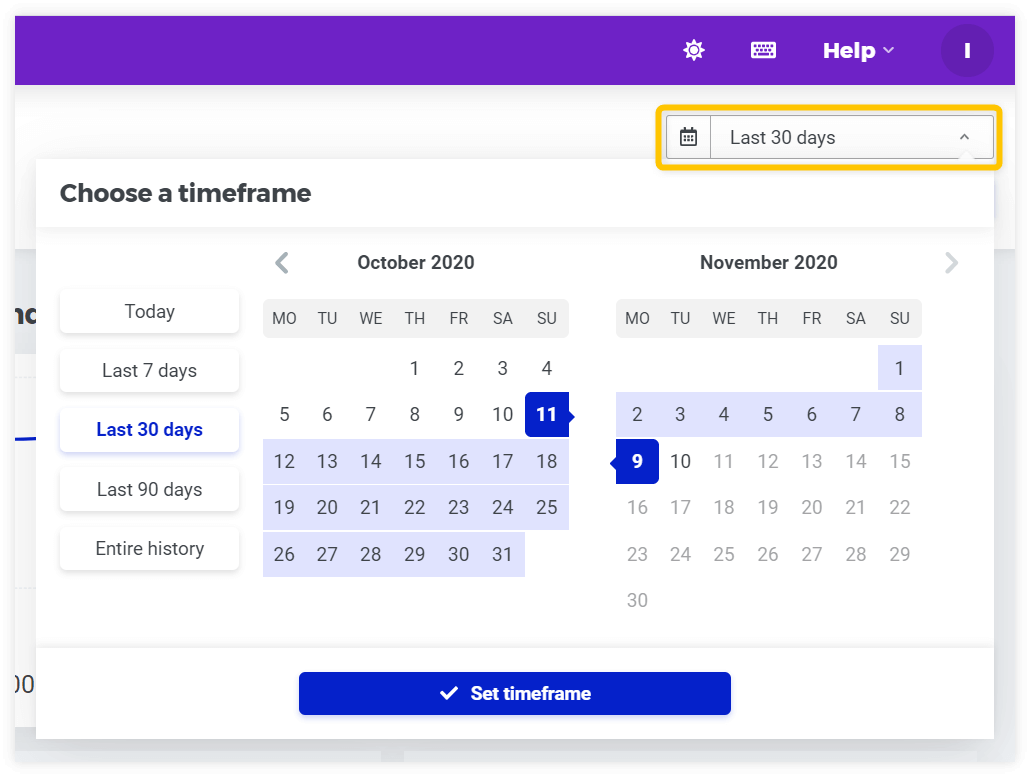
Timeframes
All the data in SERPWatcher is based on the selected timeframe. As you change the timeframe, all the data (rankings) and all metrics in the right part of the screen will be updated too.
You can change the timeframe in the top right corner of the Dashboard.
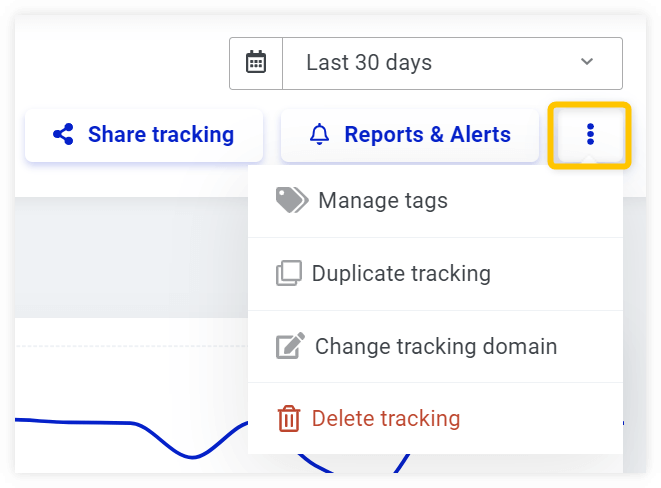
Add keywords, Share tracking, Reports & alerts, Three dots menu
Find all of these in the top right corner below the timeframe picker.
Add keywords – lets you add new keywords to your tracking with an option to tag them. We’ll highlight duplicates (yellow color) if there are any.
Share tracking – share all the data with anyone via a link. Find out more in the part Share tracking.
Reports & alerts – we have a dedicated part for this in the guide.
Three dots menu – lets you manage your keyword tags, clone the tracking to use it as a template, or delete the tracking.
Keyword rankings
The whole left part of the Dashboard is dedicated to the tracked keywords and ranking data.
Keyword rankings, changes and Estimated visits
The table includes the keyword, assigned tags, actual rank, rank change, average and best ranks, search volume (Search) and Estimated Visits (EV).
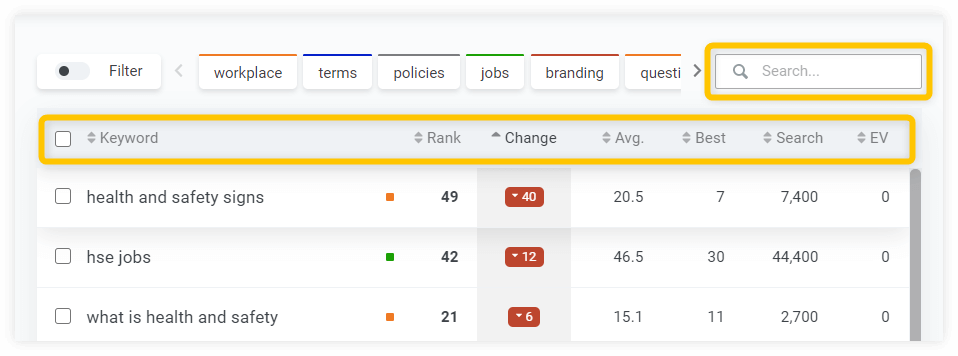
Quick tip: If you track a lot of keywords and want to see the data for a particular keyword, use the search form above the table.
Keyword detail
To open the keyword detail, click on any keyword.

The keyword detail brings a precise view of a selected keyword with a lot of data and additional features:
- Detailed position history chart
- Add or remove the tag option
- Ranking URL with Estimated visits
- Google SERP preview
- Google SERP download as an image
- Further actions to see backlinks in LinkMiner or URL profile in SiteProfiler
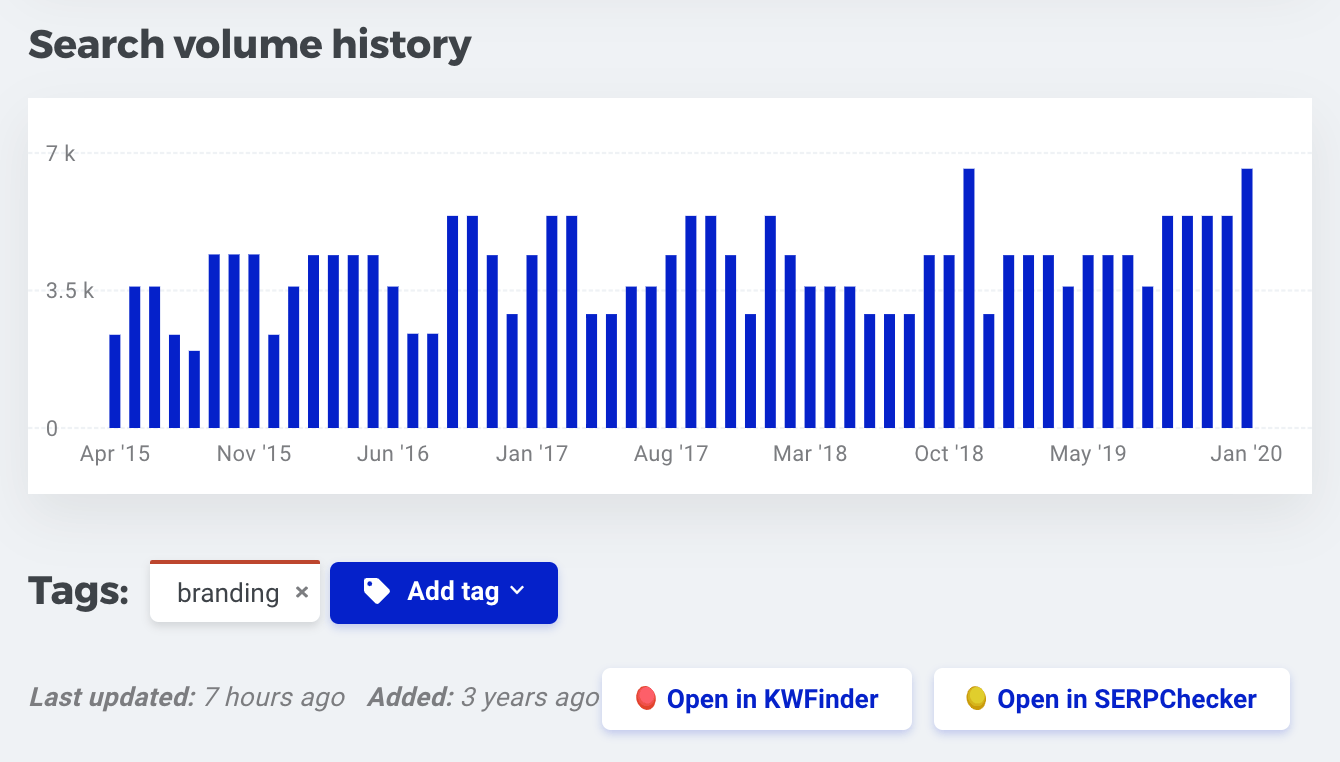
- Keyword overview with detailed rank changes and search volume
- Search volume history
- Open in KWFinder for keyword research purposes
- Open in SERPChecker for an in-depth SERP analysis
- Delete the keyword
Close the tab by clicking on the button “Close” in the upper-right corner or by pressing the “Esc” button on your keyboard.
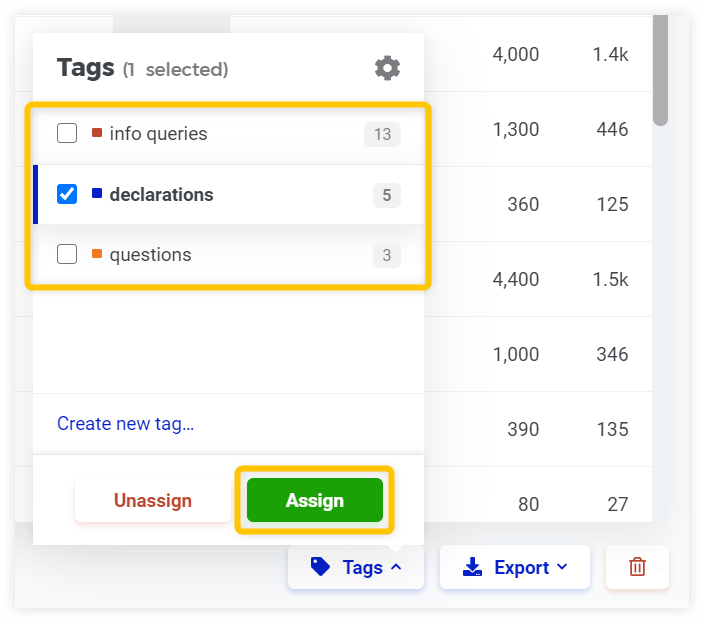
Tags, Export and Delete
Select at least one keyword to use these options located under the keywords table.
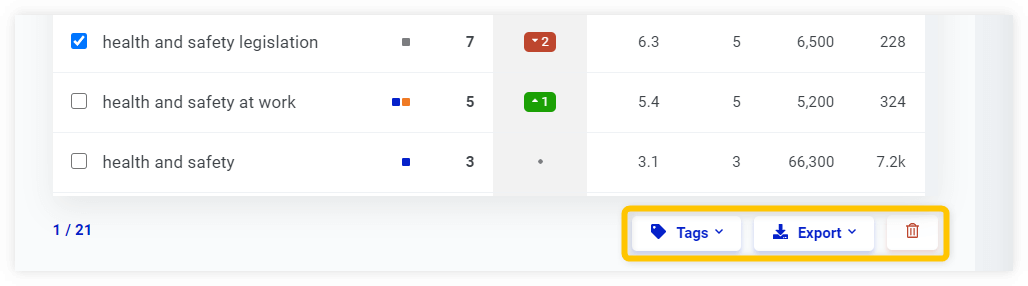
Tag the selected keywords with tags from the menu. Export the keywords as .csv file or copy them to clipboard. Click on the red trash button to delete the selected keywords.
Metrics
The right part of the Dashboard is dedicated to the aggregate metrics and charts that focus on the overall progress of your rankings.
Each metric is changed dynamically based on the selected tags or filter options.
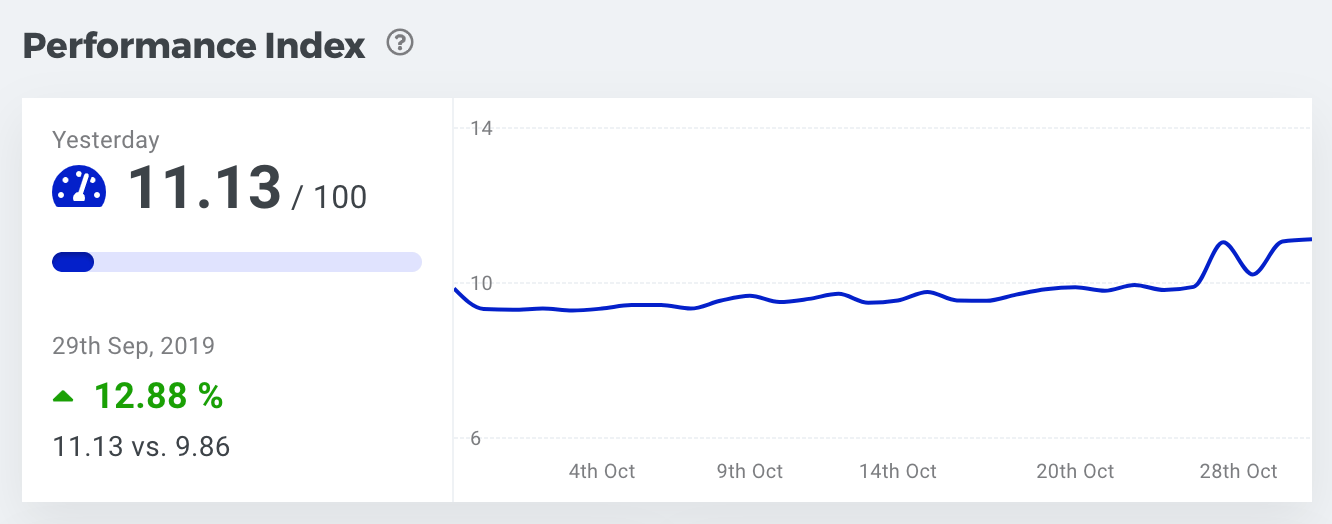
Performance Index (PI)
The Performance Index is a metric that tracks your ranking performance in Google based on actual positions of your website and search volumes of keywords tracked in SERPWatcher used as weights. It takes into account all position changes in your tracking.
PI is indicated on a scale from 0 to 100. The higher it is, the better is the performance of your rankings.
Quick tip: Check our detailed Performance Index article to find out how we calculate your performance in Google.
Filtering a different set of keywords (by tags or filter)
Perhaps you want to analyze data only for a specific set of keywords or see traffic to a special subpage, blog post, etc.
Just filter the keywords or choose any tag and the PI along with other metrics for selected keywords will appear. You can see both “Overall” and “Subset” Performance Indexes:
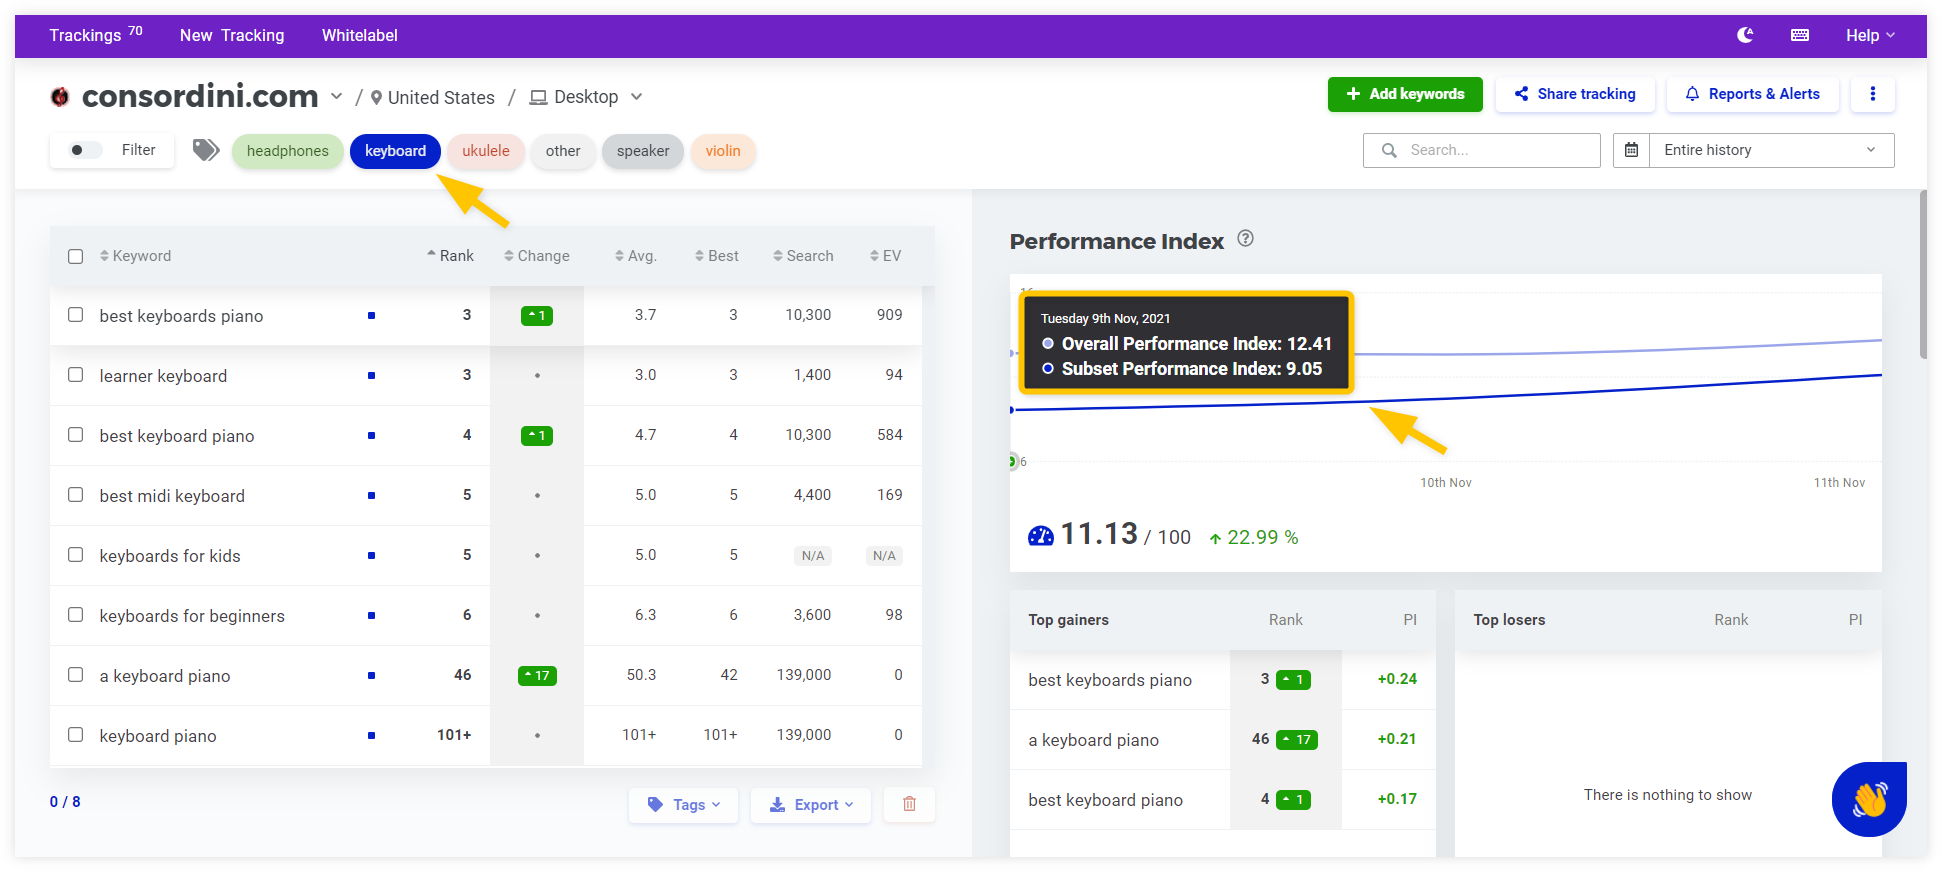
Please bear in mind that the subset PI can be sometimes higher than the overall PI. It’s because the specific subset of your keywords might perform better on Google Search compared to your overall performance.
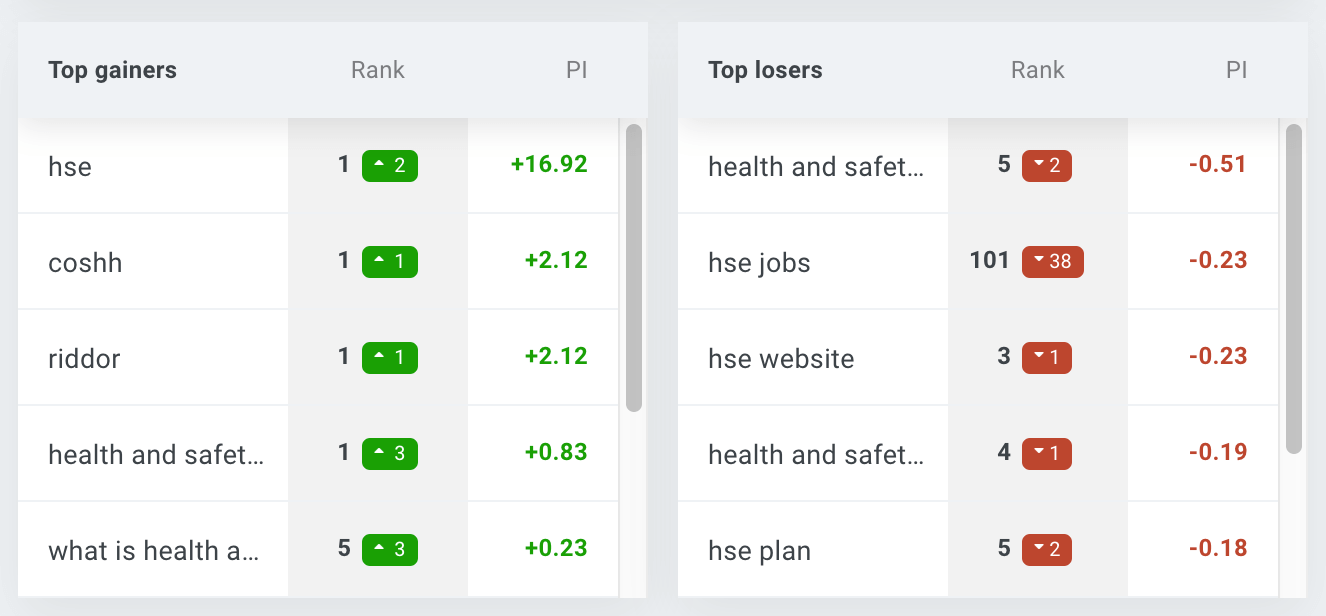
Top gainers and top losers based on the PI
Get a quick overview of the most important rank changes that influence the Performance Index in the selected timeframe.
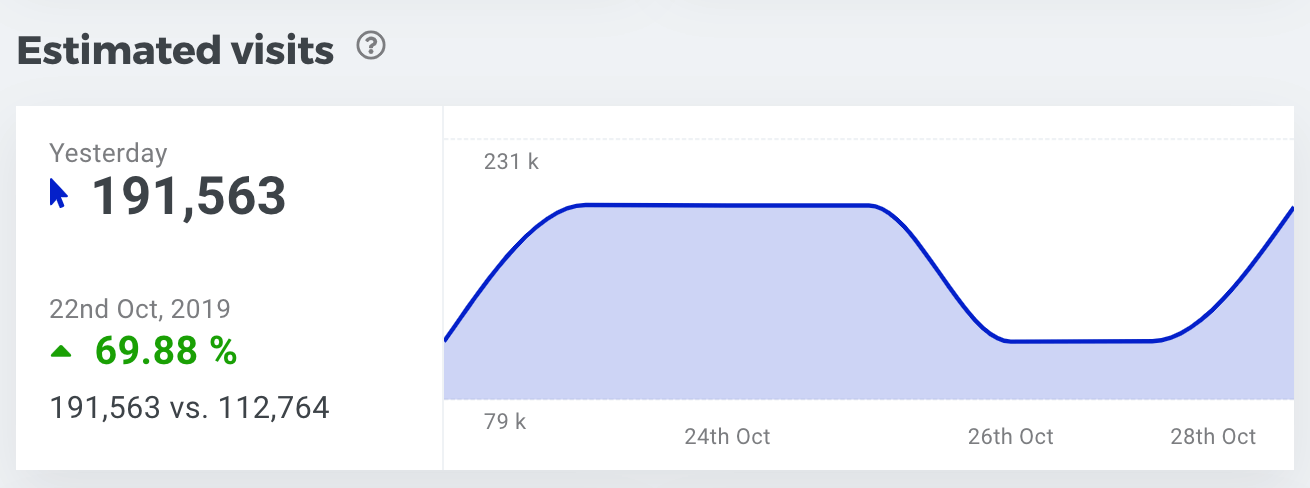
Estimated visits (EV)
The Estimated visits inform you about the potential organic traffic gathered from the tracked keywords. The metric is based on the average CTR (click-through rate) of the current SERP position of a particular keyword.
This metric reflects the changes of rankings on the 1st and 2nd SERP since there’s no real potential of any CTR on lower positions while the Performance Index counts with all positions (up to 100).
Example: You rank for “keyword 1” on 1st position. Let’s say the avg. CTR for this keyword on the 1st position is 30% and the avg. monthly search volume is 10,000. The Estimated visits per month for “keyword 1” on the 1st position will be 3,000.
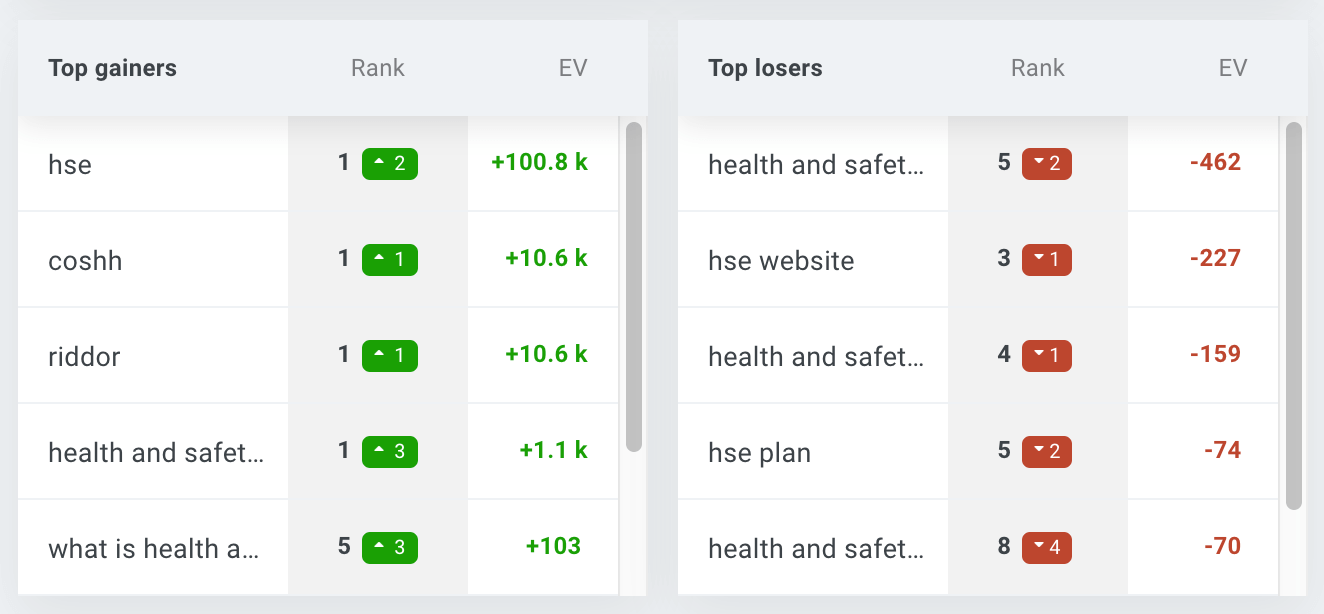
Top gainers and top losers based on the EV
Get a quick overview of the most important rank changes that influence the Estimated visits in the selected timeframe.
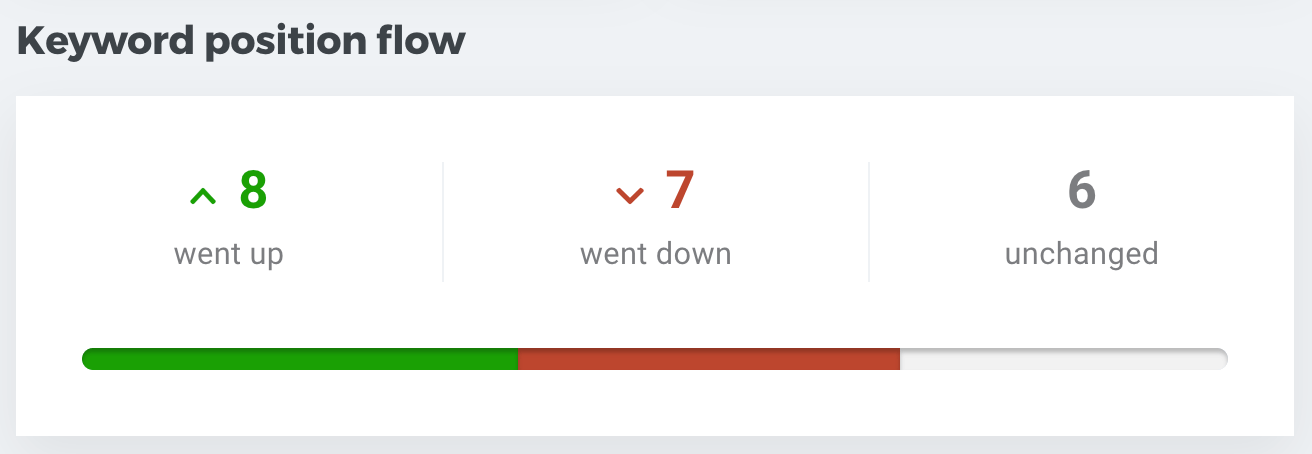
Keyword position flow
It represents how many keywords in the tracking went up, went down, or remained unchanged.
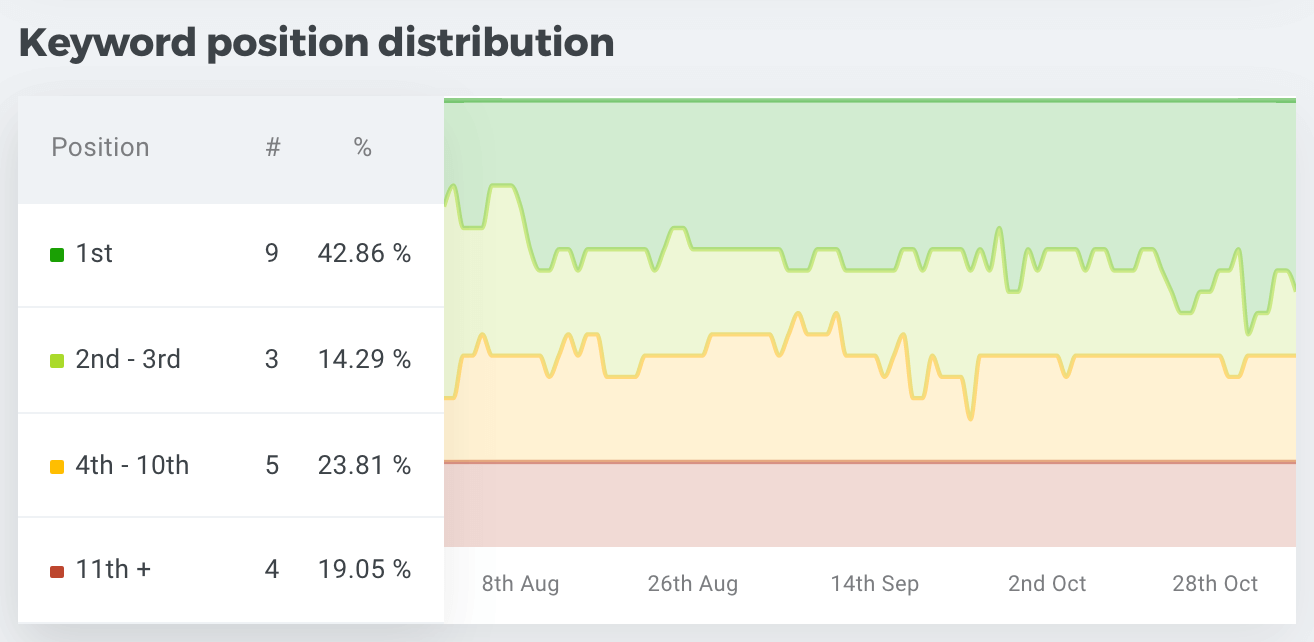
Keyword position distribution
See how many keywords rank #1, in the top 3, top 10, top 20 or top 100. Hover your mouse over the chart to see the count and percentage of keywords in the categories.
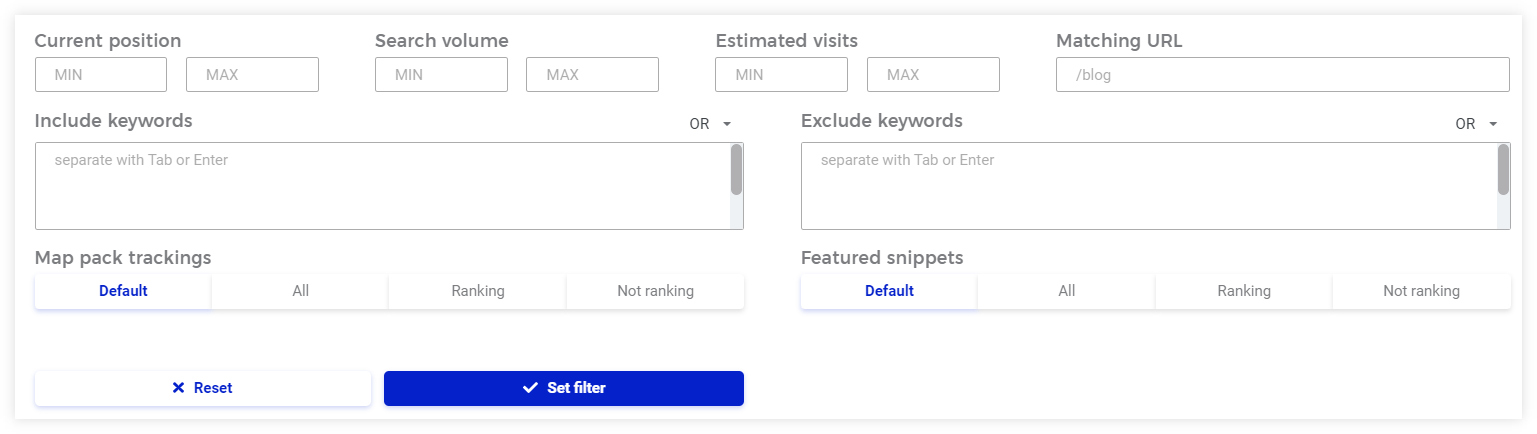
Filter
The Filter is located in the left part of the screen above the keywords table. Click on the button and set conditions that suit your needs.
Tags
Using tags is great if you want to categorize the tracked keywords, e.g. for different blog posts or landing pages under the same domain.
Tags management
There are three ways to get to the tags menu:
1. Click on the button “Tags” under the keywords table when at least one keyword is selected. You can see all your tags above the table with keywords.

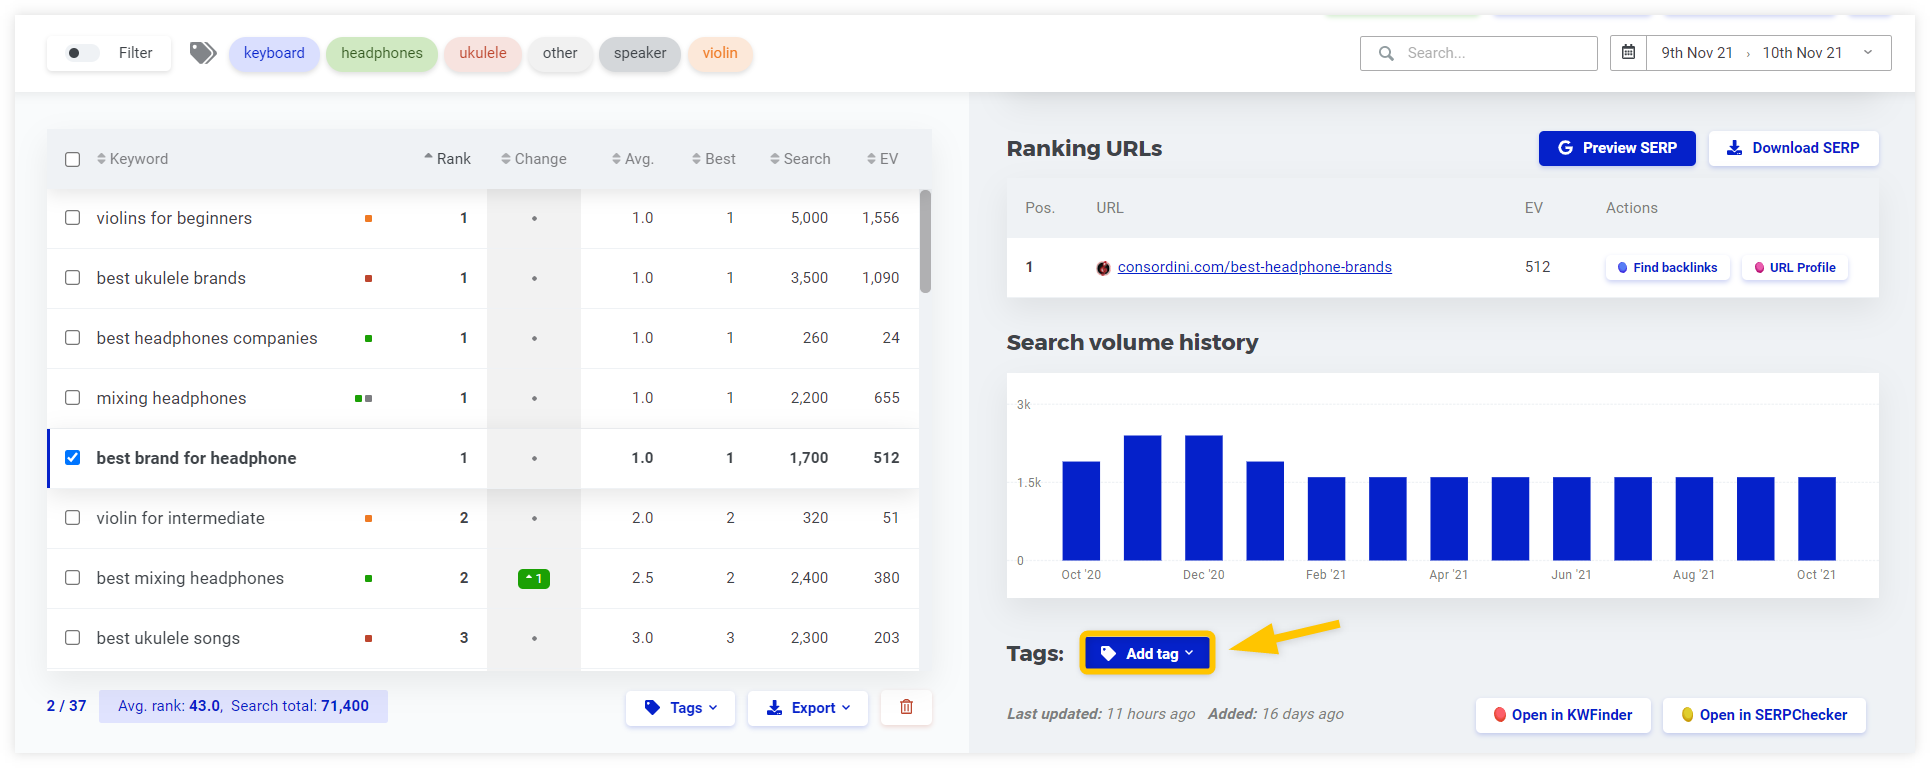
2. Click on the button “Add tag” in the keyword detail.
3. Go to the three dost menu in the top right corner and click on “Manage tags”.

Add a tag
Once you click on “Tags” under the keywords table or “Add tag” in the keyword detail, pick the tag(s) from the menu and click on “Assign”.
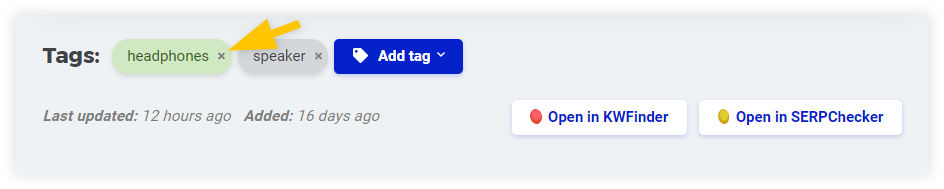
Remove a tag
1. Click on “Unassign” if you used the under-the-keywords option.
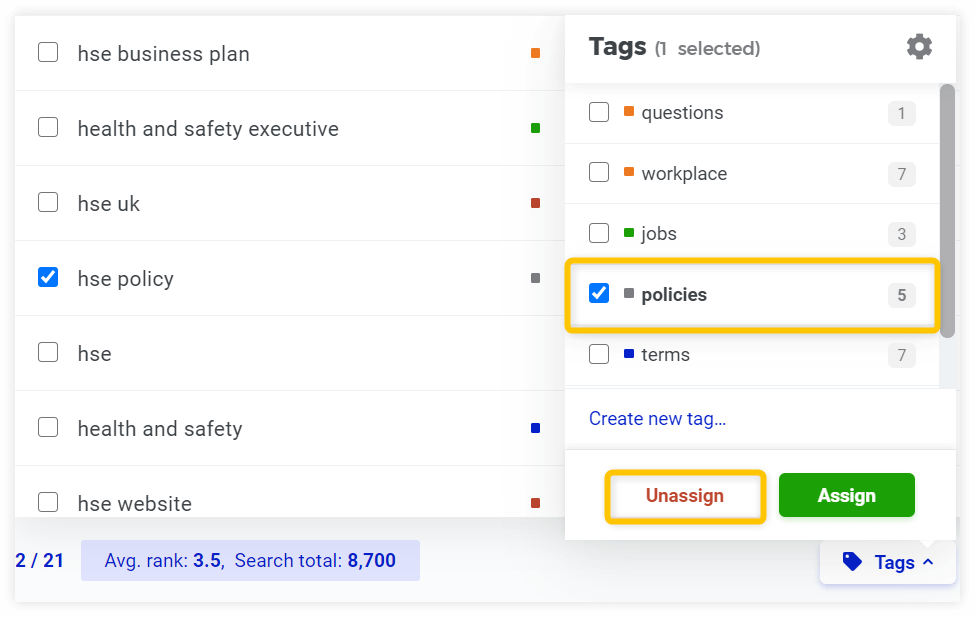
2. Click “X” in the tag area in the keyword detail.
To make it easier for you, there are colored tag squares next to each keyword in the left table. What’s more, you can see the tagged keywords by using the “Filter” feature.
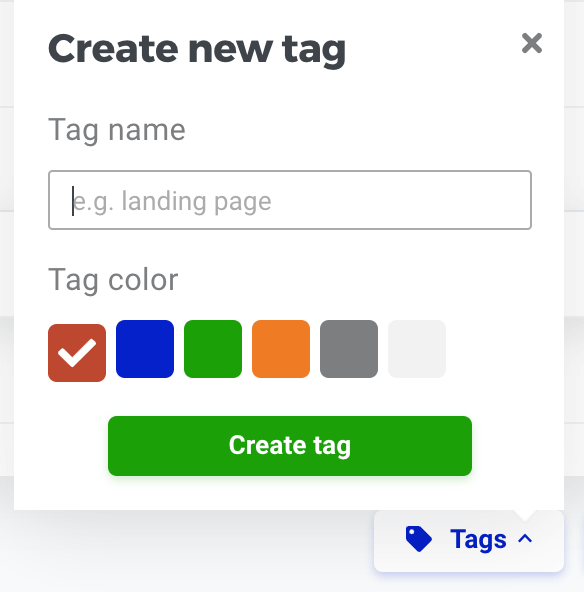
Create a new tag
Click on “Create new tag…” in the dropdown menu. You’ll be prompted to fill in the name and choose the color.
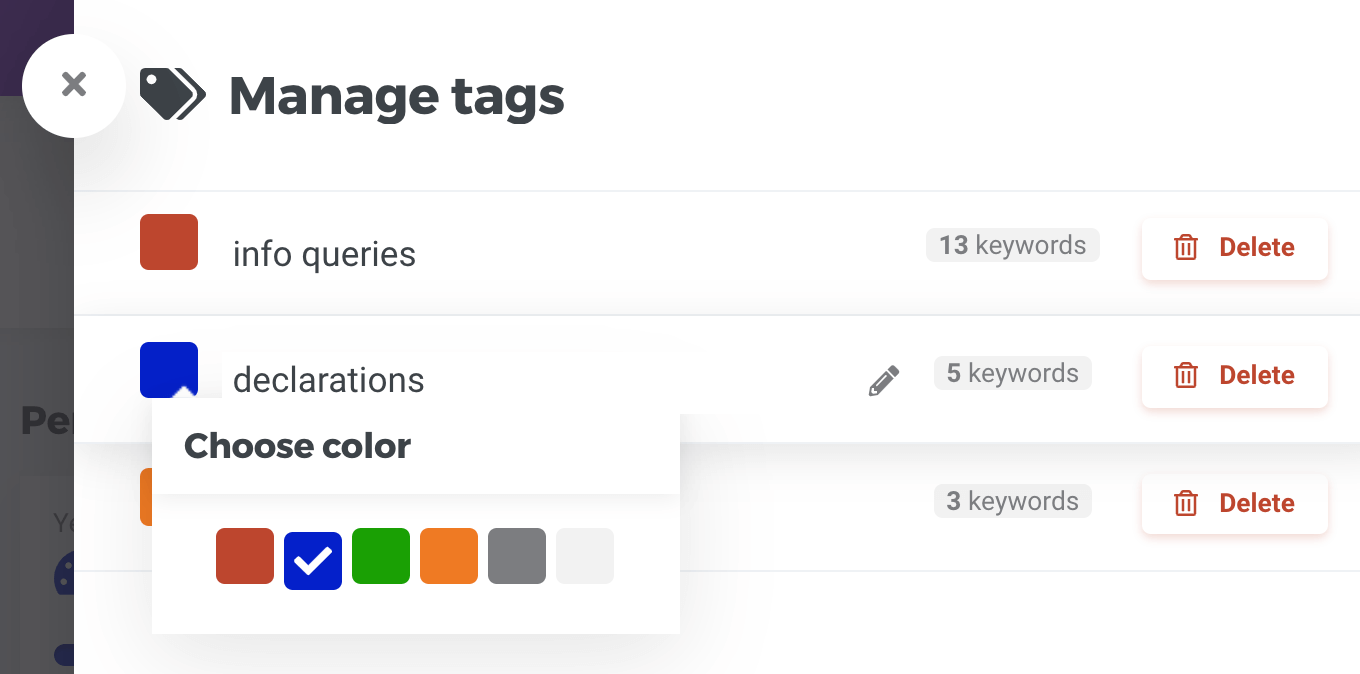
Delete or rename a tag
Open the Manage tags menu by clicking on the gear wheel showed in the “Tags management screenshot” or use the three dost menu in the top right corner.
Over here, it’s easy to rename, change color or delete any of the tags.
Share tracking
We’ve developed this feature to let you share more than just a generic rank tracking report.
Sharing a report is a two-click effort. Click on the button “Share tracking” in the top right corner.
It enables everyone with the link to see an interactive report in which they can select the timeframe, play with the filter options or see the keyword details.
Copy the link to the clipboard and share it teammates, clients or everyone else.
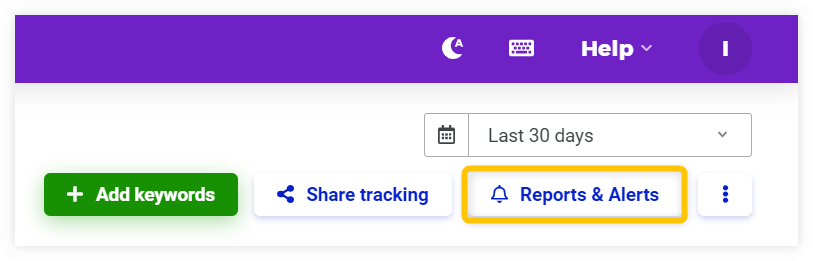
Reports & alerts
Click on the button Reports & Alerts in the top right corner to set up automatic emails based on different scenarios.
Set up a report
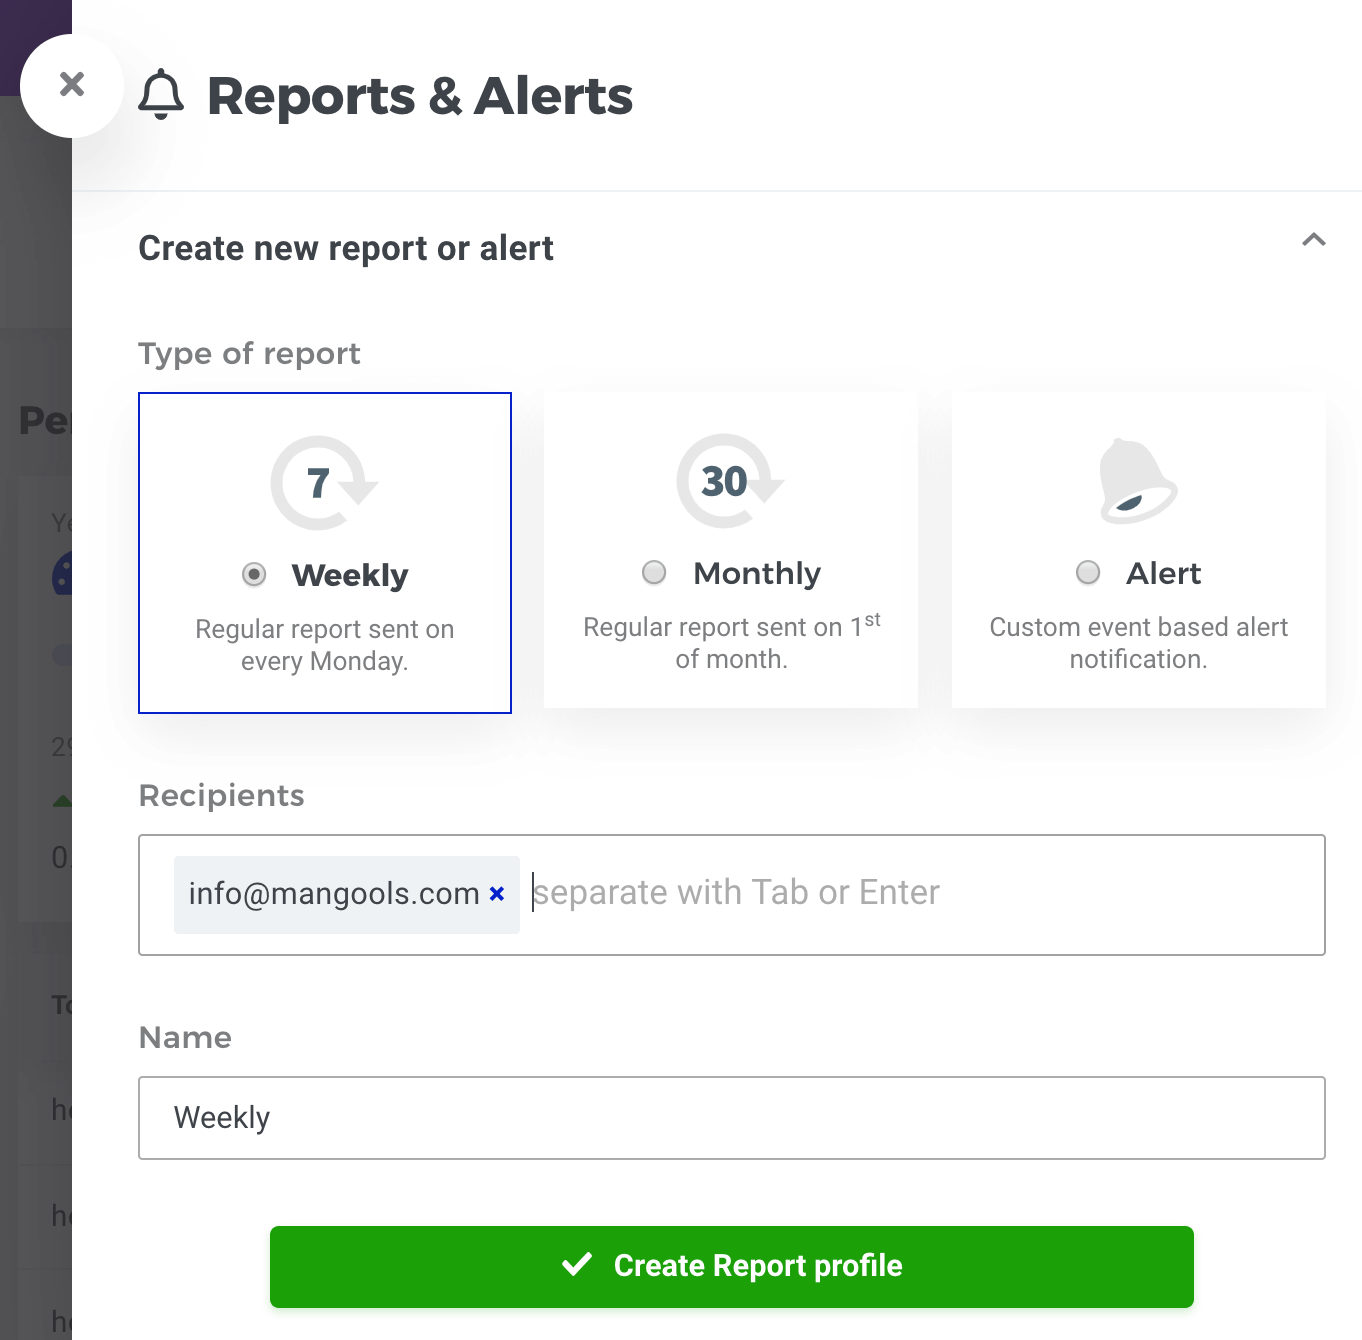
- Choose “Weekly” or “Monthly”.
- Add recipients.
- Name the report.
Set up an alert
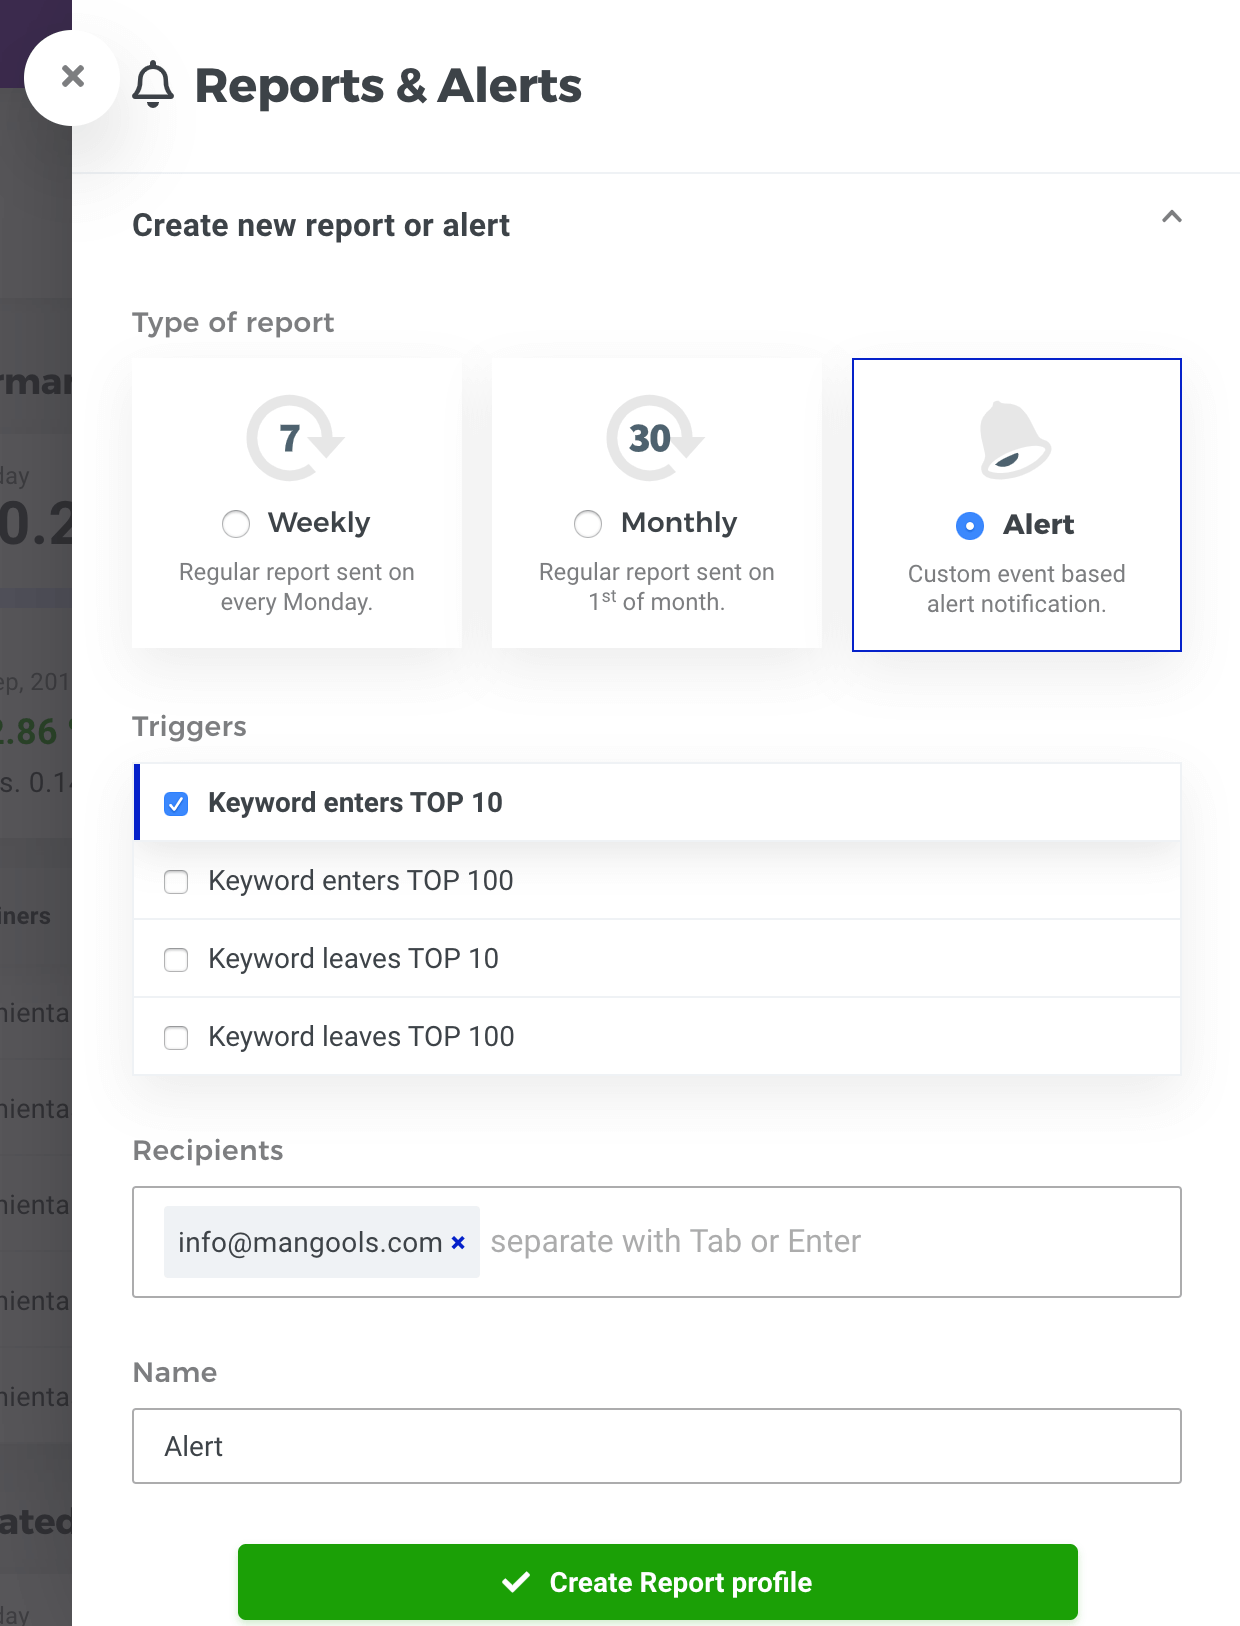
- Select the “Alert” option.
- Pick the trigger(s) of your interest.
- Add recipients.
- Name the alert.
You can edit or delete the reports and alerts anytime.
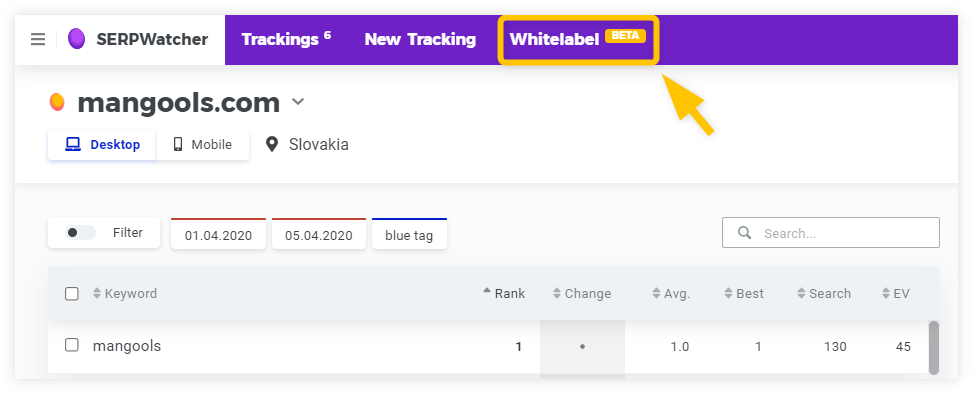
Whitelabel report
This is a great feature that helps you to boost the visibility of your brand and strengthen the loyalty of clients.
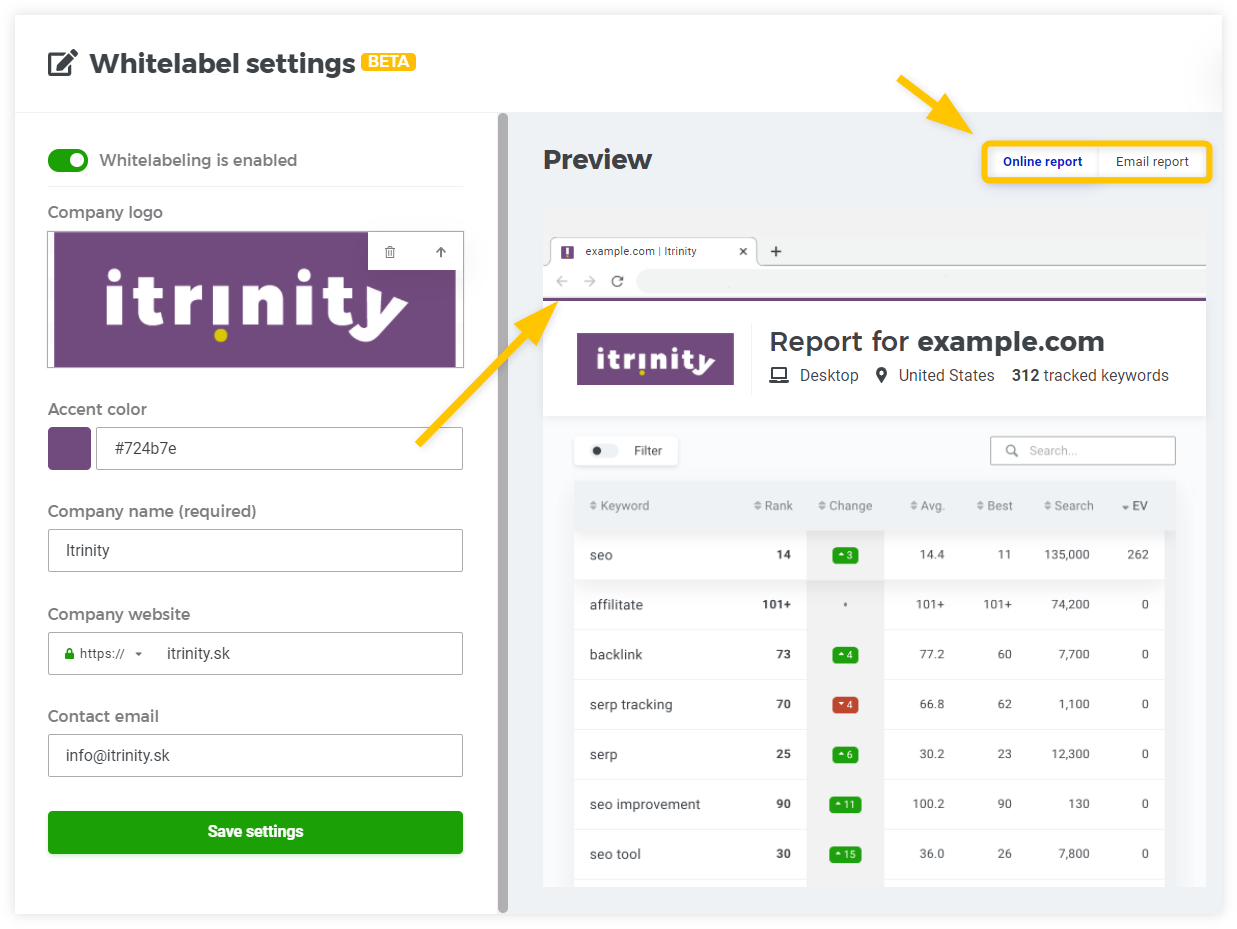
The settings you can find in the Whitelabel panel:
- Company logo – Upload your company logo here (only PNG files are supported)
- Accent color – This color is reflected in a bold line above the report
- Company name – Displayed in the page title on the browser tab and in the email report
- Company website – It’s linked to the company logo
- Contact email – Displayed in the email report and used as a “Reply-to:” email address
You can also preview both the online report and the email report before you submit the changes:
Setting up a custom URL for white label report
Besides customized visuals (logo, color, brand name, etc.) within the white-label reports, you can also set up your rank-tracking reports on your own custom domain/subdomain that is part of your website.
For example, a custom URL for a SERPWatcher white-label report on your website might look like this:
https://rankings.yourwebsite.com
You can choose any subdomain name with a combination of your main root domain name (or just use your root domain itself).
With custom white-label URLs, you can fully customize the entire rank-tracking reports from SERPWatcher, either for your own or your client’s websites.
This customization will also simplify navigation between individual white-label reports for your team members.
How to enable a custom URL for white-label reports
To enable a custom URL for white-label reports, you need to set up a custom URL in SERPWatcher first – in the “Whitelabel” modal window, go to the “Custom domain for reports” section and add the full URL under which you want your rank-tracking reports from SERPWatcher to appear on your website.
The URL can be a combination of a custom subdomain + the name of your root domain (e.g., reports.yourwebsite.com) or root domain itself. Once you added your custom URL in the Whitelabel settings, click on the “Save settings” button.
Next, you need to add a new CNAME record (Canonical Name Record) to your hosting provider’s DNS settings to allow the SERPWatcher white-label report to appear with a custom URL.
Every hosting DNS control panel may slightly differ from each other (depending on the provider); however, the process of updating your DNS settings is generally similar:
- Log into your DNS provider’s control panel.
- Click on the DNS settings and select DNS records.
- Click on “Create” or “Add” a new record, and select the CNAME option.
- Enter the hostname (it must be the same as the subdomain name you chose for the rank-tracking report in SERPWatcher).
- In the “Value” field, add the “whitelabel.mangools.com” – this value points to our servers.
- Hit the “Create record” button to save your information.
Once the CNAME record has been successfully added to your DNS settings, you will be able to see the custom white-label report from SERPWatcher under your custom URL.
Typically, it can take from 1 to 24 hours for your new CNAME record to take effect.
The custom subdomain URL will already have SSL certification encryption covered by default – you do not have to do anything additional.
Important note: Be careful when changing the DNS settings within your control panel – if you are not sure how to set up your CNAME records properly, contact your domain/DNS provider to add a new CNAME record for you.
Changing or removing a custom URL for white-label reports
If you would like to change (or completely remove) your custom URL for a white-label report, go to your white-label settings in SERPWatcher, change/delete your chosen URL, and save the settings.
Afterward, you should access your DNS control panel and update the CNAME record for the custom URL as well.
Tip: If you run into any issues or need assistance, contact our customer support – we will be happy to help you
Google Looker Studio connector
Google Looker Studio (formerly Data Studio) is a free, online reporting tool that turns data into clear dashboards and shareable reports. It’s especially useful for tracking marketing performance over time and presenting results to clients or teammates.
With the Mangools SERPWatcher Looker Studio connector, you can pull SERPWatcher rank-tracking data into Looker Studio and build visual reports around your Google rankings and key SEO metrics.
Once connected, you can create custom tables and dashboards using SERPWatcher data fields such as:
- Keyword rankings
- Search volumes
- Ranking changes
- Avg. position and best position
And much, much more!
You can also visualize overview-style tables and widgets (e.g., keyword overview, position distribution, top gainers/losers) and customize them based on what you want to highlight in your report.
Tip: If you’d like the full step-by-step setup (authorization, token, creating the data source, and building your first report), follow the SERPWatcher Looker Studio Connector guide.
Map pack
This is a great tracking feature for those running a local business and optimizing for the local SEO. It is also known as a local pack or Google My Business (GMB) listing.
There are three ways to add the GMB profile to your tracking:
1. When creating a new tracking
Click on advanced settings and find your local business in the search bar:
2. When editing an existing tracking
Go to the SERPWatcher dashboard and edit your selected tracking:
Now you can search for your local business and confirm the changes by the “edit tracking” button:
3. When adding GMB from the tracking dashboard
SERPWatcher automatically detects if there is a Map pack (with or without links) in the SERP for a given keyword. Hover your mouse on the Map pack icon and click on “Add you GMB”:
If you want to check your Map pack rank, hover your mouse on the map pack icon or see the rank on the right panel of SERPWatcher:
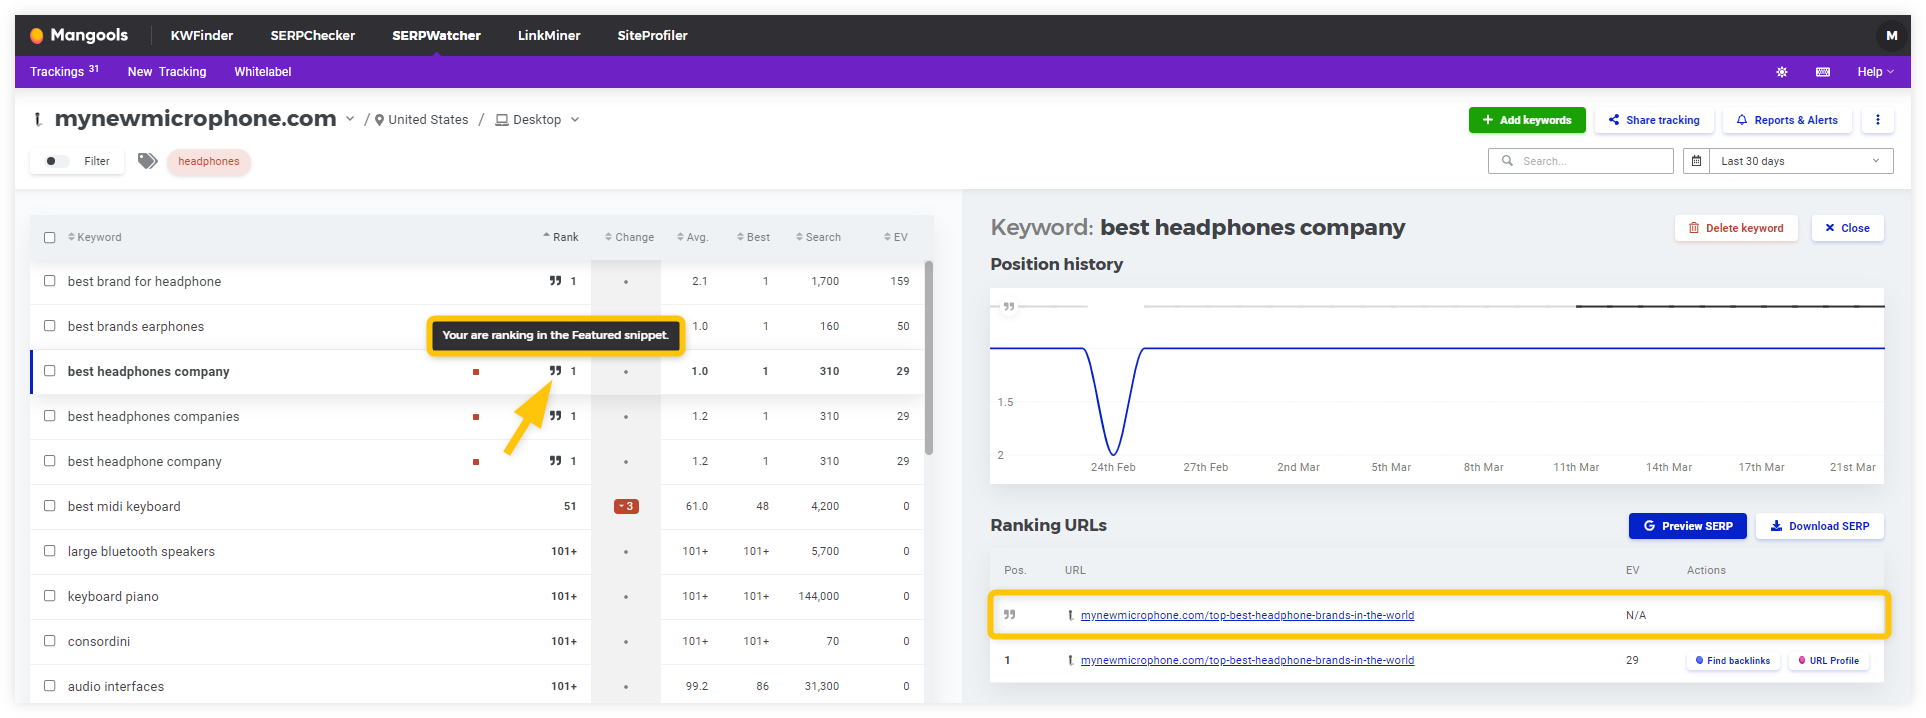
Featured snippet
SERPWatcher automatically detects if there is a Featured Snippet in the SERP for a given term. Hover over your mouse on the quotation mark icon to see if you rank in the particular featured snippet.
To learn more about this topic, check out our featured snippets guide.
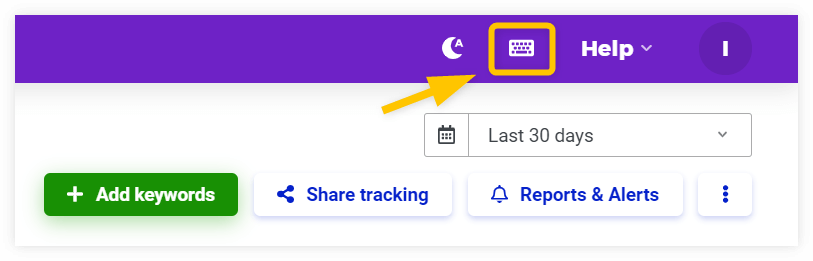
Shortcuts
Press ” Shift + / ” or click on the keyboard icon on the right of the top menu bar.
A modal window will appear with all the shortcuts and explanations of what they do. These are just a few of them:

Didn’t find what you were looking for?
If you have any questions or tips on what to include in the guide, feel free to share them in the comments below. In case you have trouble using SERPWatcher, don’t hesitate to ask via live chat or email.