

Google Search Console is an essential SEO tool. Yet, some people find it a little bit scary and complicated at first sight.
In this guide, we’ll cover all the basics (including some practical tips) you need to know to start with Search Console.
Let’s dive in.
What is Google Search Console?
Search Console (formerly Google Webmaster Tools) is a free online tool by Google consisting of a series of dashboards showing you how your site is performing on Google.

It allows you to access a wide range of important data about your website. For example, you can:
- see how your page is performing in the Search Engine Results Pages (SERP) for various keywords
- find out if you have any problems with content appearing on Google (or indexing, to use the technical term)
- check out what sites are linking to your content
- see how your website is performing by the device used
These are just some of the things you can do with Search Console and in this guide, we’ll take you step-by-step through the tool and its dashboards.
But first of all, how do you connect your website to the Search Console account?
How to setup Google Search Console
Setting up Google Search Console is quite easy. Head over to its welcome page and log in with your Google credentials.
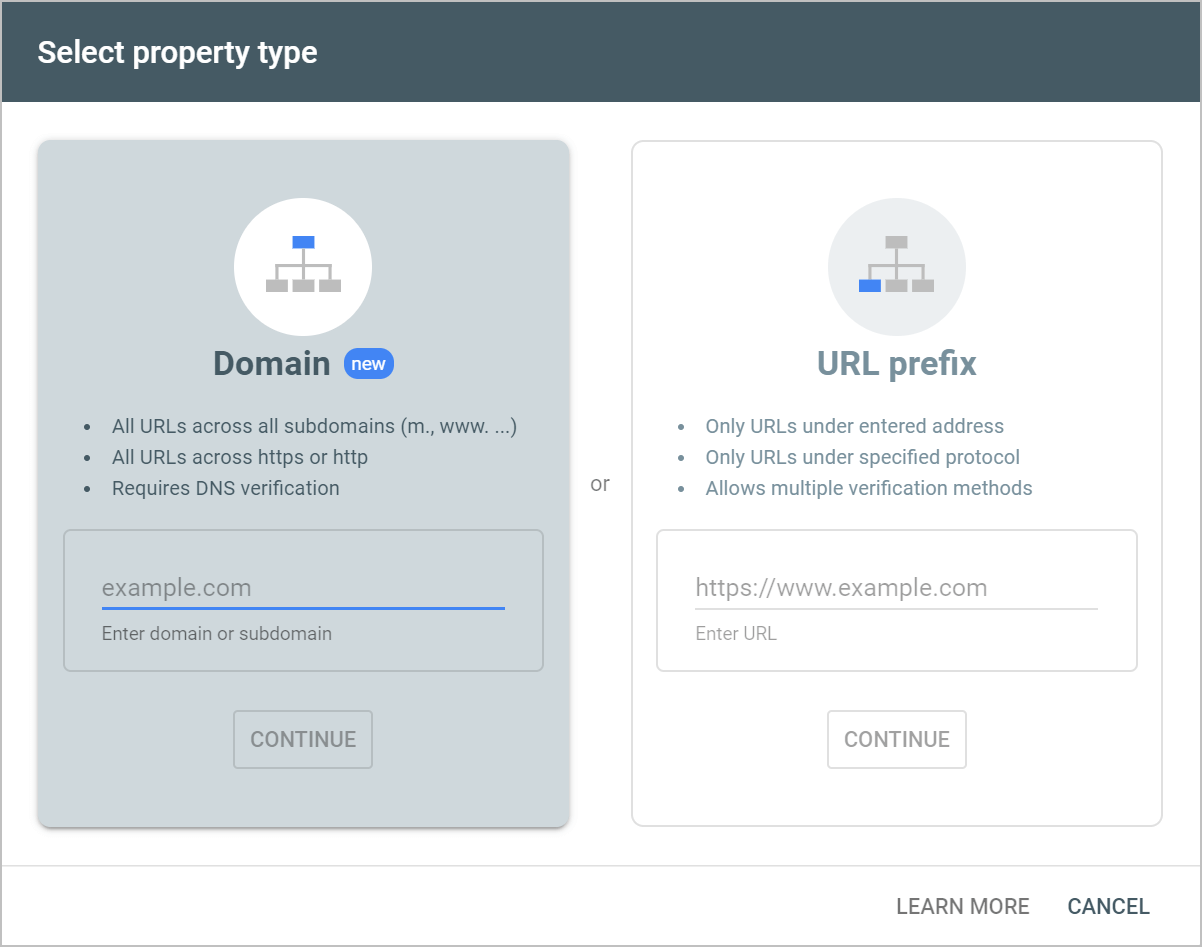
After signing up, you will be asked to enter your web address in one of two boxes. The left-hand box is for a Domain Property and the right-hand box is for a URL Prefix Property.
Let’s break it down:
Domain Property – Most people using Search Console select the domain property option. You’ll get the information on how your whole website is performing on Google. This includes all the URLs, subdomains and web protocols (http://, https://, www).
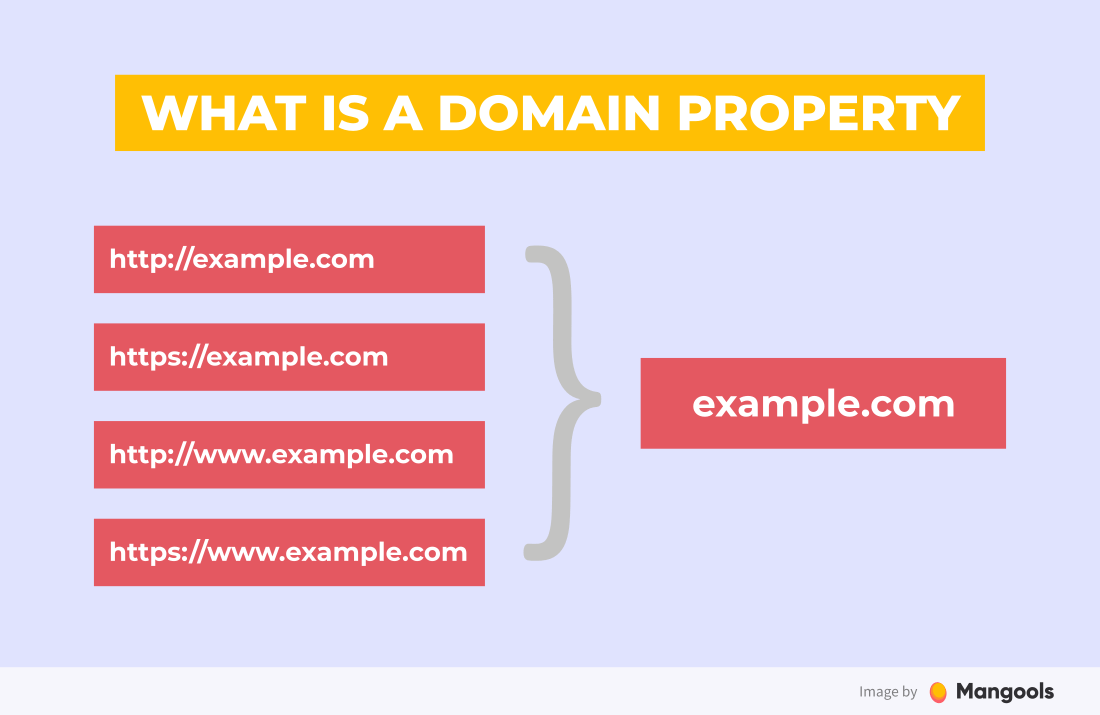
In the past, you had to verify all the protocols separately but thanks to the domain property option, all you need is to enter your domain and all the variations will be included.
URL Prefix Property – You should use this option if you only want to cover an exact URL format. For example, if you enter http://www.website.com/blog into the required field, only this URL format will be tracked. This option is often used for targeting a specific language mutation on a multilingual website, e.g. https://en-gb.example.com
Ownership verification
Now that you have selected the property type and entered your domain, you need to verify that you are the owner of the website.
If you selected the Domain Property, you’ll need to verify the ownership via the DNS record.
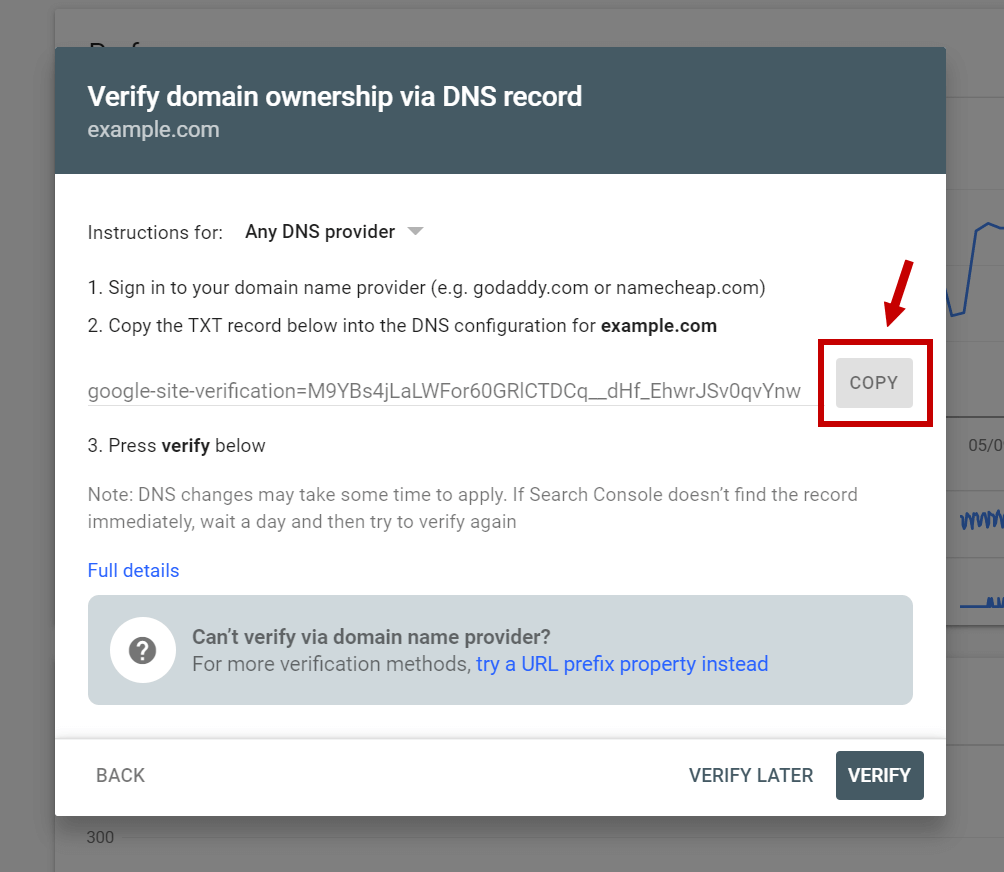
The exact steps will depend on your domain provider, but in general, you’ll need to follow these steps:
- Go to your domain’s DNS record settings
- Add a new DNS record and paste the code that appeared in the Search Console
Tip: Google has a wide knowledge base with a list of most common hosting providers and step-by-step tutorials for each of them. Check it here.
Once you added the DNS record, go back to GCS and click on “Verify”. Don’t worry if you see a message that “the ownership verification failed.” The DNS record change may take up to 72 hours to take effect.
Just try a little bit later, until you see a similar message:
Verification with an HTML tag
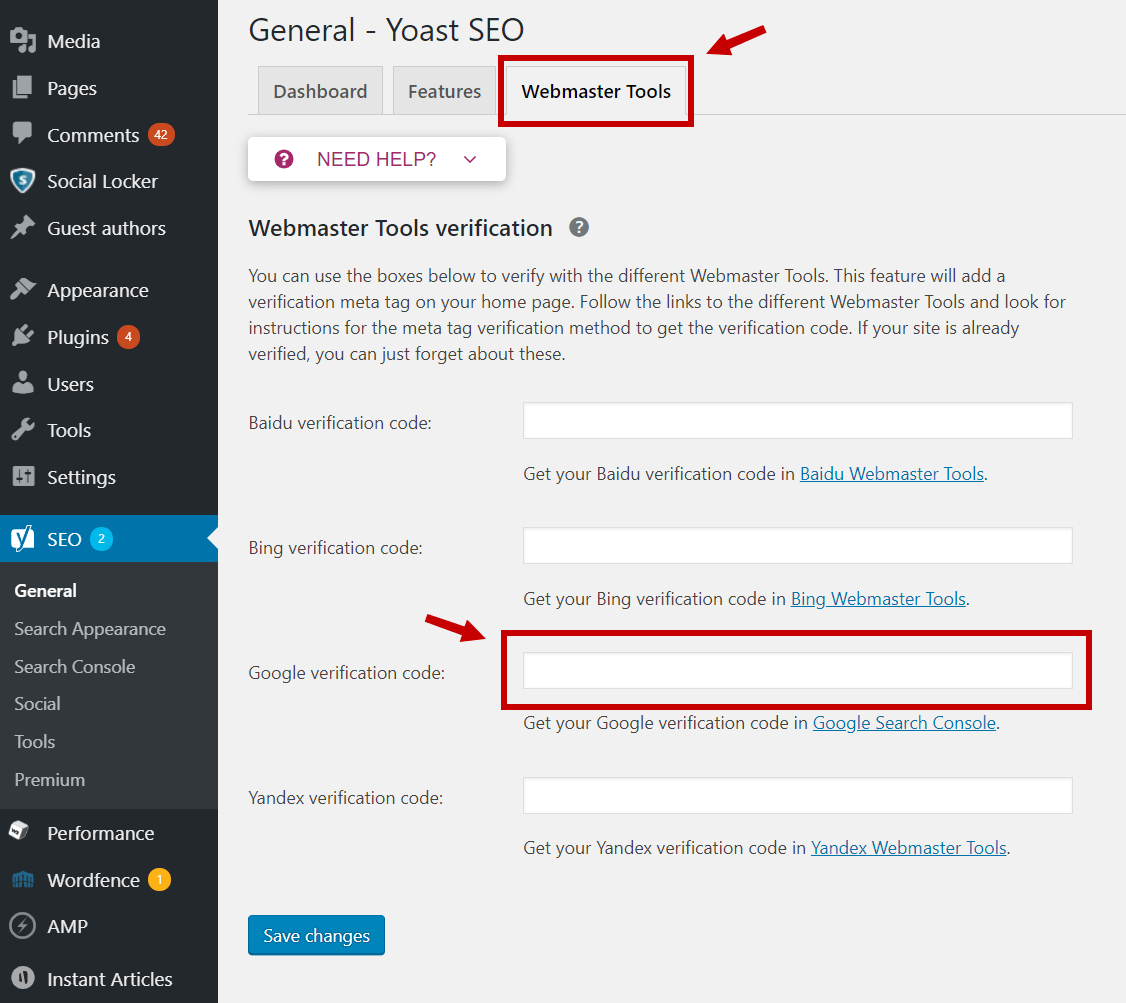
If you selected a URL prefix in the property type, you’ve got more options on how to verify your website. One of the most popular ways is to use the HTML tag and copy the code into the <head> section of your site.

If your website runs on WordPress, you can use a plugin to simplify the whole process. If you use Yoast SEO plugin, you just need to go to SEO – General – Webmaster Tools and copy the code from the HTML tag (as seen in the screenshot above) to the “Google verification code” field:
Users, owners and permissions
You now have access to Google Search Console. Let’s take a look at how you can share access with other people.
There are three different permissions levels in the Search Console:
- Owners: This will probably be you. Owners can view all the site’s data and use all the tools. They can also give other people access to the Search Console. You can also create delegated owners, who have the same control over Search Console as you.
- Full Users: Can view all site data and use most of the Search Console tools. They can’t change permissions. Neither can they share access to other G-suite accounts or change the web address.
- Restricted Users: Can only view Search Console data and generate basic reports.
To add a full or restricted user, follow these instructions:
- Press Settings, then Users and Permissions
- Hit the Add User button
- Enter the email address of the person you want to add
- Choose the level of permission you want to provide
To add a delegated owner, press the three dots beside the current site owner.
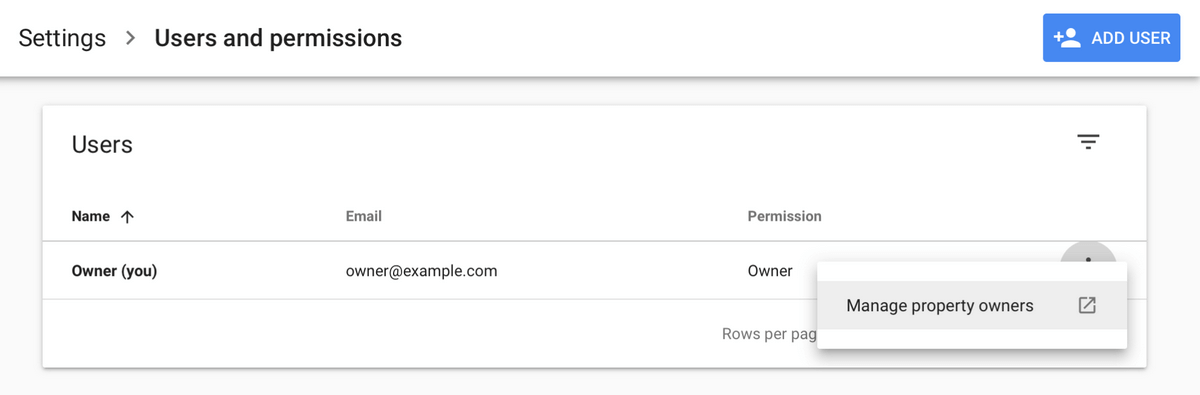
You should only provide delegated owner status to people you trust. You can provide full user and restricted user access to agencies and people in your company.
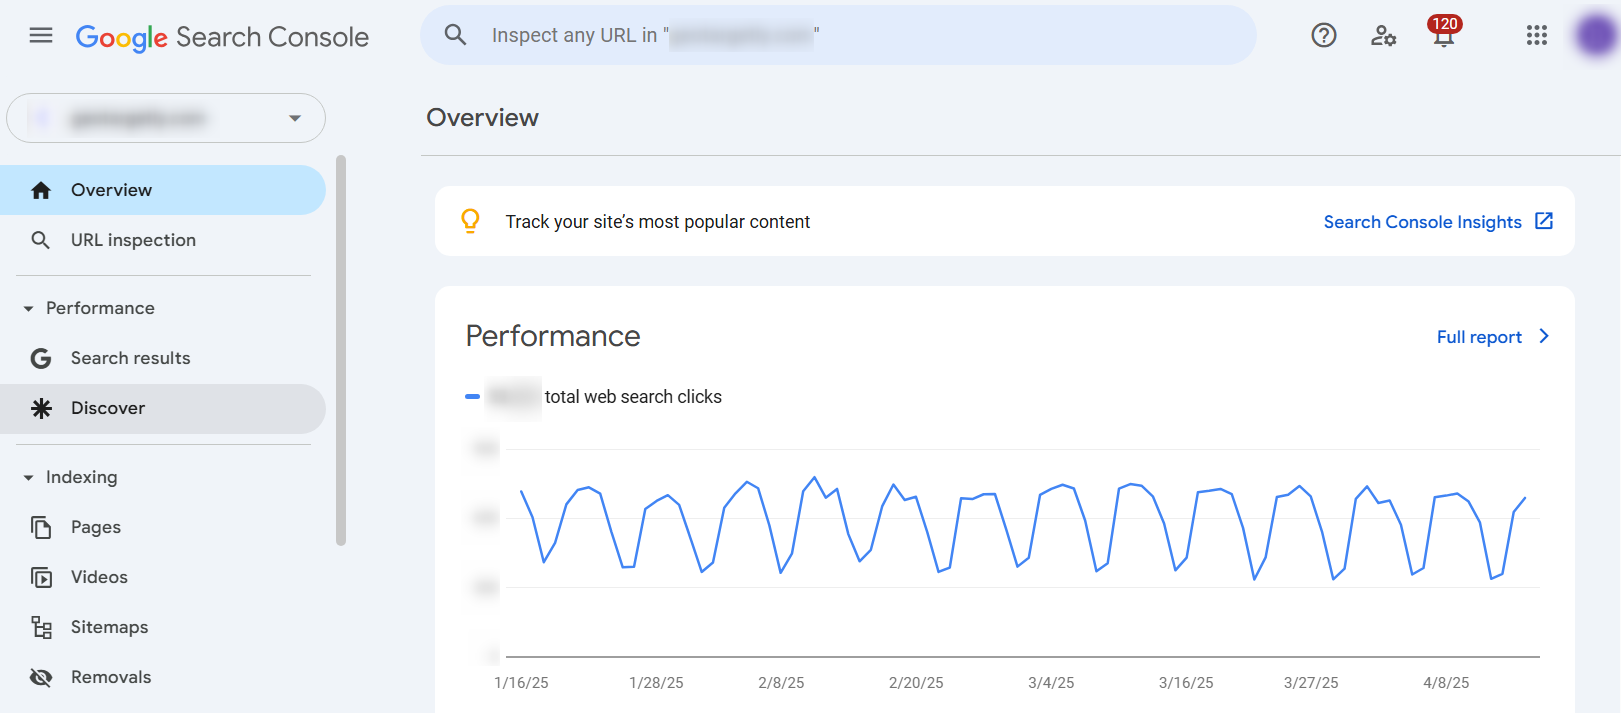
Overview
The Overview Report is the first page that loads when you access Search Console. The dashboard contains a snapshot of key information about your site.
From this dashboard you can see:
- Site performance report: How many people have clicked on your website from Google
- Coverage report: Information whether your pages are indexed properly on Google
- Enhancements report: Provides information about enhancements (such as AMP) you’ve made on your site
- Manual actions report: This will show you if Google has given you a manual penalty
You can click on the Open Report link to view each report in full. Let’s go through each report in the order that they appear in the left-hand menu.
Performance report
The Performance report reveals how your website, and pages on your site, are performing in the search results.
There is a lot to cover in this section. So let’s start with an explanation of how to navigate it.
There are 3 main sections you can adjust or click on to show the data you need:
- top filter
- 4 main metrics
- data tabs
In the top menu, you have the filter selectors that enable you to add variables. It is quite useful to set up the filter as specifically as possible to get the most relevant data in Google Search Console.
The various variables you can add include:
- Search: Choose to filter the results by web, image, or video
- Date: Filter the results by date range. You can also compare date ranges.
- Query: Filter by specific keywords, or even exclude keywords
- Page: Select a page that you want to focus on
- Country: Filter search results by country
- Device: Filter search results by the device used
- Search appearance: Filter by looking at Rich Results and other variables
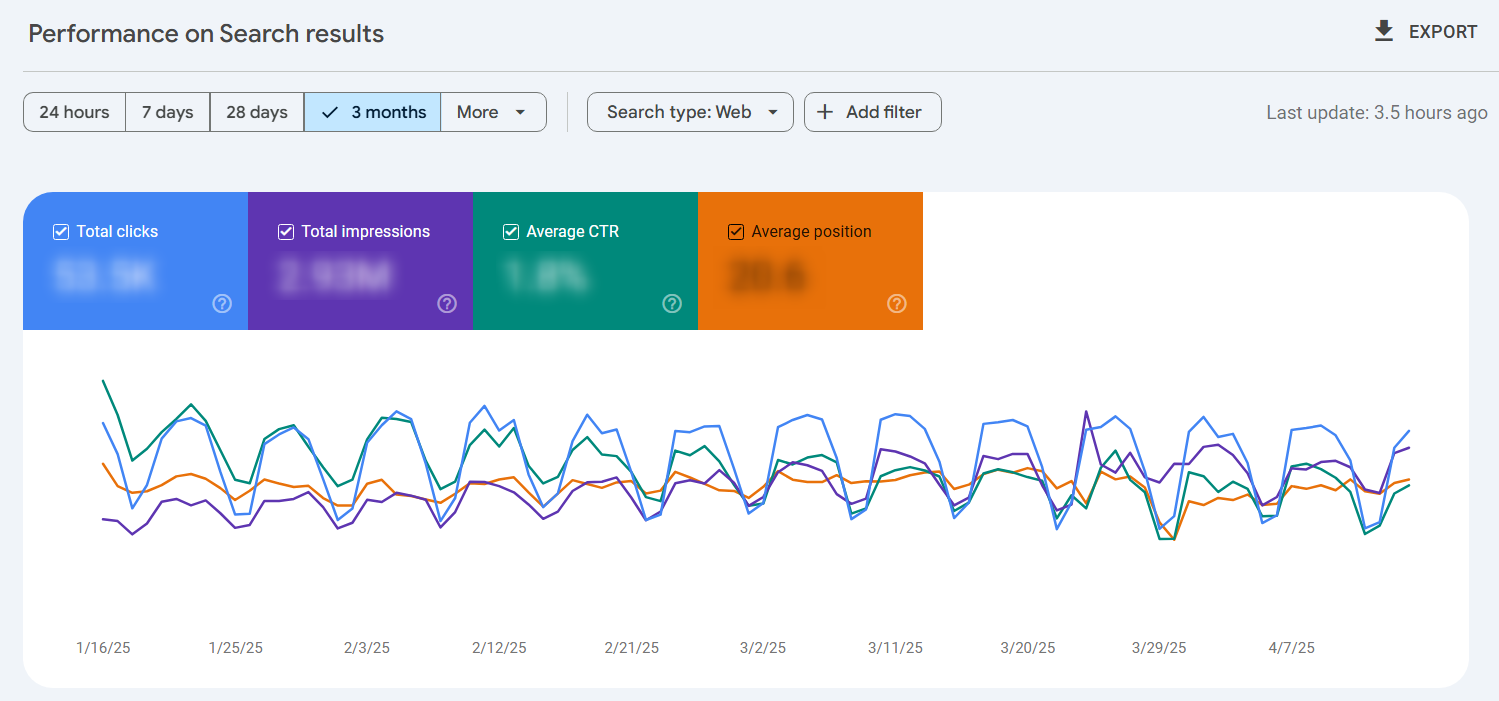
Below the top menu, there’s a visual representation of your SEO performance. By default, the graph shows an average overview of your website in the last 3 months.
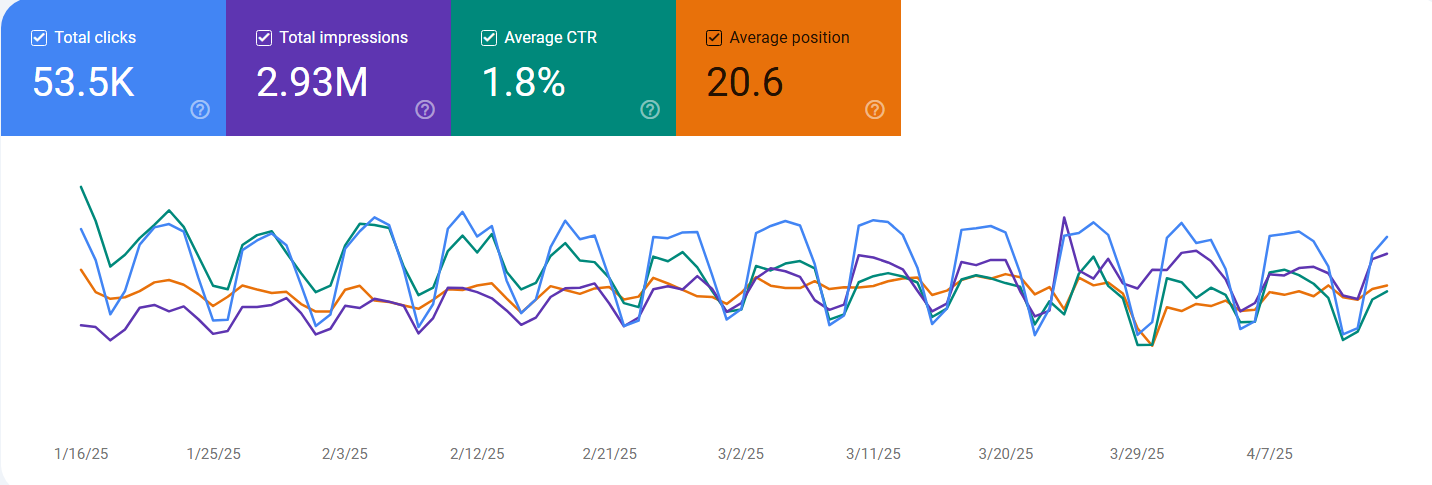
As you can see, there are four metrics above the graph. From right to left, they are:
- Total clicks: the number of people who visited your site from Google
- Total impressions: the total number of times your content was seen on Google
- Average CTR: what percentage of impressions resulted in a click
- Average position: the average ranking your content has in Google search results
You can show/hide any of these metrics by clicking on the squares above the graph.
Pro tip: Keep in mind that a sudden increase in impressions will almost always lead to a decrease in average CTR. It is not necessarily a thing to worry about – it just means your page appeared on a lower position for some highly-searched keyword.
Below the main graph, you’ll find a table with specific results.
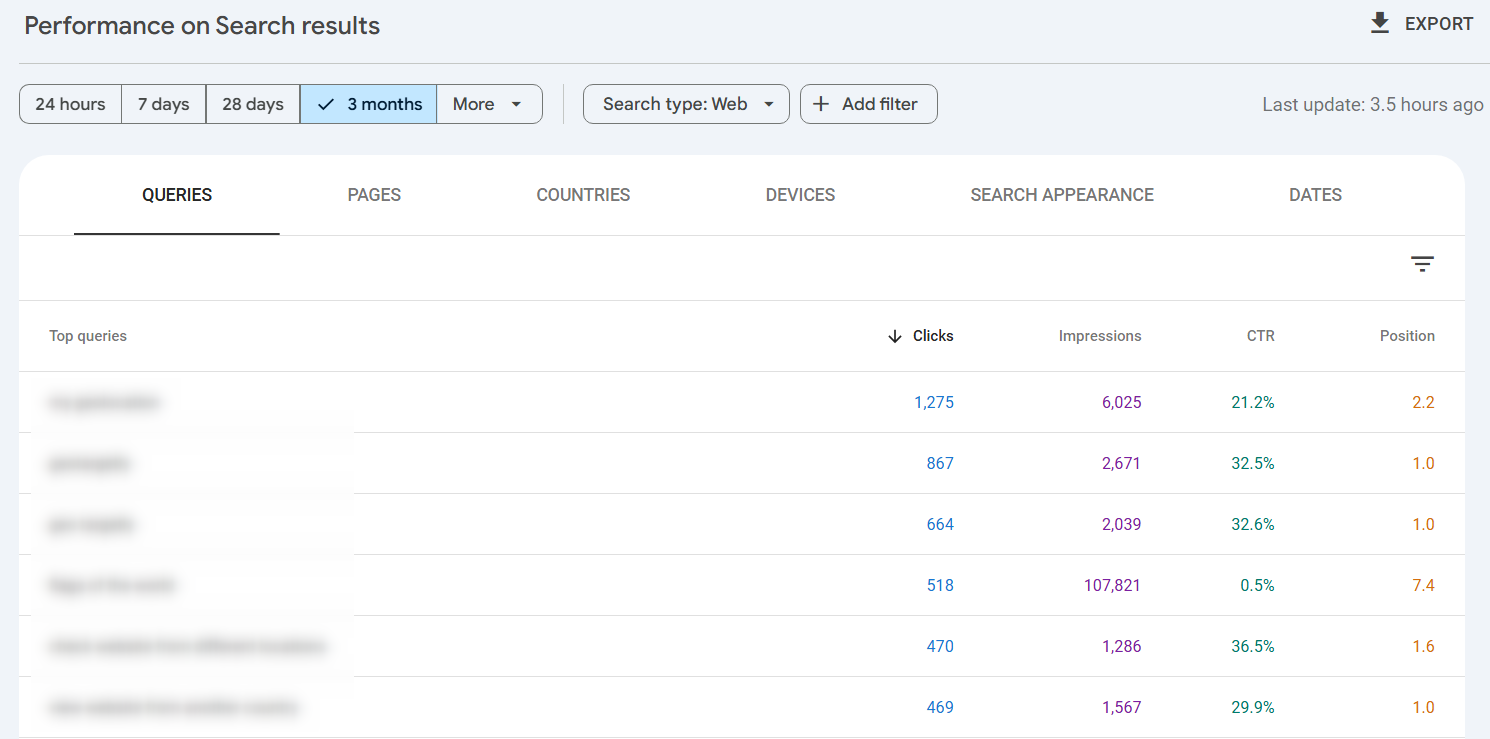
There are five tabs you can select:
- Queries: see what keywords your content is ranking for
- Pages: review how pages and blog posts on your site are performing on Google
- Countries: see how your website is performing by country
- Devices: find out what device – computer, mobile, or tablet – people use to access your website
- Search appearance: this will show you whether your structured data appear in the search results
There’s also one more filter in the tabs section that allows you to work with that data from the table.
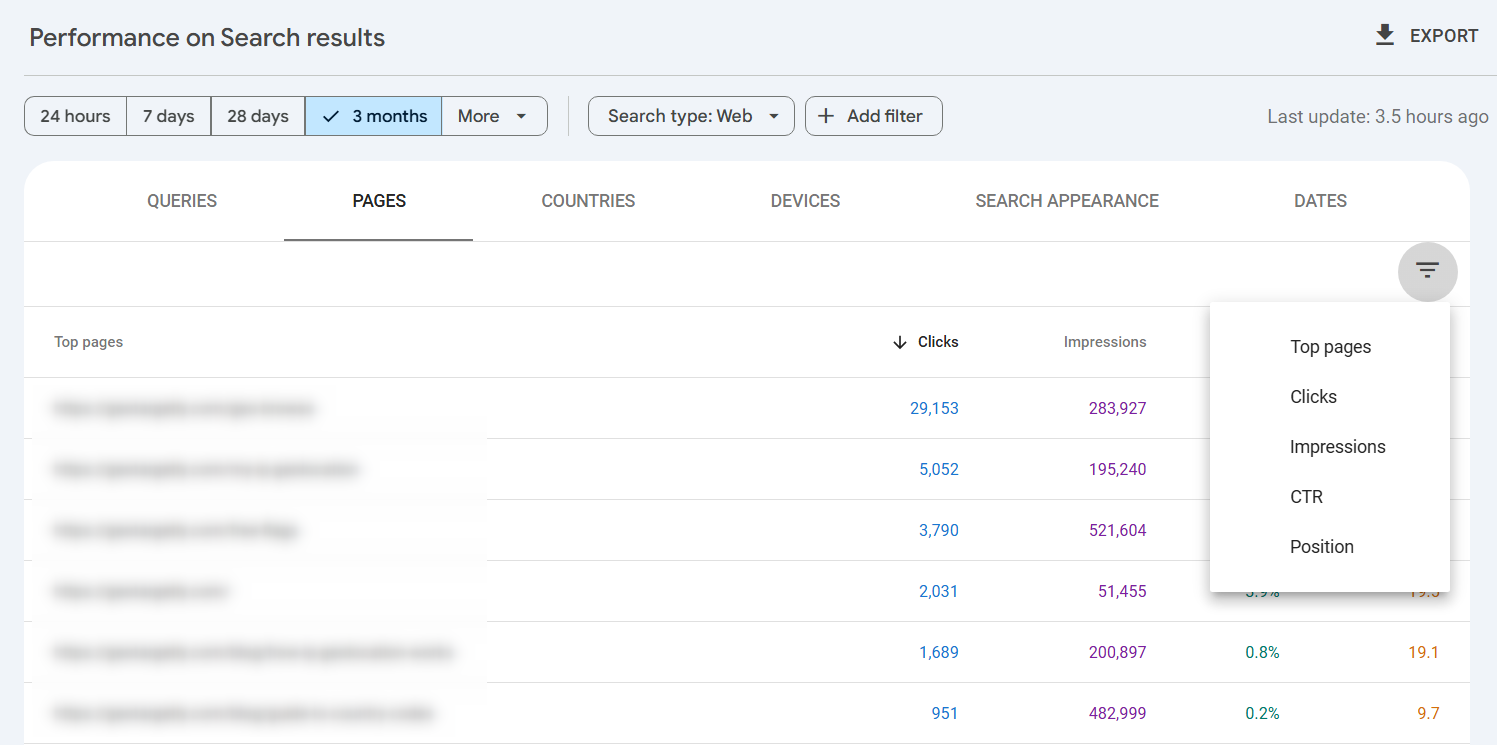
Quick tip: If you want to see what queries a specific page ranks for, select the Pages tab, then click on a specific page you want to analyze and select Queries again.
Now you have an idea in how many ways you can chop and change the way you analyze data.
For example, you can:
- See how your website is performing for a specific keyword
- View the keywords and phrases that an individual page is ranking for
- Compare search results over time to see if your ranking is improving or decreasing (for this, however, we recommend exporting the data and using a spreadsheet)
- Analyze how your website is performing on different devices
3 quick tips to get more organic traffic with the Performance report
You’ll spend most of your time on Search Console analyzing the Performance Report. It may take a little time to get to know your way around it, but don’t worry, it’s no rocket science.
Here are 3 useful tips on how to use the Performance report to improve your SEO.
TIP #1: Find pages that need the CTR optimization
The pages with low click-through rates are low-hanging fruit. They may perform much better if you just make small changes. But first, you need to find them.
Here’s what to do:
First, select the Average CTR and Average position metrics above the graph.

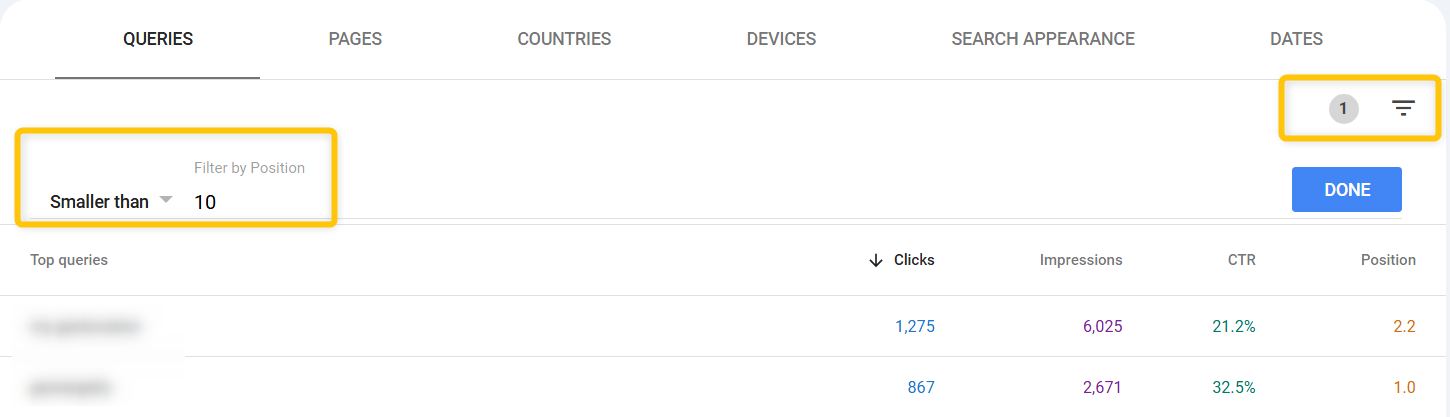
Stay in the Queries tab and sort the results by the position to see what keywords you rank for in the first SERP. You can also use the bottom filter to filter out all the keywords that do not fulfill certain criteria.
For example, we can set up the filter to show only keywords that rank on the first SERP (position is smaller than 10) or the ones that have the CTR lower than 10%.
If you’re not sure what are the average CTR values, you can use this useful study by Advanced Web Ranking as a benchmark.
If the CTR value for any important keyword is considerably low, click on the keyword and switch to the Pages tab. You’ll see the page that ranks for that keyword.
Now, we have a whole chapter about CTR optimization in our on-page SEO guide, but here are some quick tips on how to improve the CTR:
- write an appealing title tag with optimal length
- improve the meta description of the page
- add structured data, if appropriate
- don’t forget about the favicon
The title tag and meta description have a significant impact on your CTR, so use SERP Simulator tool to see what your page will actually look like in the Google results.
Of course, you can’t optimize for every keyword, so stick only to the focus keywords or keywords that have some value for you.
Note: Keep in mind, that the brand keywords will have significantly higher CTRs while the keywords that have SERPs with featured snippets may have lower-than-the-average CTRs. Always try to think about the possible reasons behind the lower CTR to understand the issue.
TIP #2: Find new keywords to optimize for
Google Search Console can be a great place to find new keyword opportunities. Let’s see how to do it:
Similarly to the previous tip, we can use the filter to narrow down the results.
By focusing on the keywords you already rank for on the 2nd or 3rd SERP (setting the filter to position smaller than 30), you’ll find the keywords with the highest potential.

Now, again, there will be two kinds of keywords you’ll see and your next step will depend on what kind of keyword it is:
Focus keywords
If you rank on the 2nd or 3rd step for a focus keyword, you should think about ways to improve the content of the page.
Look at the pages that rank in the 1st SERP and do the competitor analysis. Think about how to make your content:
- more up-to-date
- more specific
- more engaging
- more visually appealing
Secondary keywords
Secondary keywords are keywords you rank for even though you did not optimize for them at all. If you already rank for at least one bigger keyword, there will be many of them.
Your main task is to identify the ones that will bring the most value for you. You need to consider the search volume, the difficulty of ranking for them and the relevance. You’ll find more about this topic in our ultimate guide to keyword research.
Let’s say you wrote the ultimate guide to coffee machines and you’ll find out that you rank on position 22 for “4 cup coffee maker”. Great keyword, with great potential.
There are two basic things you can do:
- Improve the existing post to include more information about the 4 cup coffee makers
- Create a new post focused on 4 cup coffee makers to rank for (and link it from the ultimate guide)
TIP #3: Identify articles competing for the same keyword
I suggest doing this every time you are going to publish a new piece of content.
- add the Query variable from the filter at the top
- enter your focus keyword into the input field
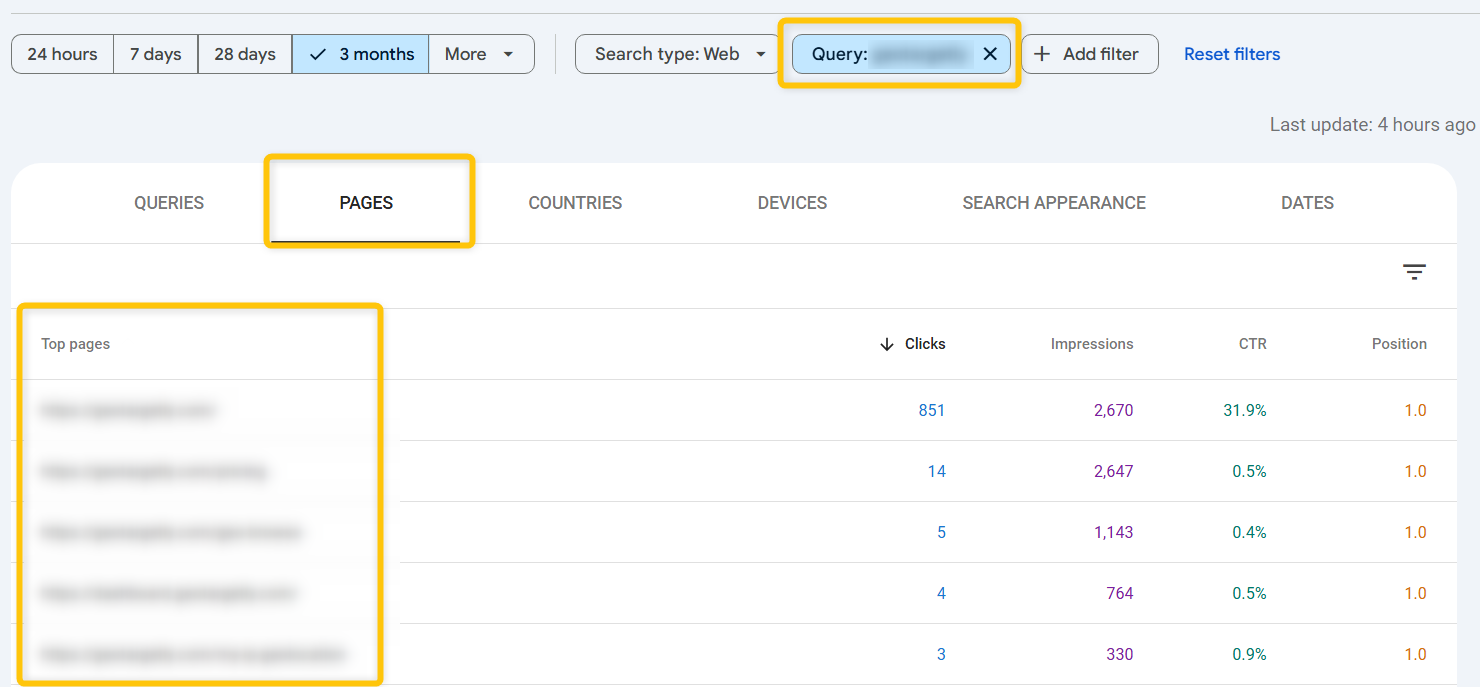
- click on the Pages tab below the graph – this will show you all your pages that rank for this keyword in Google
Now, this may not always be a bad thing. Here are some scenarios and what to do about it:
- if the page you found has the same focus keyword, think about updating the old page instead of creating a new one or redirecting the old page to the new one and repurposing the appropriate content
- if the page ranks for the keyword, but it is not it’s focus keyword, you can inspect the page and add an internal link to your new piece of content if appropriate
In the following example, we can see all the pages that rank for “things to do in jakarta”. The first page is obviously the main content while the second and third page just mentions the topic. They are a great opportunity to link to the main content internally.
TIP #4: Import keywords from GSC to SERPWatcher
You can import the most important keywords that you want to monitor and rank well for directly from Google Search Console into our Mangools SERPWatcher tool and start tracking their ranking performance on a daily basis.
This will help you see how your website performs each day and identify any improvements or declines—literally within seconds.
In addition, SERPWatcher will help you better understand the ranking impact of your keywords, as well as whether you’re unintentionally cannibalizing them across multiple pages on your site.
Importing keywords from GSC is straightforward. All you need to do is:
1. Go to SERPWatcher.
2. Click on “Create new tracking” on the main dashboard.

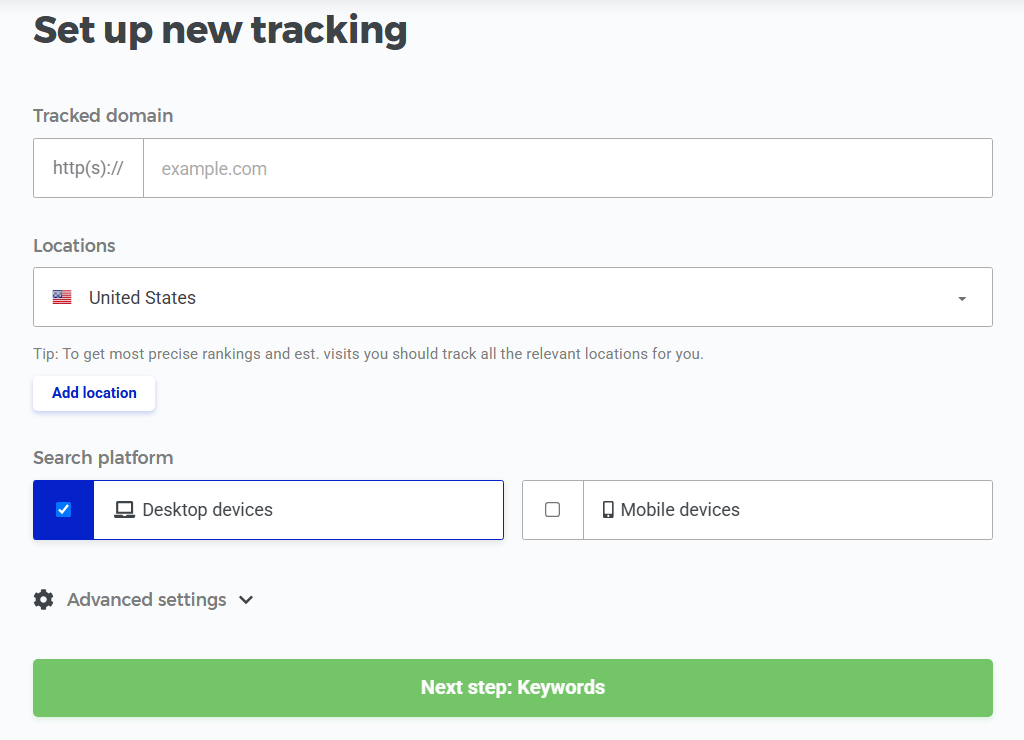
3. Set up a new tracking project for your site:
→ Enter your domain in the input field
→ Select location and device
→ Click on the “Next step: Keywords” button
4. In the next modal window, click the “Search Console” button and authorize the connection between SERPWatcher and your GSC account.
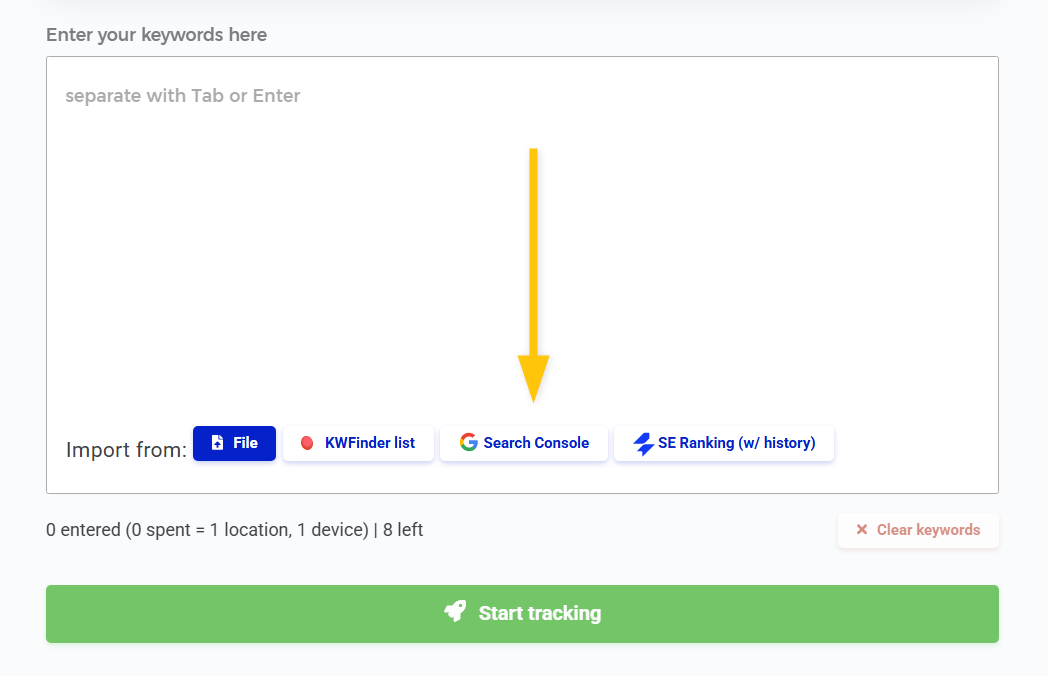
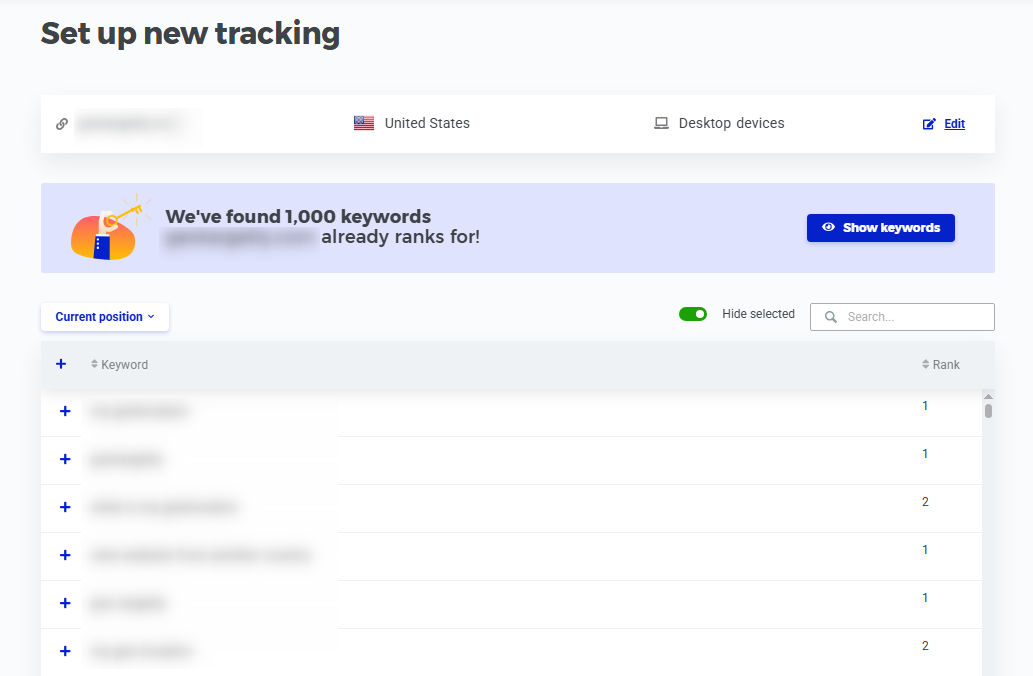
SERPWatcher will then import all the keywords your website ranks for in Google Search Console. You can manually choose which keywords you’d like to track in your SERPWatcher account, or simply track all of them.
5. Hit the “Start tracking” button—and you’re all set!
Page indexing report
Next up on the main menu is the Page indexing Report. The index report shows the total number of pages that appear in the search results (+ pages that are not indexed). If everything is green then things are good. You want the number of problematic pages to be as low as possible, ideally zero.
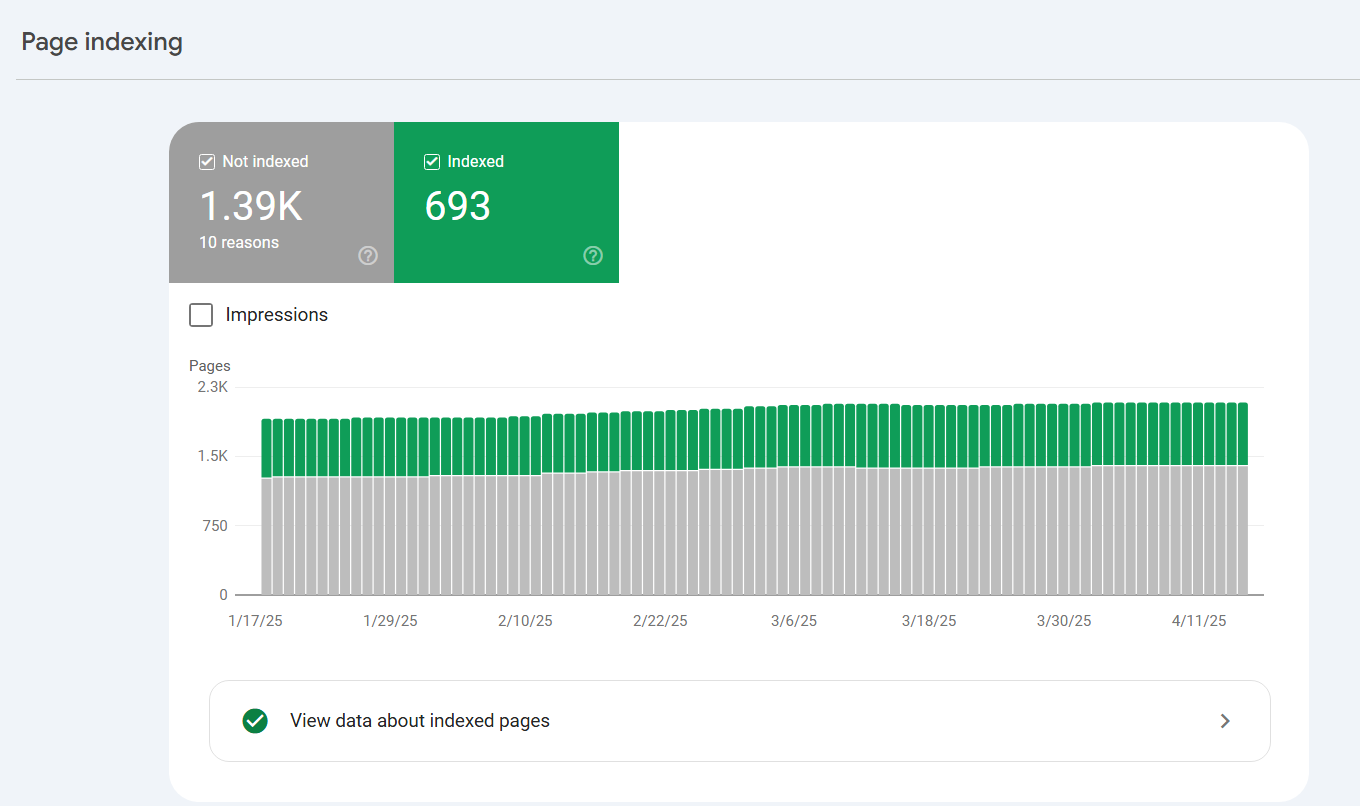
Under the details section, you can sort issues by status, type, validation, and pages. If you notice sudden spikes or drops in your indexed pages, there’s probably a technical problem, for example, a server black-out or a redirect error.
Note: You’ll be notified on most of the issues from various Search Console report via the email address you use to login to the tool.
It’s important to keep on top of these problems and resolve them quickly. Issues with technical performance will affect your visibility on results pages.
Sitemaps
A sitemap is an XML document that outlines how your website is structured. Your sitemap will help Google crawlers navigate your site. This helps Google find and index your content quickly.
You can tell Search Console where your sitemap is located on your site by entering the URL.
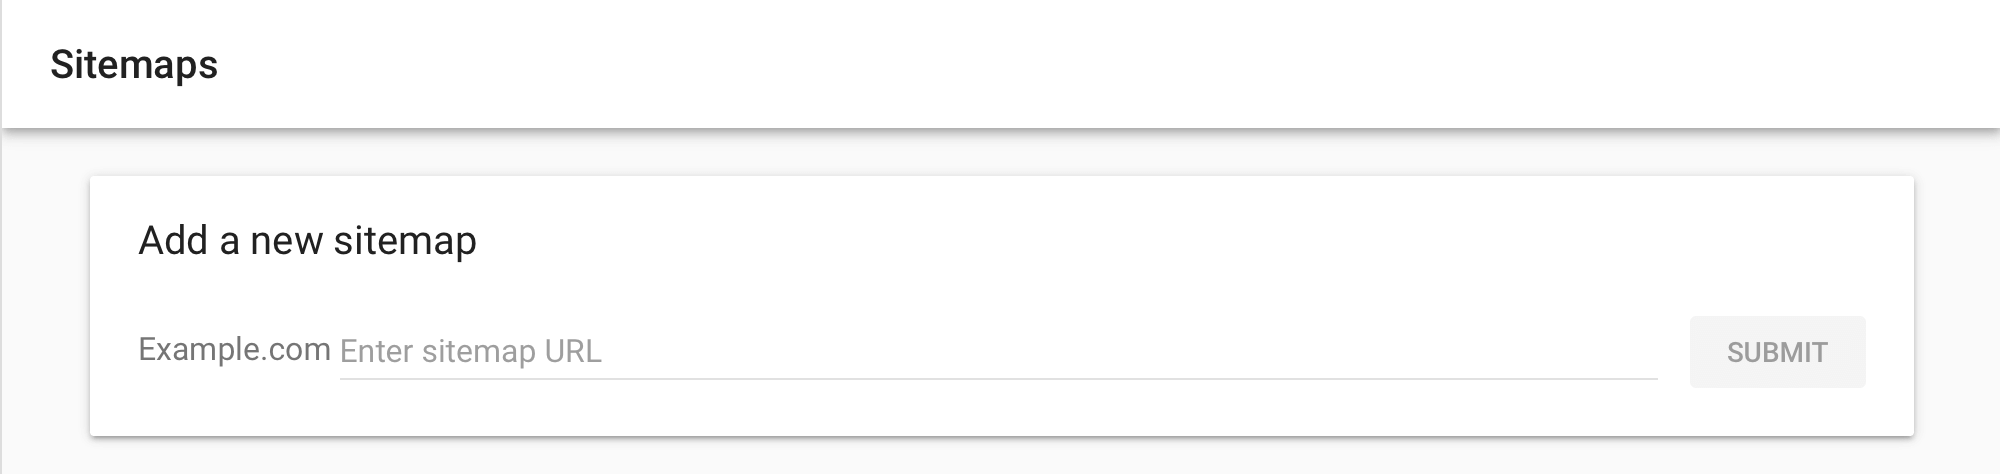
An extra benefit to providing a sitemap in Search Console is that you’ll be alerted of any issues. These include differences between the structure of your site and what Google sees.
Enhancements
The Enhancements page allows you to view the enhancements you have made to the site.
There are many reports you can find under Enhancements, and many of them will appear only if you have the specific feature implemented on your site.
Let’s cover the three most basic reports:
- Mobile usability report
- The Accelerated Mobile Pages report
- Structured data report
Mobile usability report
The Mobile usability report assesses how your site works on mobile. The report shows you any mobile responsive issues your site has. If your site is mobile responsive, everything should be green.
If there are any problems they will appear in the red rectangle.

You can find information about any problems Google identifies in the Details table below the graph.
Common issues Google finds include:
- The text is too small to read
- Content is wider than screen
- Clickable elements are too close together
AMP report
Accelerated Mobile Pages, or AMP, are stripped-down versions of a page. AMP is an initiative by Google to optimize the net for mobile. It is designed to load very quickly on mobile.
You can add AMP to your website using a plugin. When implemented, people on a mobile phone will access an AMP version of your site from Google. AMP may help your content to rank higher in the SERP, since fast load time provides a better user experience for visitors.
Once you activate the AMP on your website, you can check the report in Search Console. You can find out if the AMP is working correctly through this report.
Like the other reports, Google uses a traffic light system for rating pages. You can find details regarding any issues Google identifies below the graph.
Structured data report
Structured data allows you to present additional information in Google search results, such as pictures, videos or star ratings.

An example of structured data in SERPFor your structured data to appear on Google, the search engine needs to understand the code you use. Issues with your structured data will appear on the Structured Data Report. A good resource for reviewing and fixing issues is the Structured Data Testing Tool developed by Google.
Manual actions report
Hopefully, you will never have to view this report. By default, it will show No issues detected. If a manual penalty has been applied to your site by a Google employee, then the penalty will appear in this tab.

Google will apply manual penalties to your site if they think you have been doing anything shady. For instance, you might get a manual penalty as a result of buying backlinks.
A penalty from Google can harm your search rankings or result in your site being de-indexed. It is crucial to resolve any manual link penalty if you want to avoid SEO problems.
Legacy tools and reports
These are some features from the old Search Console. They are not available for domain property so we won’t go into much detail here.
The legacy tools include:
- International targeting – you can set a specific target country (used for hreflang)
- Removals – you can remove URLs from the search results
- Crawl stats – you can view and regulate the frequency of crawls by Google
- Messages – messages from Google
- URL parameters – you can let Google know about various parameters you use
- Web Tools – access to other tools
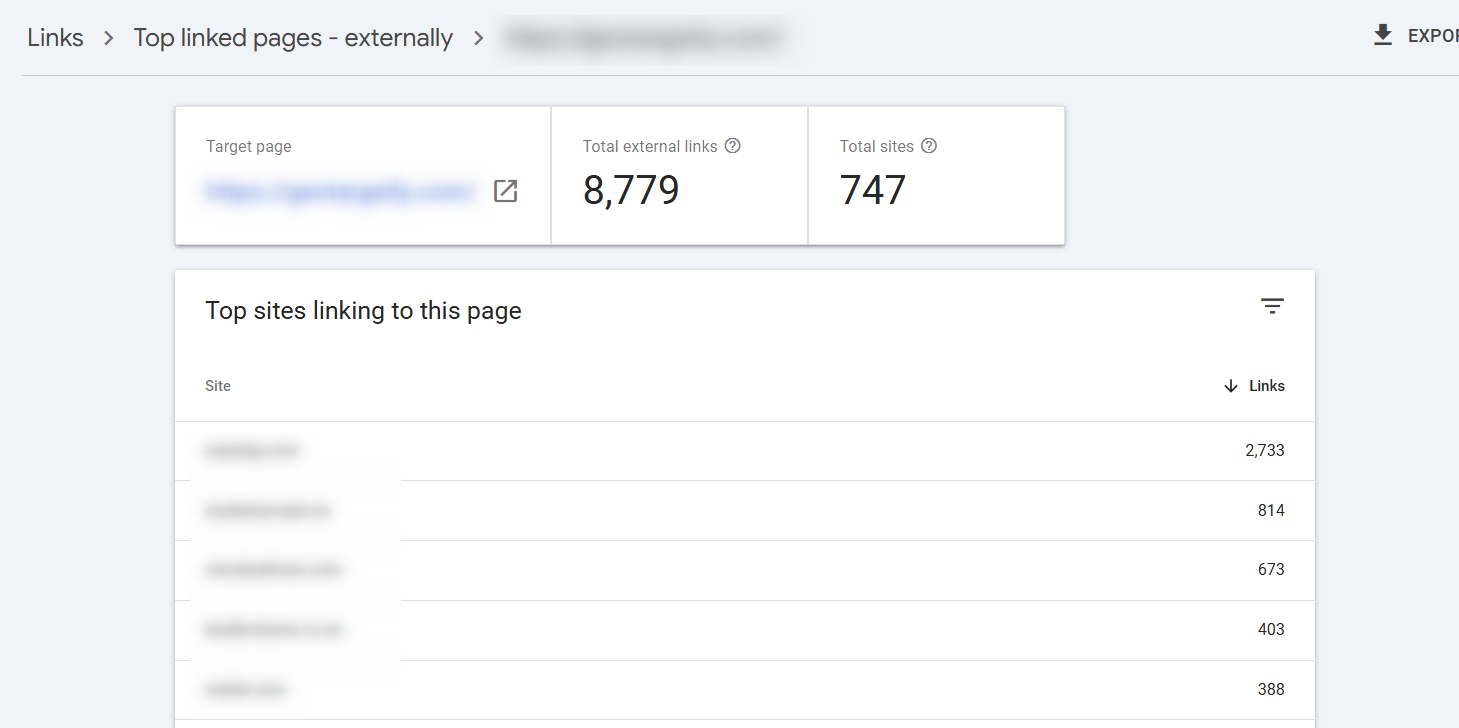
Links report
Through the Links Report in Search Console, you can view the backlinks pointing to your website. From the table, you can see the pages that have the most internal and external links.
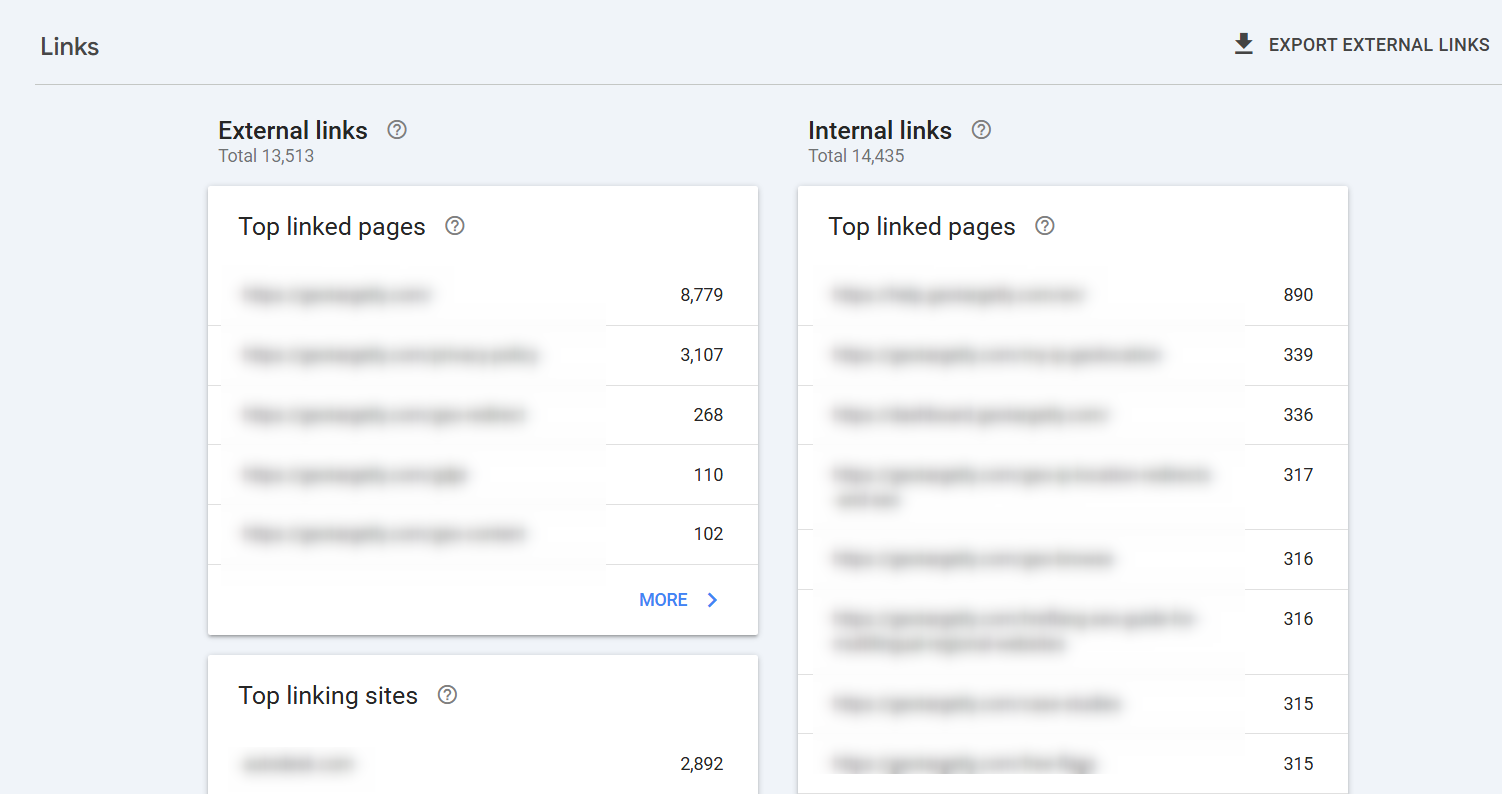
Further down, you can see the top linking sites and anchor texts.
Backlinks (both their quality and quantity) are one of the most important SEO ranking factors – so even if you have great content and a perfectly optimized site, you’ll need some quality backlinks to profit from your blog or website.
The report is a great starting point to find:
- which pages of your website have the most links
- what websites link to you the most
- what are the most common anchor texts
- what pages have the most internal links
In the Top linked pages report, you can click on a specific page to see who links to it:
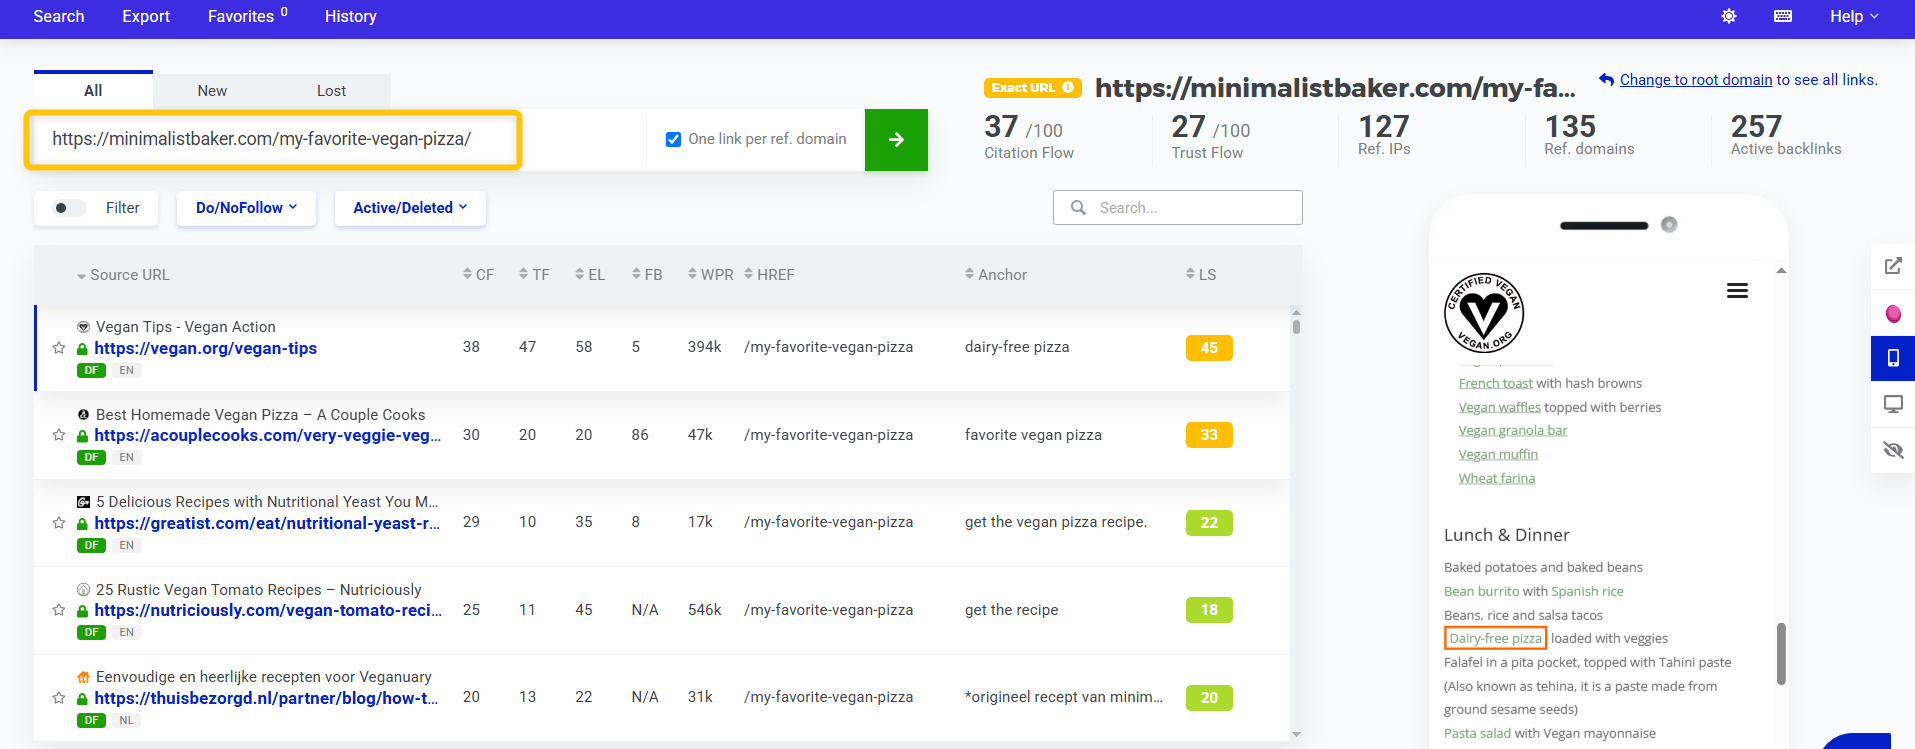
Note: Google Search Console has its limitations when it comes to backlinks.
You don’t see the anchor texts of specific links. You don’t know whether the link is nofollow. And most importantly, it doesn’t say anything about the quality of the links.
So if you want to look into your link profile more closely, you should definitely use a backlink tool like LinkMiner:
As you can see, Google Search Console is a very useful tool that will help you to get a general overview of the technical and on-page SEO aspects of your website.
Let us know in the comments below what is your most common use case for using the Search Console.
