

When you are starting a website, you might feel a little bit lost about how it should be structured.
What should be the home page? What categories should it contain? And which pages should you even focus on?
Luckily, there is a solution that should help you with that – the keyword map.
Let’s just jump right into it.
What is keyword mapping?
Keyword mapping is a process of assigning keywords to the relevant pages and creating a logical structure of the website based on keyword research.
The purpose of the keyword map is to create an intuitive site structure that will help you with content planning, internal linking, on-page optimization as well as with tracking and evaluating the performance of your pages.
What are the benefits of keyword mapping?
Keyword mapping brings several benefits in terms of SEO:
- It helps you to create an intuitive and logical structure for your website
- Improves the internal linking between pages and optimization of their anchor texts
- Provides a content plan for your website
- Helps with tracking the website’s performance
Let’s take a closer look at each of them.
a) Creates intuitive site structure
Keyword mapping can help you with the planning and organization of the content on your website.
Creating a logical site structure is one of the most crucial steps when you start optimizing your pages – the search engine has to understand which pages are the most important for you as well as which ones are relevant subtopics for the main category/pillar pages.
Note: It is important to understand that every main page/pillar page and subpages should cover 1 specific topic – which is always represented by 1 focus keyword per page:
1 page = 1 topic = 1 focus keyword
Think of keywords as topics – each page with a specific focus keyword should cover either:
- Pillar content – the main/category page that covers the topic more broadly; usually for more general keywords (e.g. jogging)
- Cluster content – subpage that explains a specific subtopic in detail; usually for long-tail keywords (e.g. how to do jogging)
With pillar and cluster pages, you can create a more meaningful site structure with pages that have semantic relationships with each other.
Read more in our detailed guide to content hubs.
b) Improves internal linking
Keyword mapping can help you to decide which pages should be logically interlinked together based on how they are topically related to each other.
It will also help you to properly optimize anchor texts on your website – you can use keyword-rich anchor texts based on the assigned keywords from your map.
c) Planning for content
A keyword map provides a general content plan for your website and individual pages.
With a clear overview of your site structure, you can quickly get an overview of what type of content you should be focusing on, prevent the creation of duplicate content as well as avoid keyword cannibalization on your website.
Note: Keyword cannibalization happens when one or more webpages are ranking for the same set of keywords in Google Search.
If you accidentally optimized some of your pages for the same query, the search engine might be confused about which one should be ranking high for the term, leading to low rankings altogether.
d) Easier tracking, managing, and reporting
Keyword mapping helps with tracking of all important search terms that you wish to rank for with your pages.
With properly researched and assigned keywords to the relevant parts of your website, it is much easier to have an overview of the performance of your content for those queries.
How to do keyword mapping?
Creating a keyword map is a pretty straightforward process:
- Start with keyword research and analysis
- Categorize keywords into the main topics for your niche
- Assign your sets of keywords to individual pages within your keyword map
- Prepare and optimize individual URLs
- Track and update your keyword map regularly
1. Start with keyword research
Keyword mapping starts with the first fundamental step – keyword research.
In order to create the keyword map, you need to find your main seed keyword which you want to rank for with your website.
If you already have a website or know your niche well, you probably have an idea of what your seed keyword is.
But in the case you don’t, there are many ways how you can find it, such as:
- Brainstorm your keyword – simply write down a few short keywords that would describe your website and be the most relevant for your niche.
- Use Google Search Console – you can use GSC to find out the best performing search queries that your website is already ranking for and use them as your seed keywords
For example, let’s say that we want to start an informative parenting site about toddlers and activities that you can do with them.
In this case, we can use “activities for toddlers” or “toddler activities” as our seed keywords.
Once you have your seed keywords, you can use a keyword finder tool such as KWFinder to find more related keywords and suggestions that you wish to rank for and use them for keyword mapping.
In KWFinder, simply enter your seed keyword into the search – the tool will automatically generate hundreds or even thousands of possible suggestions that might be relevant to you.
In our example, we will enter the seed keyword “activities for toddlers” – KWFinder will show us many related keywords that are also important:
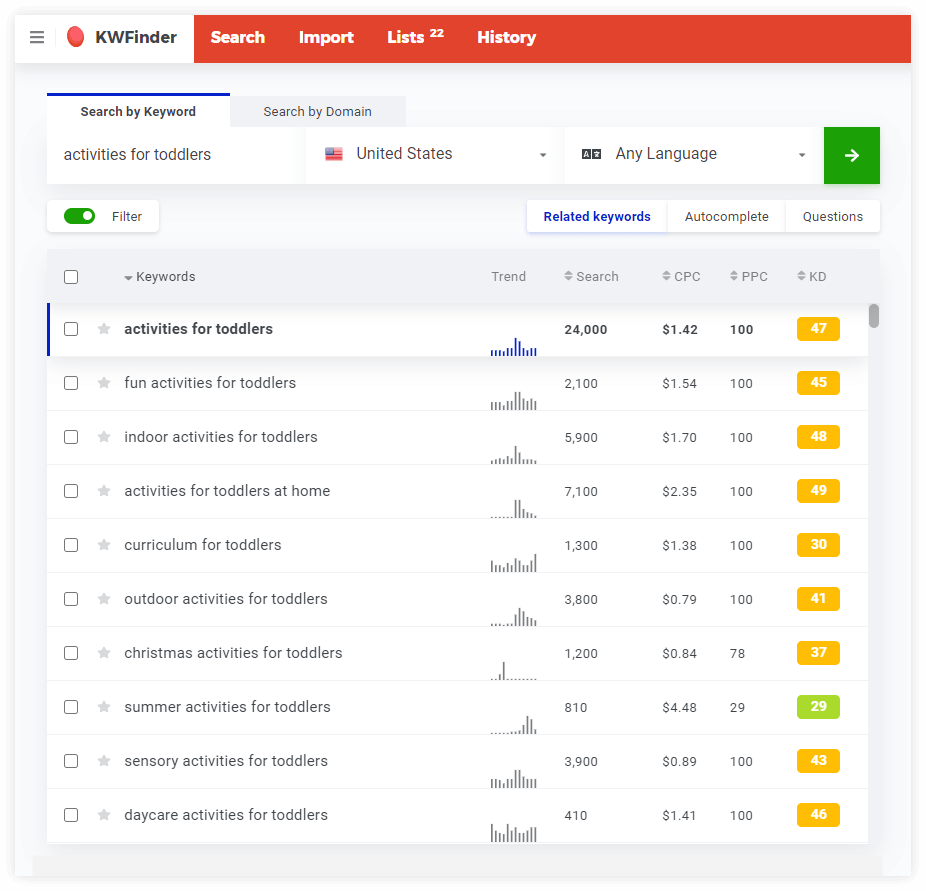
In addition, you can use the “Autocomplete” and “Questions” tab to further expand your keyword research and find out what kind of topics are users interested in.
Once you get the list of keyword suggestions, you can use the filter to get rid of the keywords with very low search volume (otherwise you would end up with thousands of search terms that would be impossible to properly sort out).
Now its time for further keyword analysis and the creation of a general keyword list.
Firstly, you need to determine what is the intent behind every keyword from your list and use those, that are relevant to you.
The search intent behind the keywords can be divided into 4 basic categories:
- Navigational intent – the user is searching for a certain website
- Informational intent – the user is searching for some information
- Transactional intent – the user wants to buy a product or service
- Commercial intent – the user wants to research a product/service before he buys it
Depending on your niche and your marketing strategy, you might want to prioritize keywords that have a certain user’s intent.
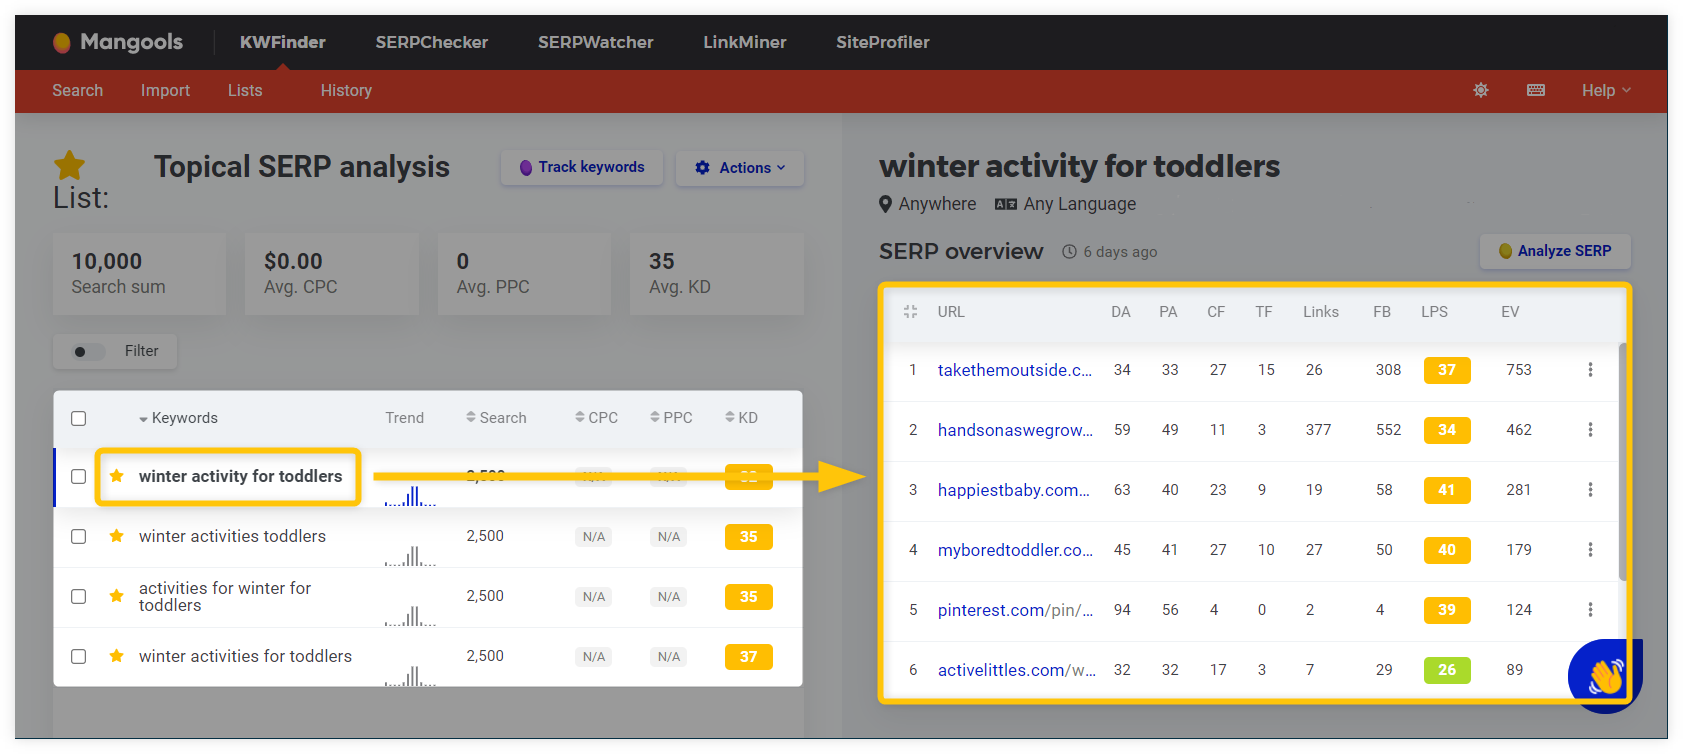
In KWFinder, you can simply click on any generated keyword and hit the “Analyze SERP” button – this will transfer you into the SERPChecker tool where you can quickly analyze and see what kind of pages are ranking for the search term and find out the intent behind the query.
You can even take a look at a snapshot of the SERP to see, what kind of pages are displayed for the search term:

Whenever you find a relevant keyword for you, you can simply mark the search term, click on the “Add to list” button below the keyword suggestions, and create a general list for your keywords.
Tip: In KWFinder, you can also use the “Search by domain” tab for competitor keyword research – simply enter the URL of any website that is already ranking in the top 10 search results for your seed keyword.
The tool will show you a list of keywords that the competitor’s website is already ranking for:
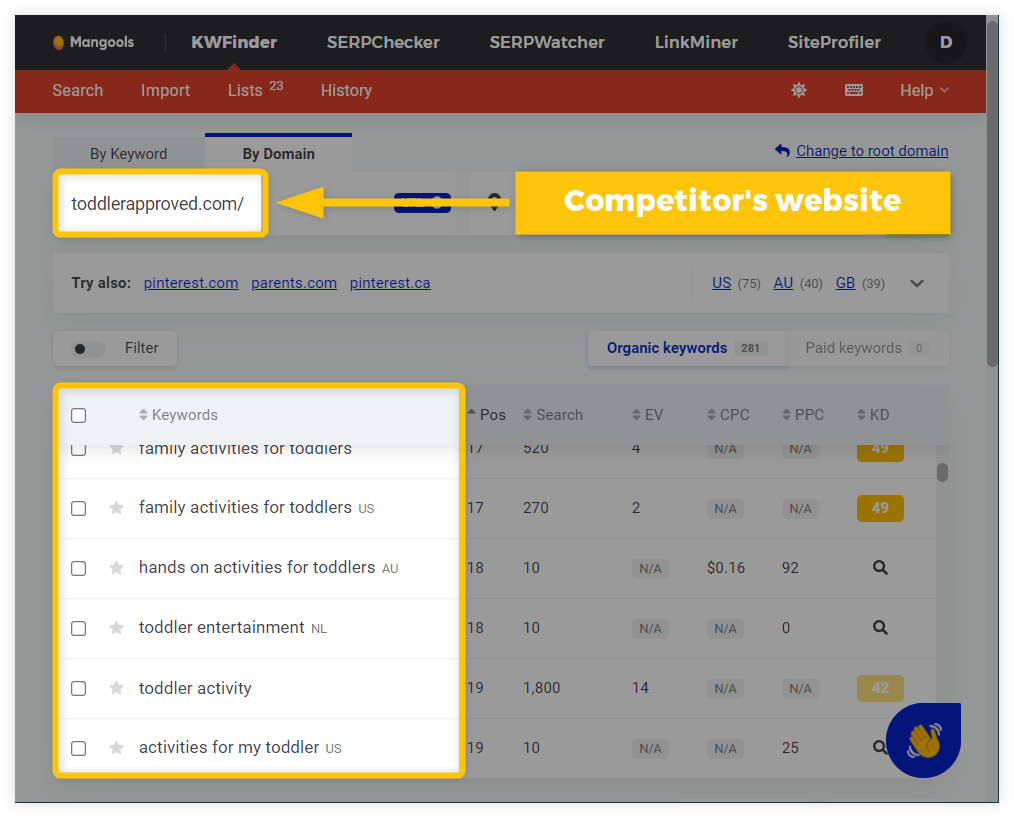
This will help you to find out what your competition is focusing on, get more keyword ideas on how to expand your keyword map, and find out the content gaps that you would otherwise miss.
You can sort the competitor-based keywords according to the highest positions that the website is ranking for and use the filter to get rid of queries with low search volume.
Once you sorted and analyzed the competitor keywords, you can use those that are relevant to you and add them to your general keyword list.
Now it’s time for categorization of your keywords according to their topical relevance.
2. Categorize the keywords
You can categorize keywords from your list according to their topical relevance to each other – it will make it easier to roughly map out the structure of your website in the keyword map.
If you know your niche, you probably have a rough idea of how you can divide keywords into the general topic clusters/categories.
There are many ways how you can divide search terms from your seed keyword – as the main topic – into multiple subtopics (it will always be different for every website and its niche).
In KWFinder, you can simply create as many keyword lists as you want and use them as main categories for your website before you start creating an actual keyword map.
When you start analyzing the topics behind the keywords from your list, you can simply mark the keywords that represent one general category (or one main topic) and assign them to a new, more specific list to make it easier for you to orient yourself.
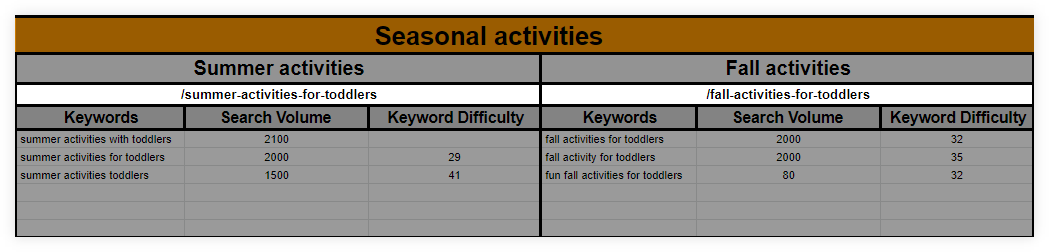
In our simple example, we divided our keywords in KWFinder into 4 general categories/pillar pages about toddler activities according to their “Place”, “Type” of activities “Seasonal” activities, and “Holiday” activities, with keywords that are topically relevant for each category:
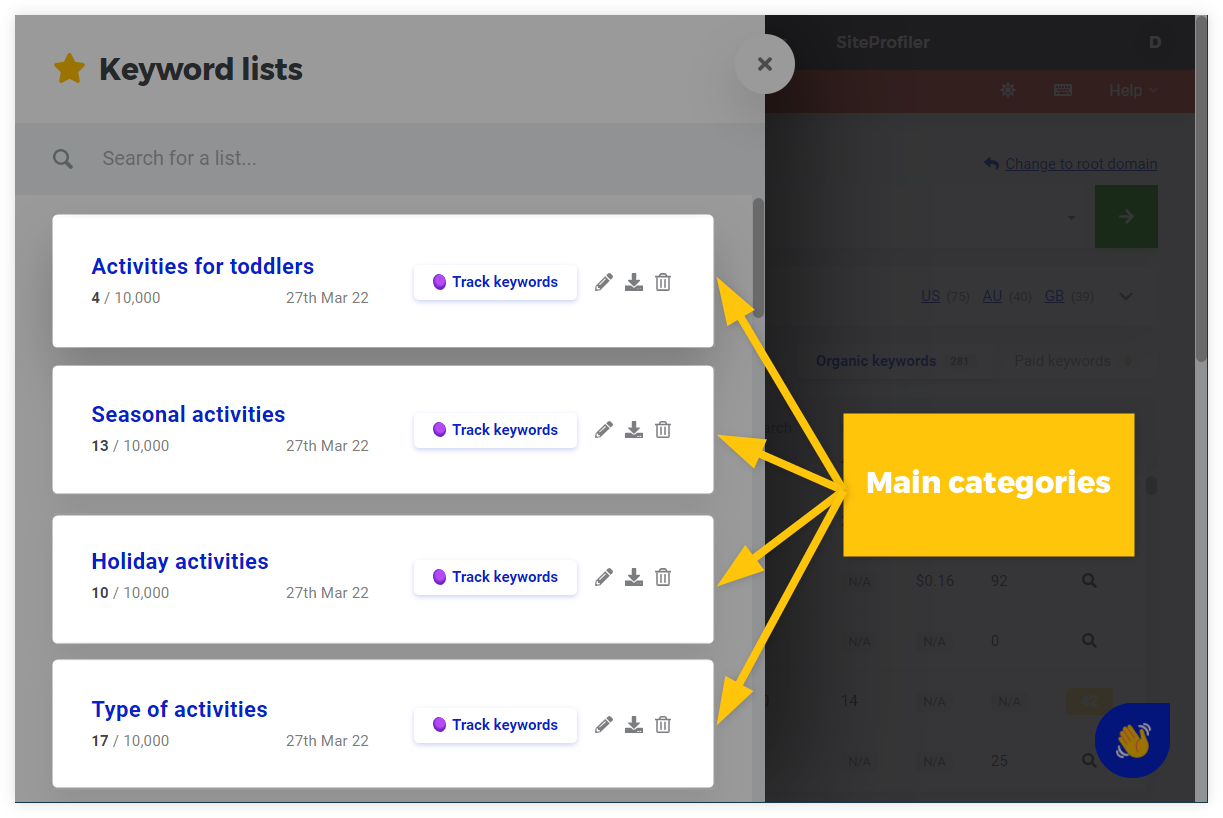
Each keyword list will represent a basic category in our keyword map example later.
You can also sort out the keywords according to their search volume and keyword difficulty to have a general overview of their importance.
Once you have your keywords organized and sorted into general categories, it is time to create a visual structure of your website in the form of a keyword map.
3. Create a keyword map
There are multiple ways how you can create a keyword map – the most common way is to use a spreadsheet like Google Sheets or Microsoft Excel that will help you to create a good visual structure of your website with keywords and their search volumes, keyword difficulty, and other important data included as well.
If you prepared your keyword categories in KWFinder, you can simply click on the “Export list” button next to the keyword category to download them to your computer.
Once you have all lists downloaded, simply import all of them into Google Drive and open them in the Google Sheets.
Adding and sorting all these data is pretty straightforward (although a little bit time-consuming):
- Copy all your keyword-category sheets into 1 general Google Sheet and start organizing them
- Create a homepage/main category with the seed and supporting keywords.
- Add categories below the homepage that will represent pillar pages for your website – each category can be 1 main/pillar page with a highly searched and competitive keyword or can be further divided into individual pages/subtopics with a specific set of keywords for every one of them.
Every set of pages within a category can be viewed as a topic cluster composed of several subtopics that your website should cover in order to be authoritative in your niche.
Once you have created a home page, its categories, and subcategories, you should end up with a logical structure of your website with specific paths to individual subtopics.
For the sake of simplicity, here’s an example of the keyword map for our parental website with categories and individual pages that should cover specific topics for this niche:
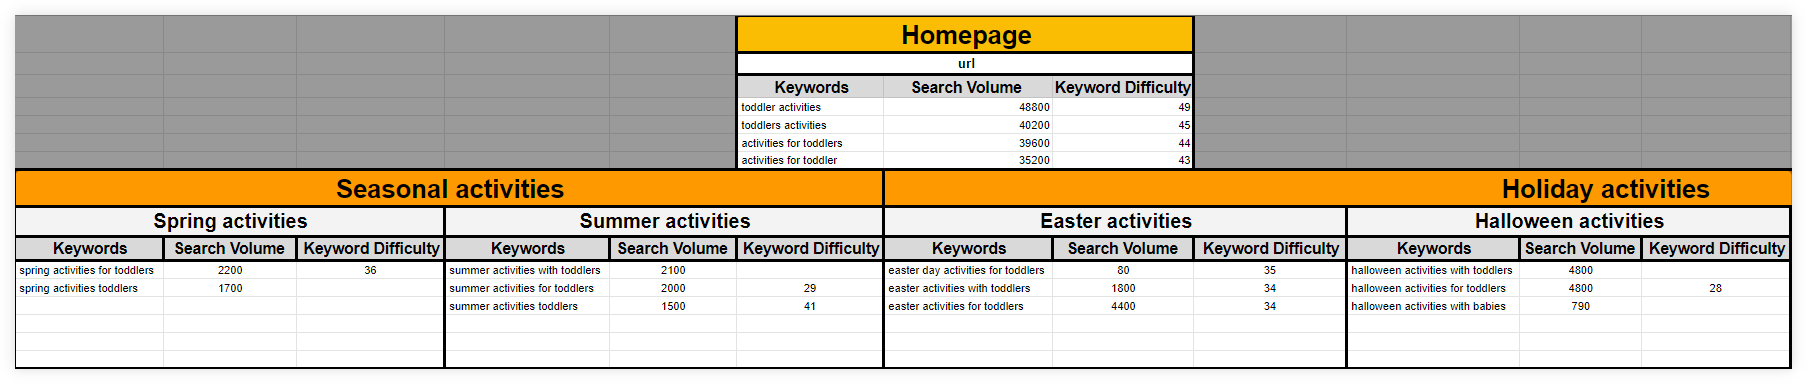
After mapping out the structure of the website, you should have a clear overview of all topics and subtopics that you need to cover, with sets of keywords for every page that you should rank for, as well as the data about their importance and difficulty.
Double-check the topics behind keywords
Each set of keywords for a specific page should be topically identical to each other (e.g. keyword variations, plurals, synonyms of each other, etc.).
Sometimes it is not obvious whether or not 2 or more keywords are representing one specific topic.
Let’s take a look at the keywords “science activities for toddlers” and “science experiments for toddlers” – although the queries are not completely identical and contain different words in their keyword strings (“activities” vs. “science”), the topic behind them is the same.
If we take a quick peek in KWFinder, we can see that they both display the same set of search results for their SERPs – just in a different order:
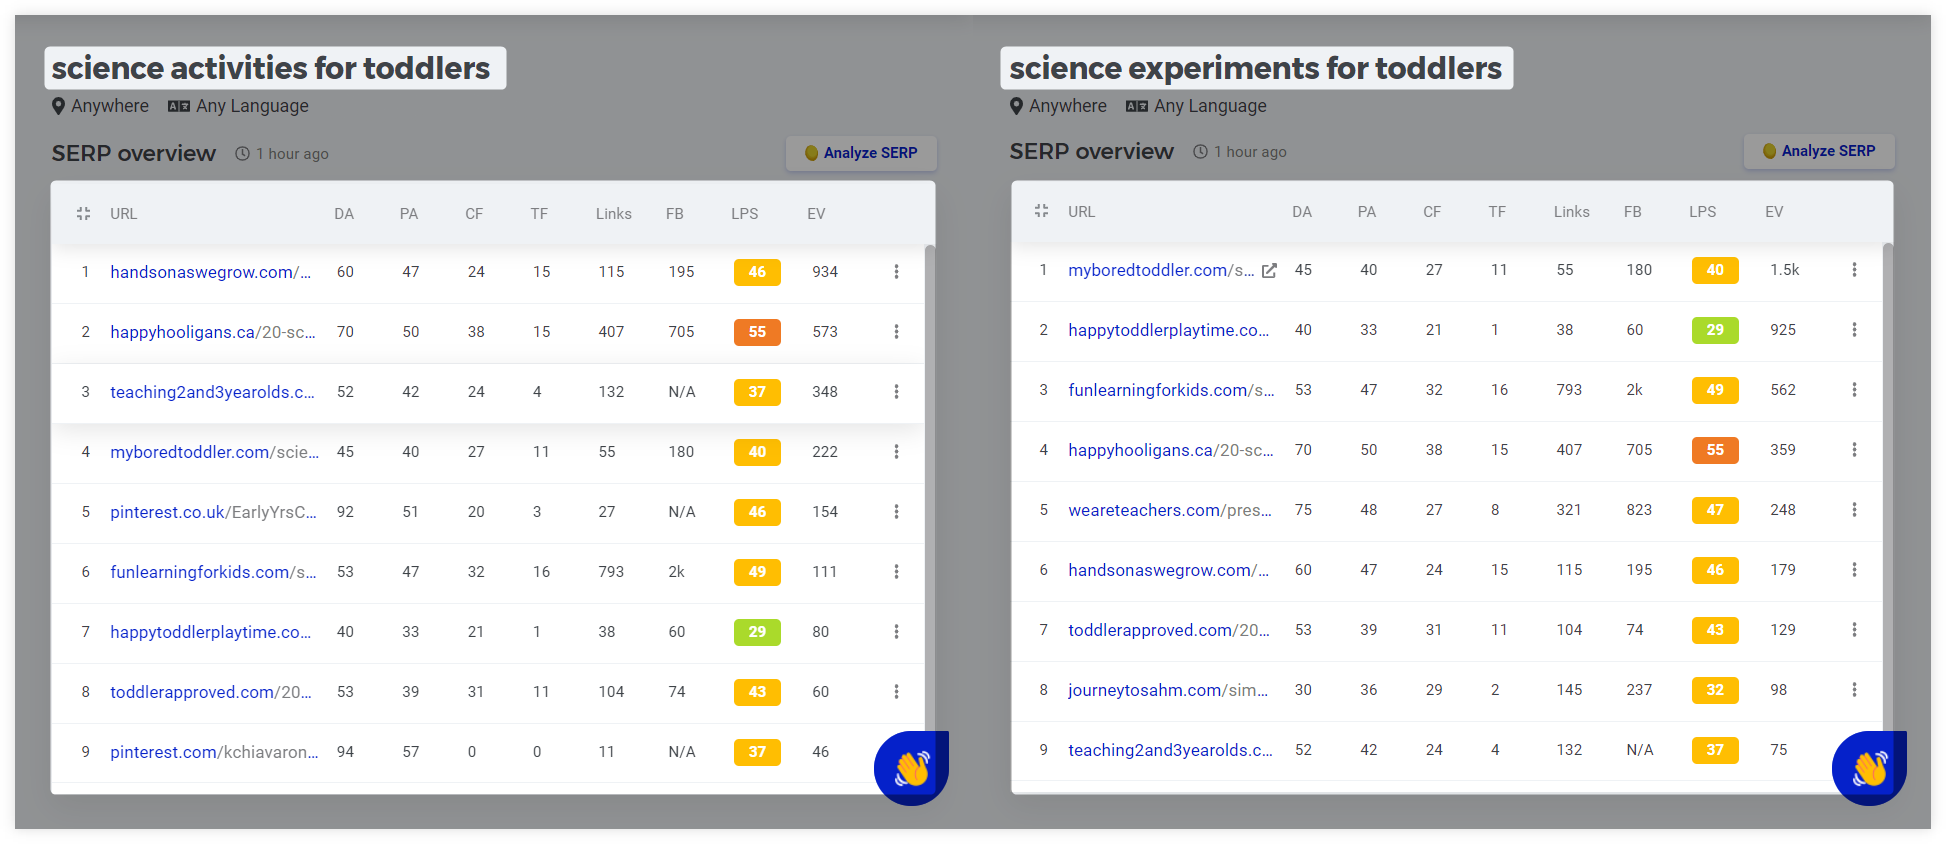
In this scenario, it is up to you to decide which of these two queries should be your main, focus keyword for the web page (based on their search volumes and keyword difficulty) and which one should be the supporting, secondary one.
Pro tip: If you are not sure which query should be your focus keyword, simply check a few pages that are ranking for your set of keywords – there is a high chance their URLs will contain the focus keyword that they initially intended to rank for (so you can use it as well).
Keep in mind though, that if you create high-quality content with one of these queries as your focus keyword, there is a high chance that your page will be ranking for others as well.
Let’s take a look at another example, this time we have queries: “home activities for toddlers” and “indoor activities for toddlers” – for some people, it might seem that these two keywords represent the same topic.
But if we take a look at the SERPs for both queries in KWFinder, they do not show identical search results, but rather a mix of the same and different ones:
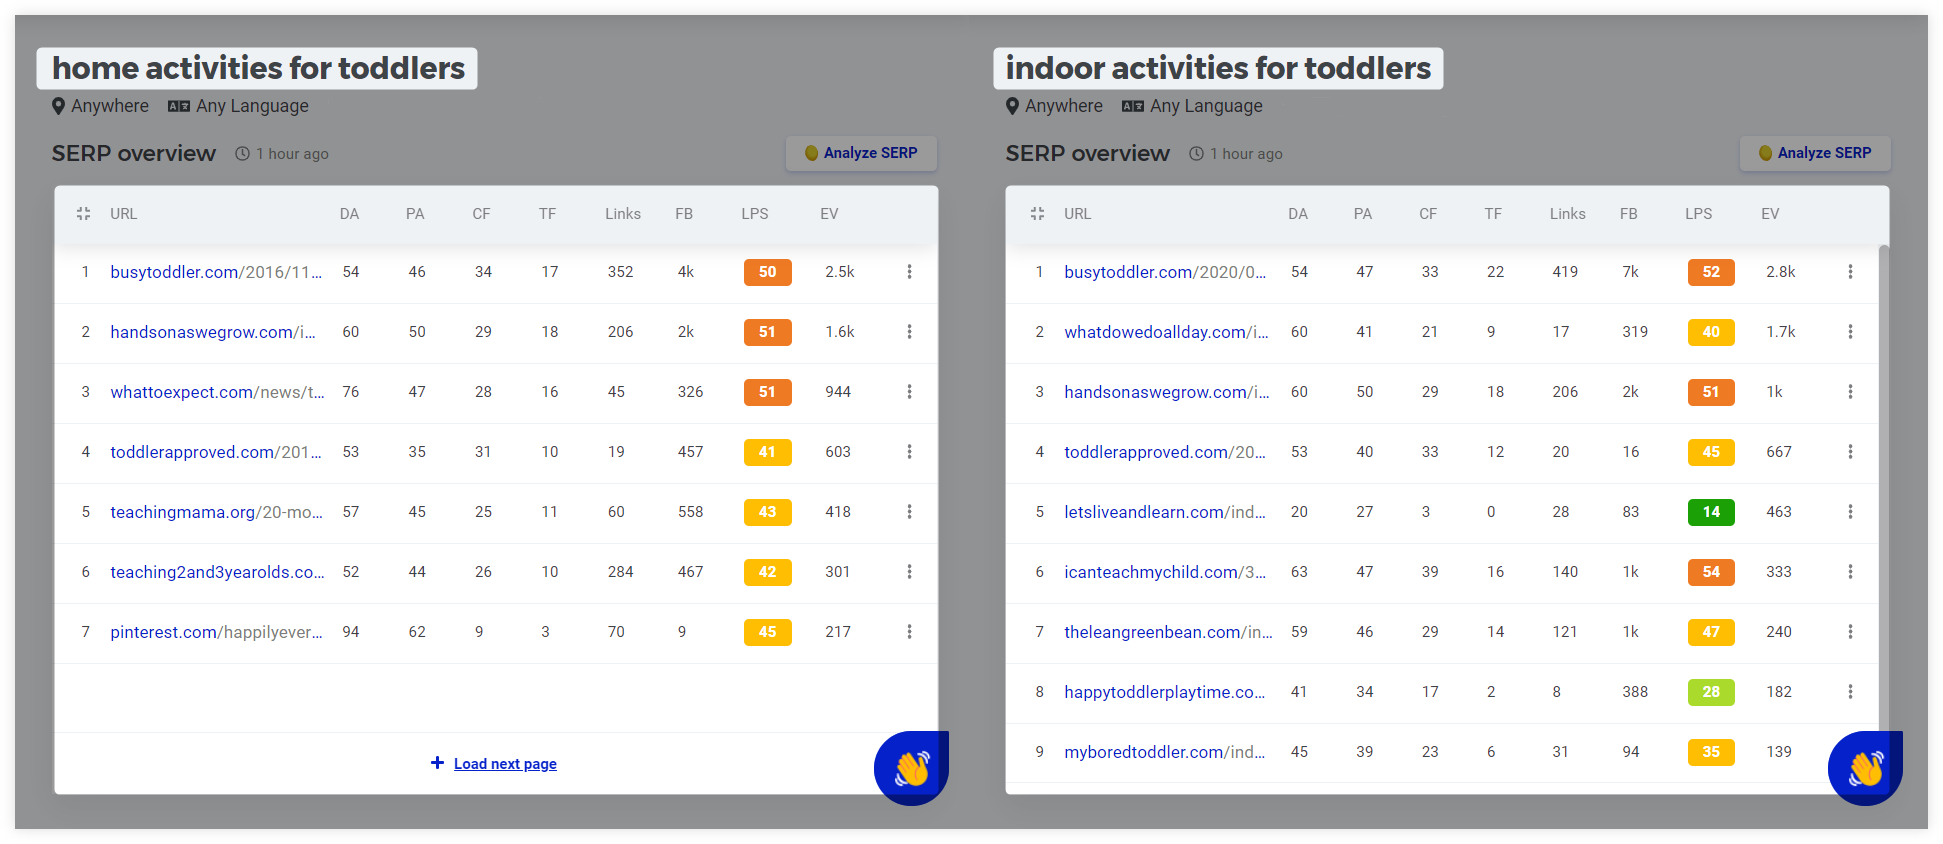
From the example above, we can see that the website busytoddler.com ranks for both queries but with different posts.
On the other hand, the website handsonaswegrow.com ranks for both keywords with the same webpage.
This scenario shows that even if 2 keywords seem to be topically identical, it is not always the case – because of that, you should always manually check what kind of content is behind every search query and even then carefully consider whether or not you should try to rank for 2 queries with the same webpage or just create a different webpage (and content) for each keyword.
If you are not sure about some set of keywords (and the topics behind them), you can make a quick check in KWFinder:
- Create a small list of keywords that you are not sure about – if it is only a few search queries, you don’t have to
- Import the keywords into KWFinder
- Check which pages are ranking for every unclear keyword
If 2 or more keywords display the same set of search results, they should belong to 1 page: with 1 query as the focus keyword and the second one as the supporting keyword.
4. Prepare potential URLs
The next step is to prepare actual URLs for your pages in the keyword map.
Every URL should contain 1 main focus keyword from the sets of keywords that you have prepared in the keyword map for every webpage.
Depending on your SEO strategy, you can either use keywords with smaller search volume (and smaller keyword difficulty) or try to rank for highly searched yet competitive queries:
There are many ways how you can utilize the data from your keyword map:
- Creating new content – the URLs you have prepared in the keyword map will dictate which content you should be focusing on next
- Optimizing pages – you can use the focus keyword with all the supporting ones in your keyword map for on-page optimization (e.g. in title tags, headings, body text, image alt texts, etc.)
- Optimizing anchor texts – the keywords in your keyword map can serve as anchor texts for every link on your website – the main benefit is that you will have a clear overview of which anchors to use for every individual webpage you are linking to.
5. Update the map regularly
Creating a keyword map and optimizing pages according to its design is not the final step – you need to regularly update your keyword map and track its performance over time.
Keywords and their trends may change over time – and so should your keyword map as well.
That is why it is important to revisit your keyword map from time to time, make additional keyword research and search for new queries as well as keep an eye on the competition.
There are also many tools that can help you track how your pages are ranking to the keywords from your map.
In SERPWacher, you can simply add all your prepared keywords from your lists in KWFInder just in a few simple clicks and see the changes in rankings for your pages over time.
You can also create individual lists for every category or even for every individual webpage to have a more granular overview of every set of keywords that you are trying to rank for.
