


Is WordPress good for SEO?
The answer is quite simple: WordPress is as good for SEO as you make it.
The whole thing is fully in your hands.
Of course, there are some things that make WordPress great for SEO, namely:
- It is designed with basic SEO and UX principles in mind
- It makes optimizing the website easy
- There’s a ton of awesome guides on how to improve WordPress SEO (like this one)
But neither of these will be enough to rank your website. You have to actively optimize your WordPress website to make it SEO-friendly.
Tip: If you’re totally new to SEO and want to get into the topic, you can also read our detailed SEO guide. There’s a short SEO quiz at the end where you can test your knowledge!
In this guide, we’ll take a look at how to do it in 8 easy-to-follow steps.
Note: A big thank you goes to SEO experts Marko Saric and Pam Neely for contributing with their own valuable insights.
1. Use a responsive WordPress theme
Google has been talking about the benefits of responsive web design for nearly a decade.
Basically, all it means is that a website is programmed in such a way that it automatically fits to any size screen.
A note about mobile-first indexing
In 2019, Google made it official: Responsive design is not optional if you want to rank.
Not only does Google expect every website to have a responsive design, but they look at the mobile version of the website when crawling and indexing the pages.
Here are some tips for building your website to be “mobile-first”:
- Make sure the website is readable on smaller screens
- Hide your navigation under a hamburger menu
- Turn disruptive pop-ups into sticky elements (e.g. notification banners, live chat buttons, newsletter subscription boxes, etc.)
Thankfully, it’s very easy to create a responsive website in WordPress. All you have to do is use a theme that’s built to be responsive and let it do the work for you.
There are a number of places you can go to find one:
Official WordPress repository
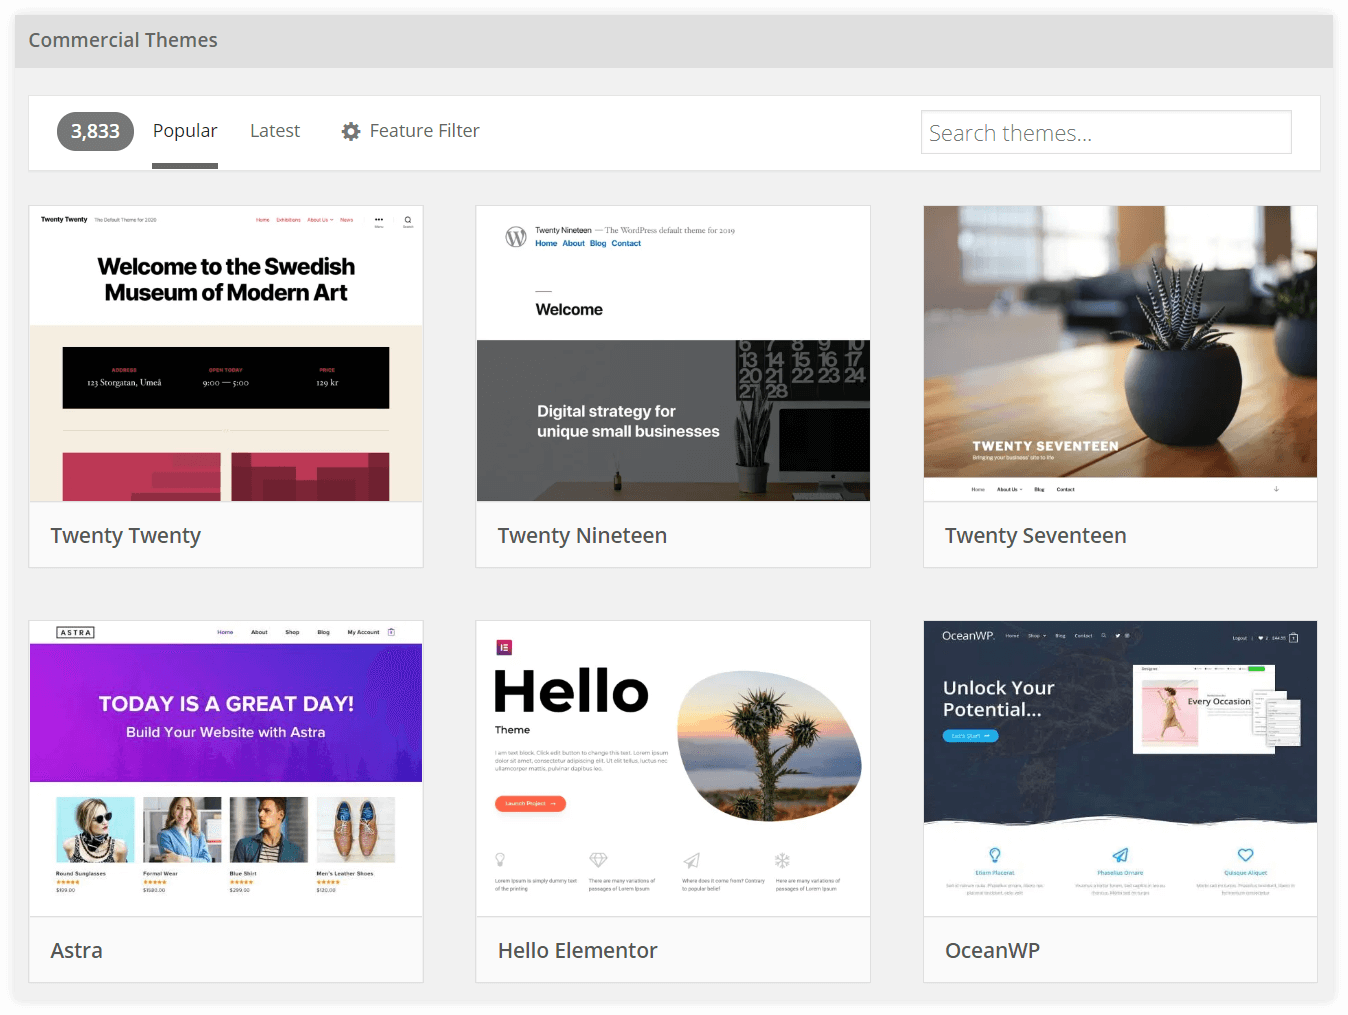
WordPress.org is the place to go if you want to save money and start with a free theme. The best thing – all the themes in their repository must be responsive.
The most popular themes are highly-customizable and fit most types of websites, so we’d recommend starting with one of the top-ranked themes.
Here are some examples:
Note: Besides the responsiveness, you should also focus on the loading speed of your WordPress theme. Selecting a lightweight, fast-loading theme is one of the key factors that influence the page speed (more on that in Chapter 6).
Premium themes
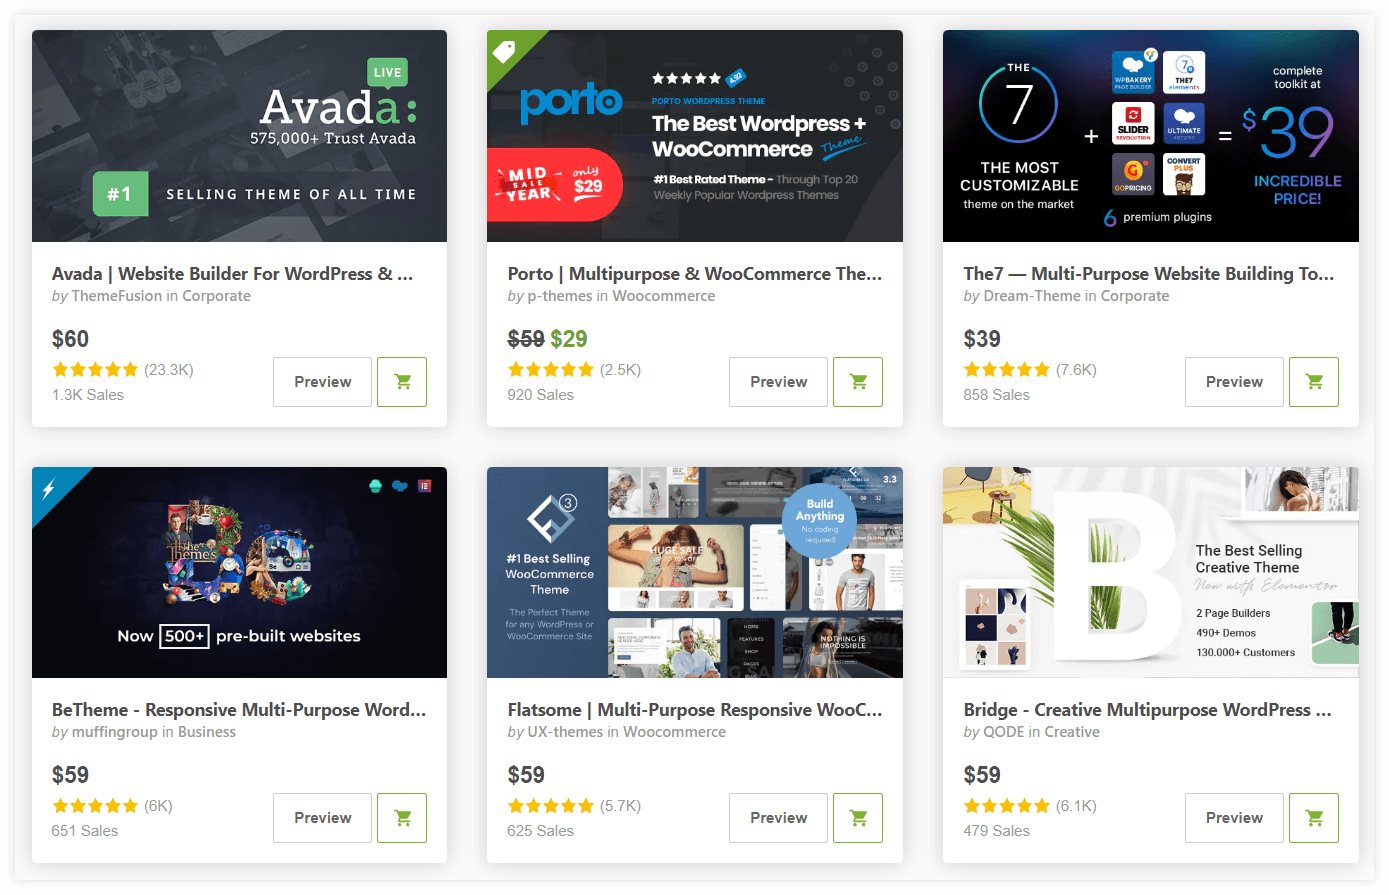
If you’re planning to ramp things up quickly with your website, you may find it beneficial to pay for a premium WordPress theme through Themeforest.
Why? Well, they often come with everything you need, so you won’t have to worry about choosing the right page builder or finding plugins to add advanced features to your site.
Themeforest keeps a running list of its best-selling WordPress themes, so we’d suggest starting with one of the most popular options.
What about page builders?
Page builders have become a popular way to get advanced designing options for your WordPress website, even if you have no coding or designing skills.
There’s a discussion about whether they negatively impact your SEO (especially in terms of site speed) or they are totally harmless.
Our conclusion is: They do impact site speed but this impact is much smaller than you might think.
In other words: You can absolutely have a well-ranking website using a page builder, as long as you stick to all the other SEO best practices.
The most popular page builders for WordPress are:
- Elementor (our favorite, powerful free version)
- Divi by Elegant Themes
- Page Builder by Site Origin
- Beaver Builder
2. Configure basic WordPress SEO settings
Every decision you make for your website and the experience your visitors go through can impact your search ranking.
Within WordPress, you can adjust various settings that affect this.
a) Choose WWW or non-WWW version
Under Settings > General, there are two fields you should pay attention to:
- WordPress Address
- Site Address
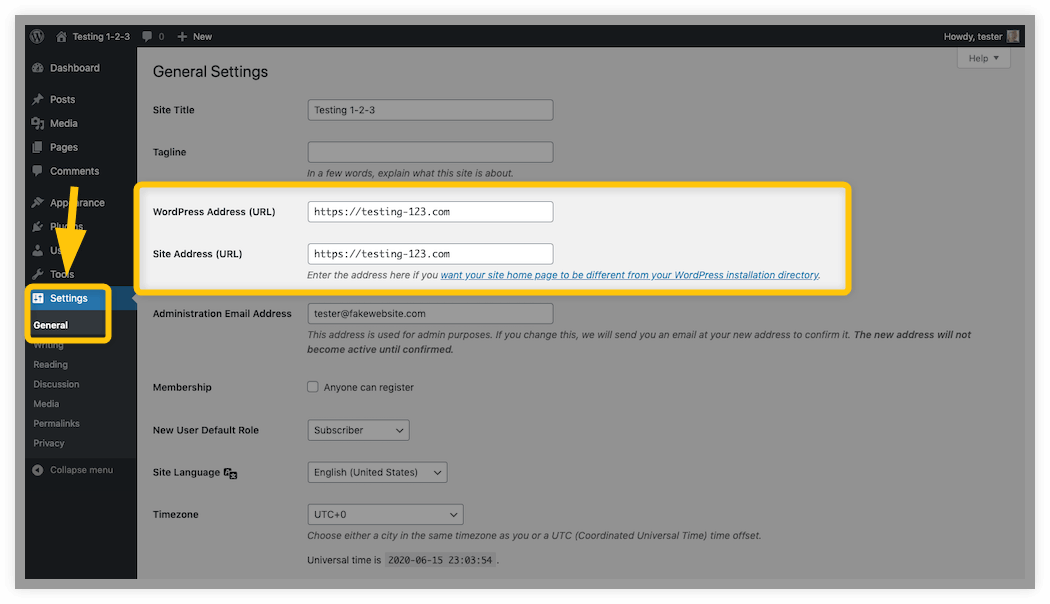
These fields should both contain your domain name and be identical. WordPress will automatically populate this for you.
Now, here’s what you need to think about:
Should your URL contain WWW after https://? Or can you skip it altogether?
Historically, website addresses all began with WWW. However, in recent years, it’s fallen away since most people just type the name of a website into their address bar.
For the purposes of SEO, it doesn’t matter so long as you pick one URL structure and stick to it.
b) Clean up the permalink structure
Whenever a new page is created on your website, it has to be given a unique name. This is how we create permalinks.
Under Settings > Permalinks, you may need to adjust how they’re structured:

There are a number of options available, but the SEO-friendly one is Post name. This does away with all the excess info, like the page number and publication date.
Note: If you run a news magazine with several posts a day, you may consider the Day and name slug version.
The goal is to keep each URL short and easy to read – both for users and the crawlers.
Let’s look at these examples:
- https://doggotreats.com/beefy-treats/
- https://doggotreats.com/?p=201
Which URL gives you a better idea about the content of the page?
c) Put strict controls on blog comments
If you decide you want to open your blog up to comments from readers, don’t let it be a free-for-all.
Unfortunately, comment spam is still a thing and very soon, your comment section would be full of these:
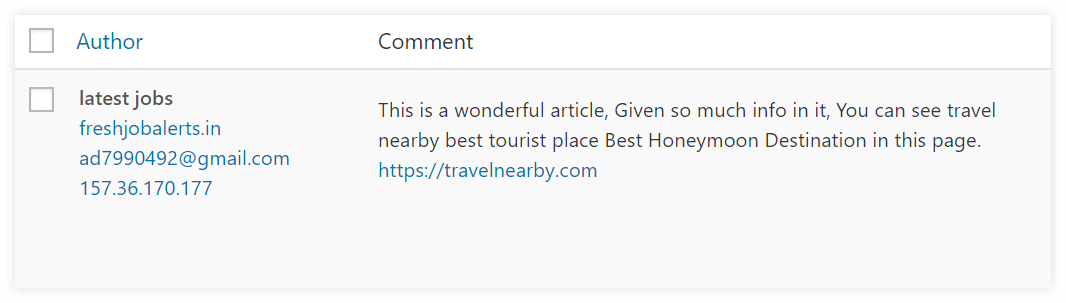
Too many spammy comments can hurt your rankings as they contain low-quality content, link to shady websites and bother your users.
Google’s recommendation in this matter is clear:
“If this feature isn’t adding much value to your users, or if you won’t have time to regularly monitor your comments, consider turning them off.”
If you want to keep the comments but prevent the spam, go to Settings > Discussion.
I know this is going to seem like extra and unnecessary work, but you should check the box next to Before a comment appears that says Comment must be manually approved.

Moderation enables you to review incoming comments before they ever get posted in order to keep the spam, hate speech, and other malicious comments from infecting your blog.
Note: Other than that, we strongly recommend installing an anti-spam plugin (such as Akismet Anti-Spam). It will automatically detect most of the spam comments so that you don’t have to mark them manually.
3. Install and configure an SEO plugin
Whether you’re an SEO newbie or a seasoned professional, using an SEO plugin ensures that you don’t miss anything critical as you build out your website.
There’s a couple of great options:
In this post, we’ll guide you through Yoast SEO as it is one of the most downloaded and well-reviewed plugins in the WordPress repository. And with good reason.
From setting up your website’s sitemap to guiding you through the optimization of each page, this plugin is powerful.
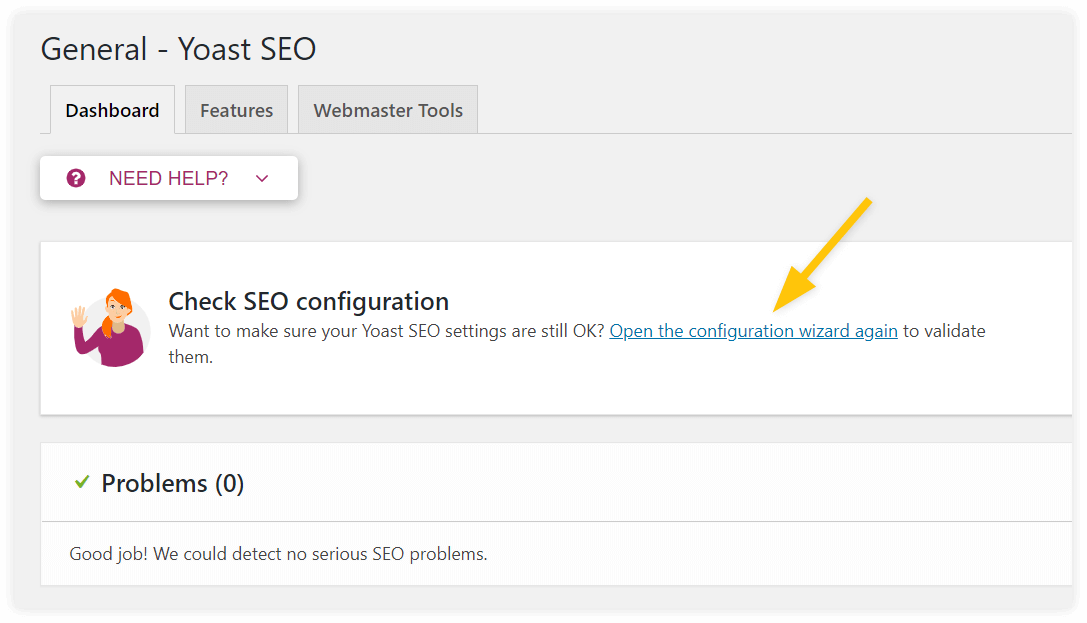
Let’s take a closer look at its Configuration Wizard:
Environment
The first slide is important as it lets Google know if your site is ready for indexing.
In most cases, you’ll want to check the “Option A”:
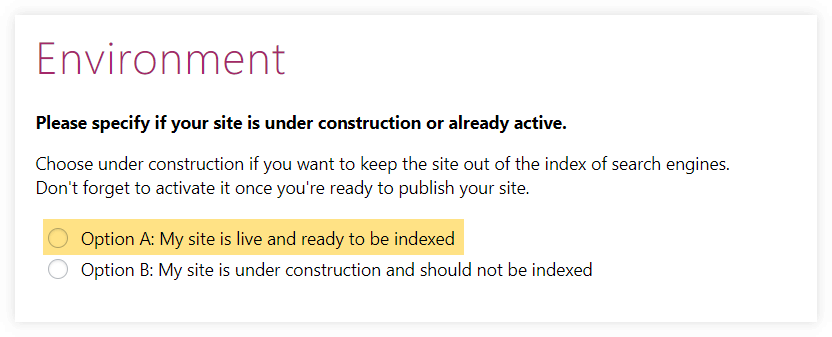
If your website’s under construction and not ready for visitors’ eyes just yet, choose “Option B”. Just don’t forget to remove this setting later.
Site type
This one’s pretty straightforward.
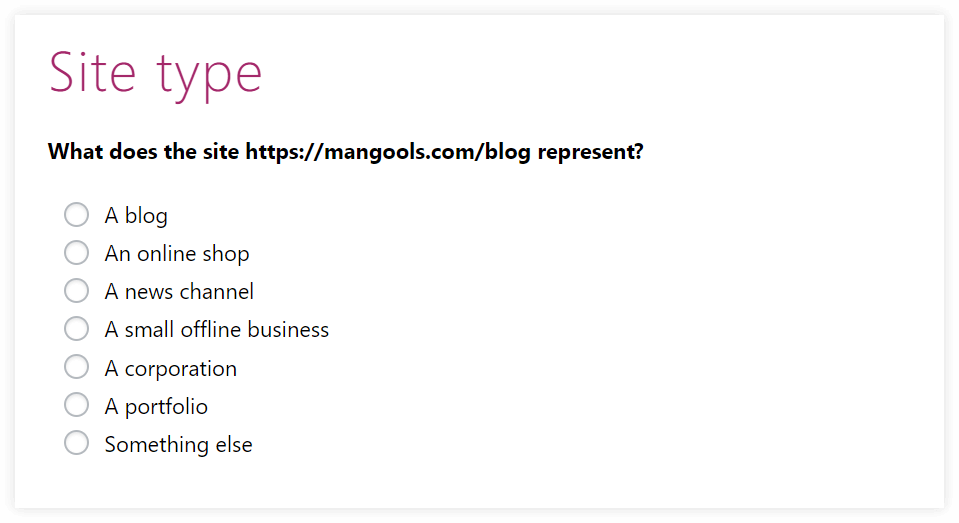
Yoast can use this information to inform Google about the kind of content found on your site and then match it to people searching for it.
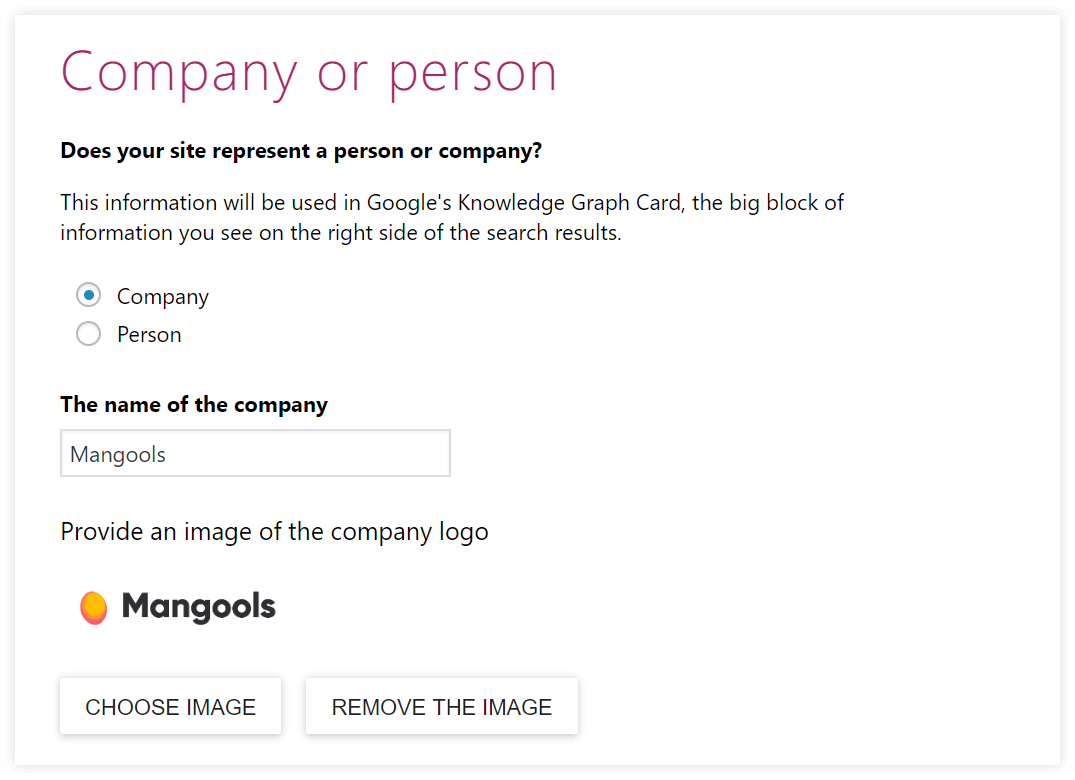
Company or person
Yoast wants to know the entity behind the website so it can better help shape your identity if Google decides to create a knowledge panel about your company or yourself.
For instance, this is the knowledge panel Google users see when they search for a person like Matthew Woodward:

The same applies to the “social profiles” fields below.
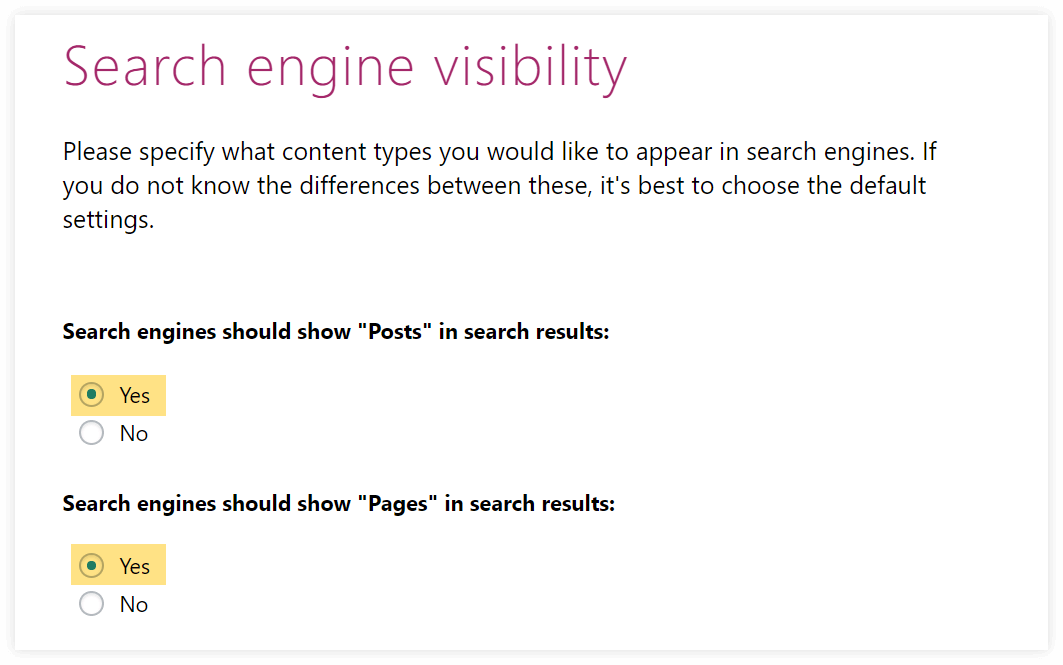
Search engine visibility
There are two kinds of content that a WordPress website is primarily built with:
- Web pages
- Blog posts
Unless your content is private, Google should be indexing your pages and posts, so make sure these are set to “Yes”.
Multiple authors
The primary reason Yoast asks this question is so it can keep a solo contributor’s author archives page from ranking.
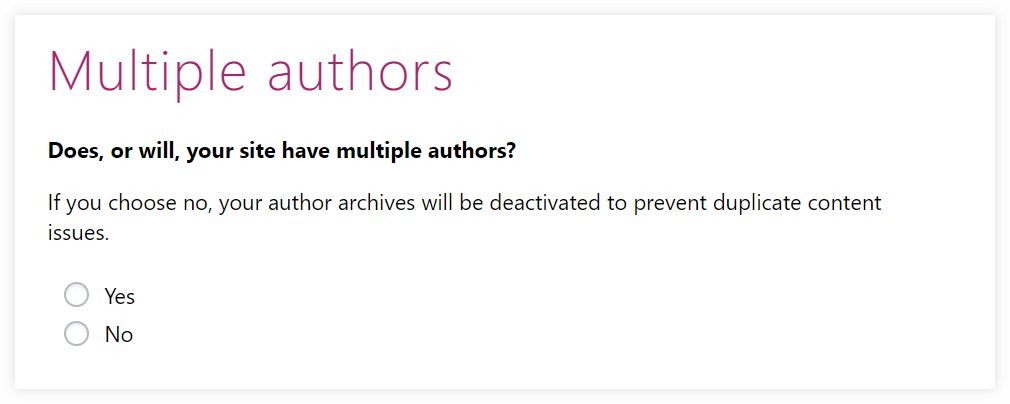
This is because duplicate content can harm your website’s rankings. And when there’s only one person creating content on the site, the blog feed essentially becomes their “archive” (making the actual Archives page redundant).
Title settings
The first thing to fill in is your website name. Try to keep it as short as possible as Google doesn’t give you much room to play with.
The second thing to do is choose which symbol separates the title from the website name. This is an aesthetic choice, so pick the separator you like the best.
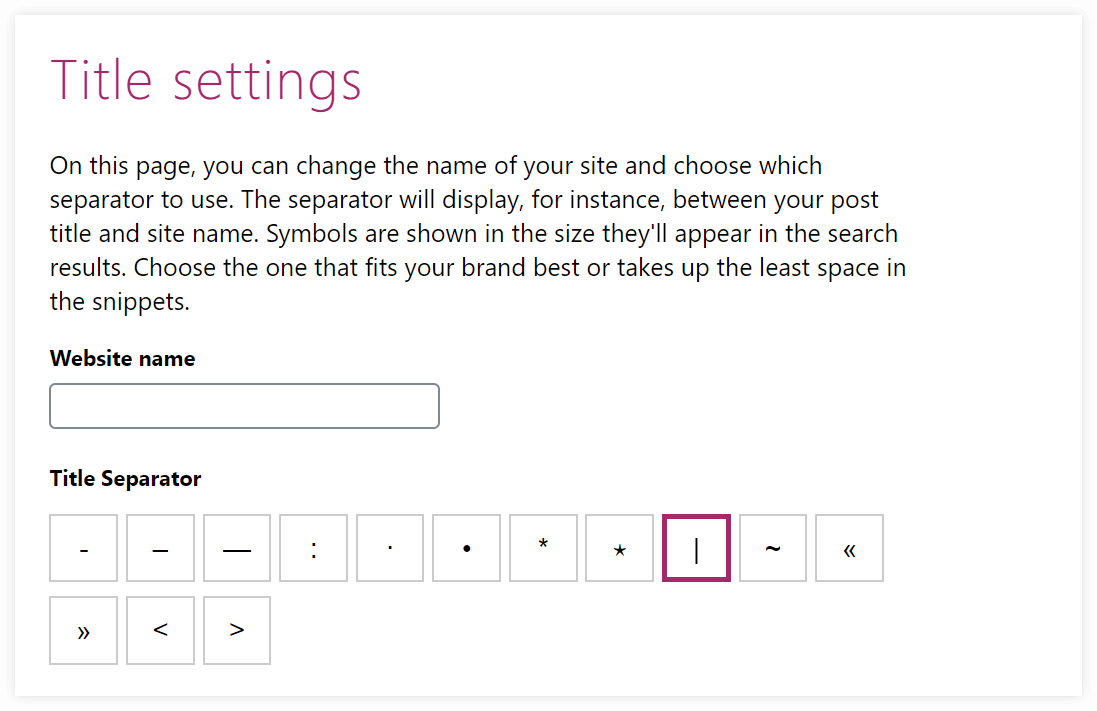
When it comes to the separator, there’s no right or wrong choice here, but Yoast helps you keep it consistent from page to page.
It’s also much easier to change it later than to rewrite each page’s title just because you want to adjust the brand name or the separator.
Note: At this point, it might be useful to mention, that installing and setting up an SEO plugin does not mean your website is suddenly “SEO-friendly”.
Many beginners think that activating Yoast SEO = “activating” SEO. They couldn’t be more wrong.
Please remember that Yoast SEO is just a tool (one of many actually), not a solution to all the SEO issues. SEO is much more than a couple of settings in the plugin.
Once you’ve completed the configuration wizard, you can always revisit and adjust your settings through the Yoast SEO plugin in WordPress.
We’ll talk about Yoast SEO plugin and its features a couple of times in the next chapters.
4. Connect your site to Google Analytics and Google Search Console
Although Google isn’t the only search engine, it’s going to be the primary driver of traffic to your site as 87% of all search traffic takes place on Google today.
Google offers two very useful tools when it comes to SEO:
- Google Analytics – an analytics tool that enables you to track the traffic and user behavior on your website
- Google Search Console – a series of useful dashboards showing you how your site is performing on Google
There are many ways to connect these two tools to your WordPress website.
Connect Google Analytics to WordPress
Go to Google Analytics, sign up with your Google account and create a new property.
Once you go through the initial steps, you’ll get to the tracking ID and the tracking code that needs to be implemented on your website:
Most ways to connect Google Analytics to a WordPress website require you to embed this code into the header of your site.
To do that we recommend Insert Headers and Footers plugin.
Once you’ve installed it:
- Open the settings page for the plugin
- Paste your Google Analytics tracking code into the “headers” section
- Save your changes
Alternatively, you can use one of the plugins that are made specifically to connect your website to Google Analytics.
- GA Google Analytics – a lightweight plugin that simply connects your GA account to WordPress and nothing else
- Google Site Kit – the official WordPress plugin by Google that is designed to connect your website to all the Google tools you might need
- MonsterInsights – a very popular plugin that comes with nice reports directly in your WordPress dashboard
Congratulations, you’ve successfully set up your Google Analytics account.
Tip: To learn more about the tool, what it does and what data it offers, check out our SEOpedia post: What is Google Analytics?
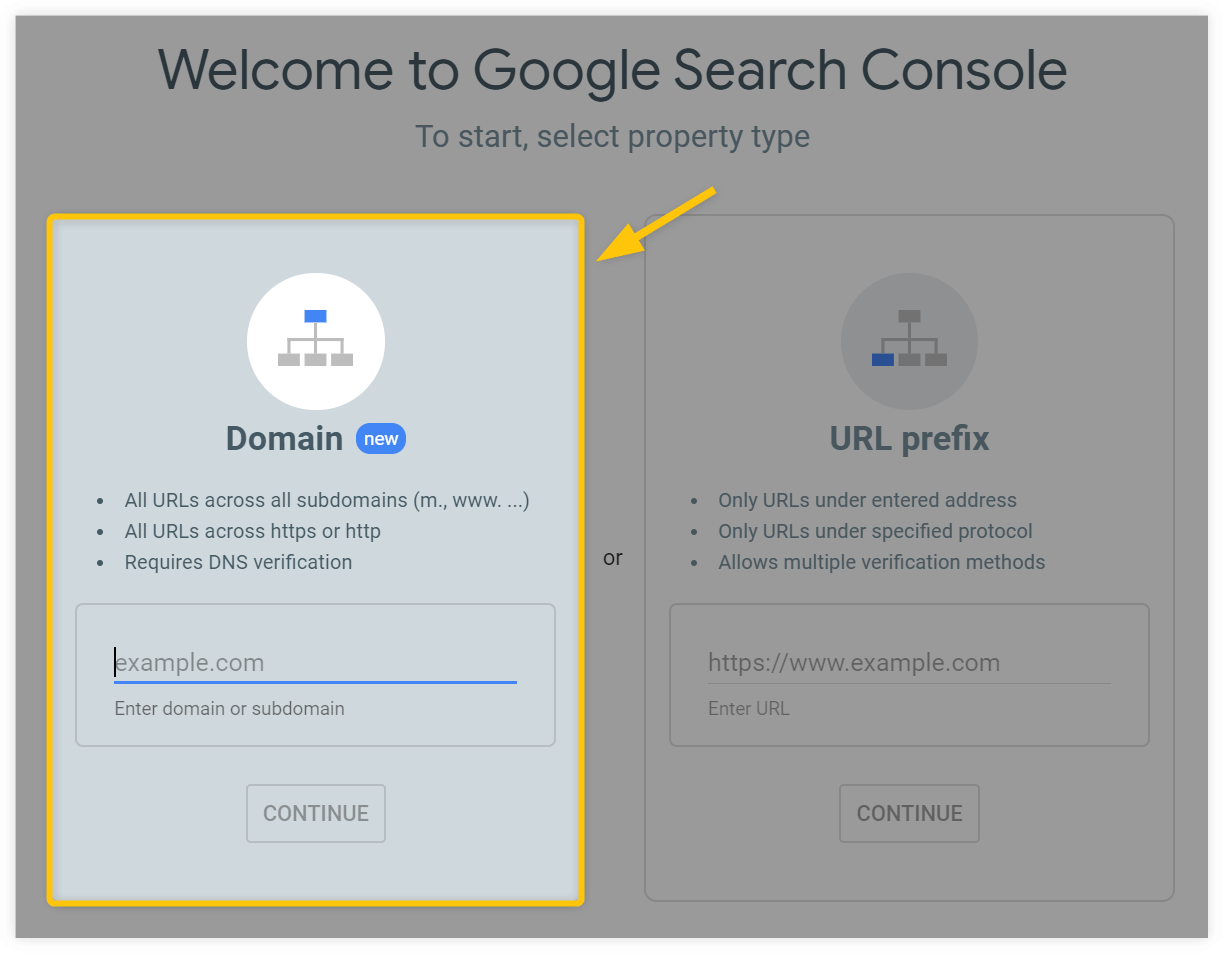
Verify your domain in Search Console
When it comes to Search Console, we recommend verifying the whole domain.
The biggest advantage is that it will include all the URLs, subdomains and web protocols (http://, https://, www, non-www).
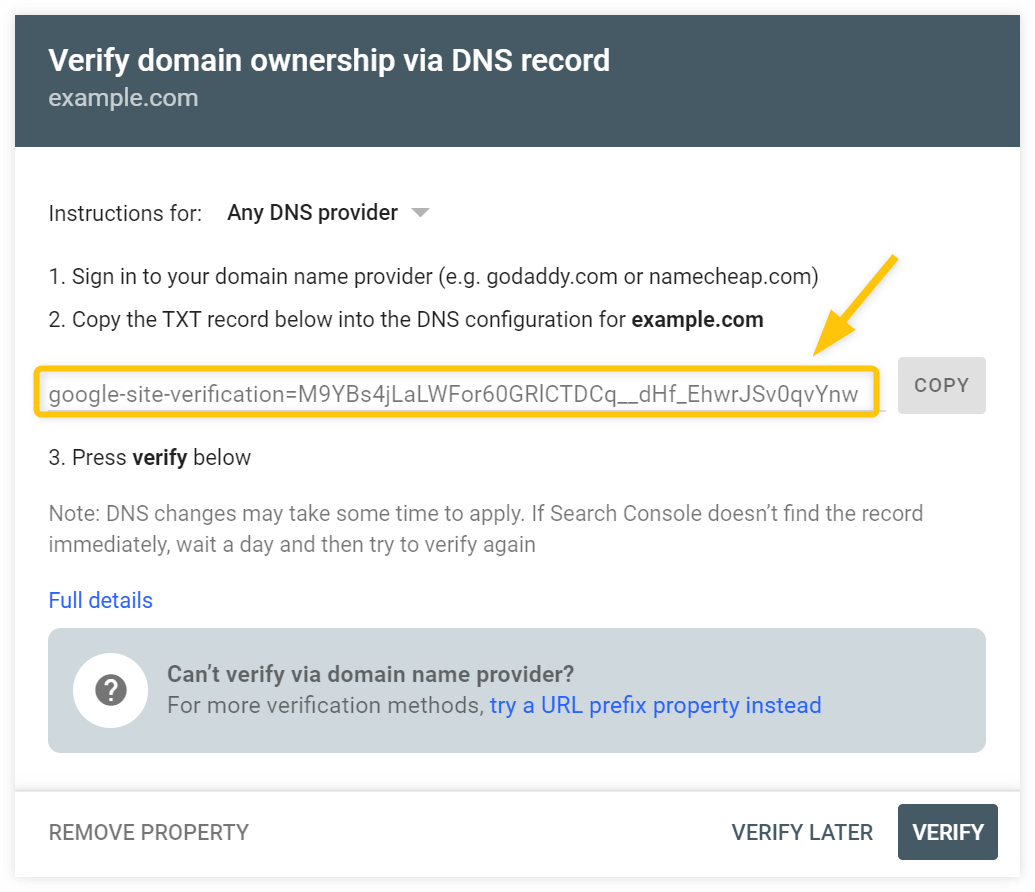
Unfortunately, there’s no plugin that can simplify the connection. The exact steps will depend on your domain provider, but in general, you’ll need to follow these steps:
- Go to your domain’s DNS record settings
- Add a new DNS record and paste the code that appeared in the Search Console
The code in your Search Console will look something like this:
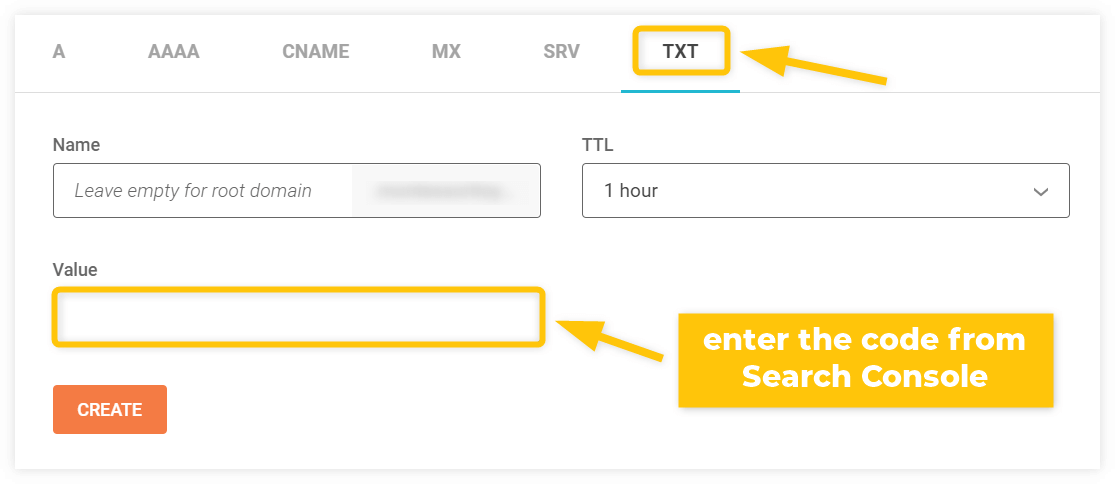
In SiteGround for example, you need to go through Websites > Choose the preferred domain and click on Site tools > Domain > DNS Zone Editor.
The process in your domain name provider account may be different, but ultimately you need to get to a “DNS editor” and create a new TXT record.
Once you added the DNS record, go back to GCS and click on “Verify”. Don’t worry if you see a message that “the ownership verification failed.”
The DNS record change may take up to 72 hours to take effect.
Submit your sitemap to Google Search Console
The sitemap is a document that tells Google:
- What content is on your site.
- Where are the links to find that content.
The best way to submit your sitemap to Google is to do so manually, so you don’t have to worry about messing with code again.
Return to your WordPress site and go to the (Yoast) SEO tab. Go to General > Features, click on the question mark next to XML sitemaps and click the link “See the XML sitemap.”
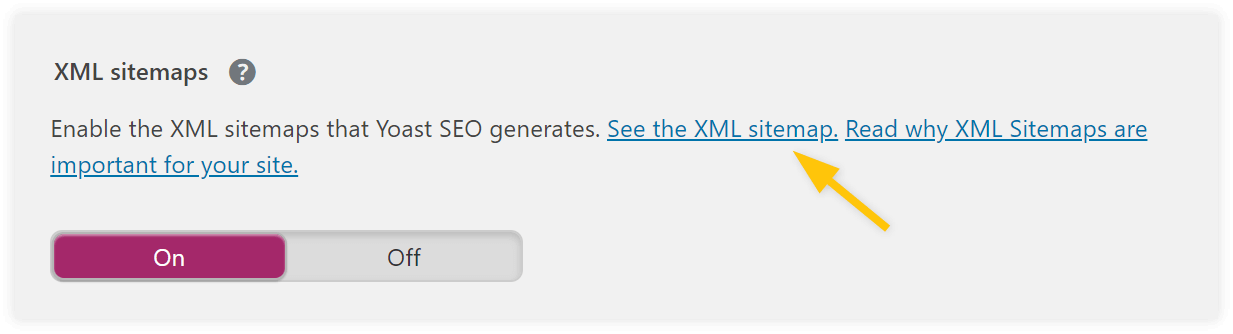
This will take you to your sitemap, which will look something like this:
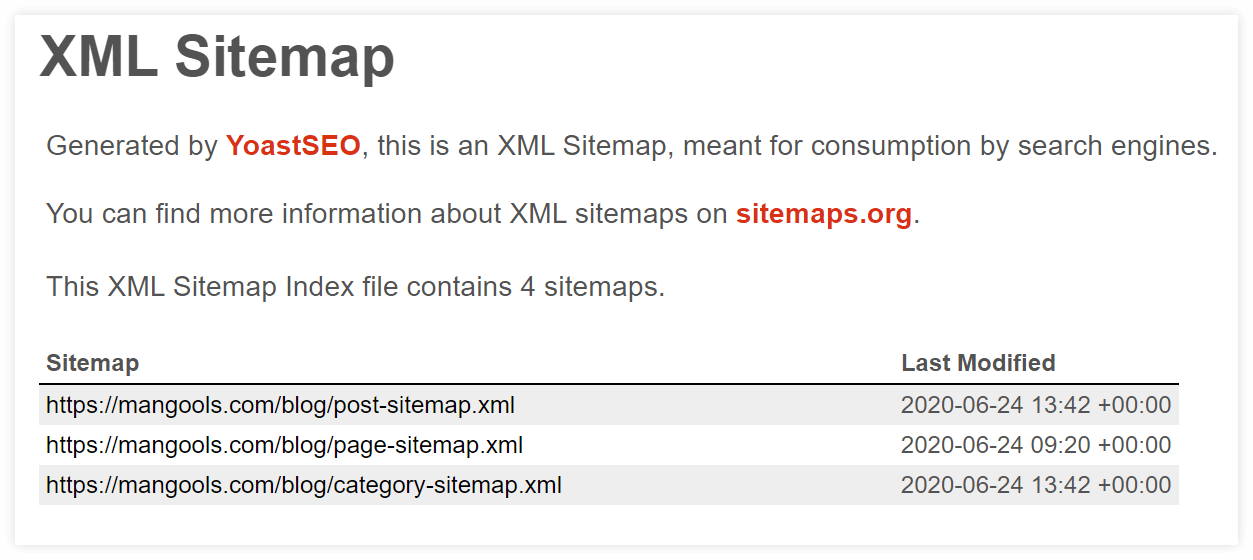
The easiest way to submit the full sitemap to Google Search Console (that includes all of the content above), is to copy the top-level link. It’ll look like this:
https://yourdomainname.com/sitemap_index.xml
Then go to Google Search Console > Sitemaps and paste it under Add a new sitemap:
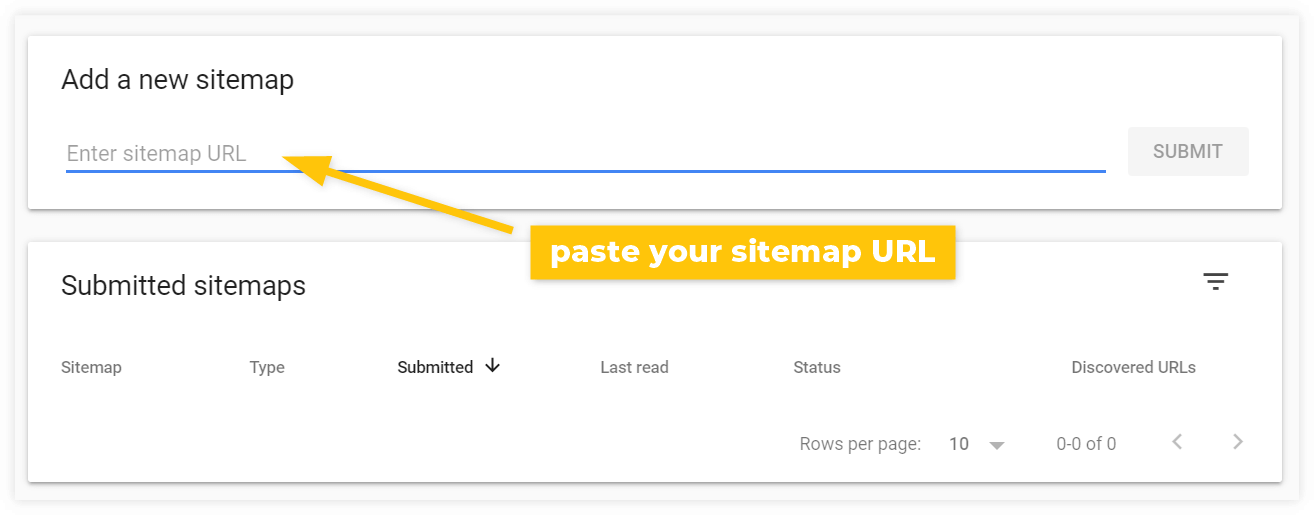
Click “Submit” and let Google do its work.
When it’s done, Google will display a success message along with how many pages it’s indexed.
Note: You don’t need to worry about re-uploading the sitemap to Google Search Console. Every time you add new content to your site, the Yoast-generated sitemap will update Google with the changes.
Link Analytics and Search Console
To connect your two Google accounts, go to Google Analytics and navigate your way to Admin. Click on Property Settings, scroll down and find “Adjust Search Console”, and then click on it.
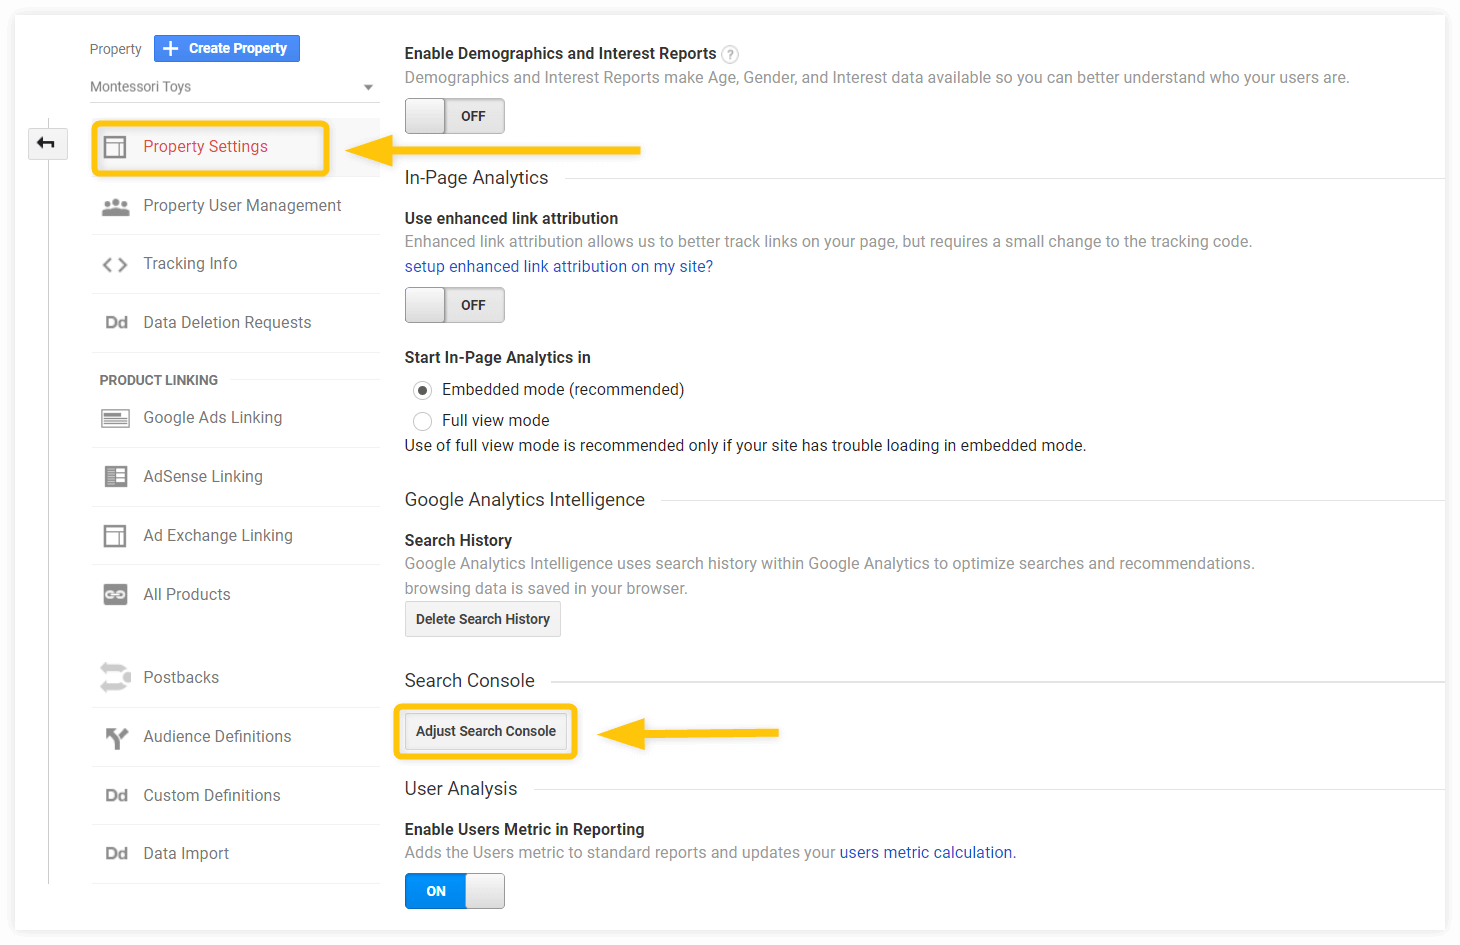
On the next page, click “Add”.
Google will then ask you to select which property you want to connect to (if there are multiple websites you created accounts for).
Select the website and click “Save”.
You’ll now have access to Google Search Console data under the Acquisition tab in Google Analytics:
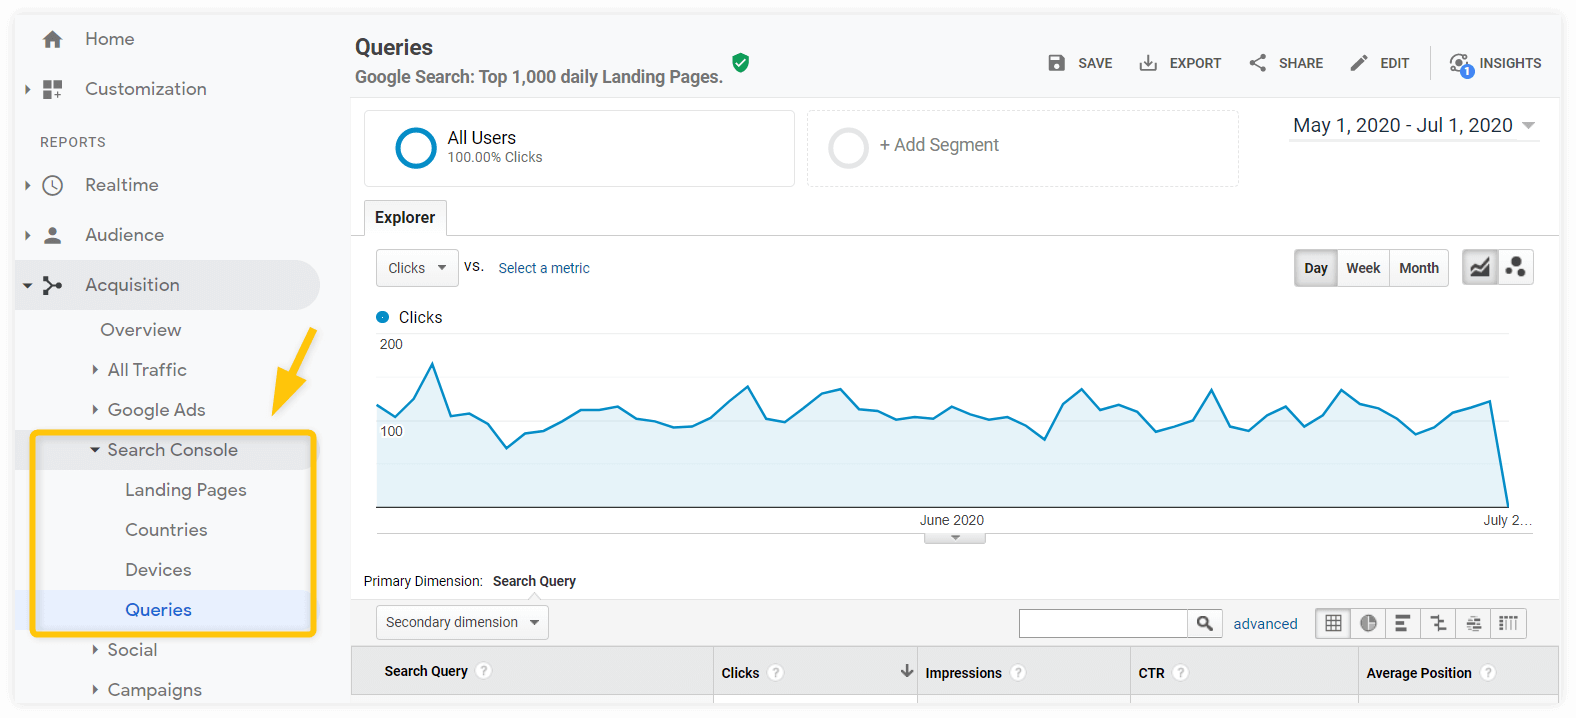
This is useful as you’ll not only be able to see how your website traffic is performing, but you can track how your website is doing in search.
Tip: If you want to explore all the possibilities Google Search Console offers, check out our guide to Google Search Console for SEO.
5. Secure your WordPress website
Many beginners don’t realize that website security can play a part in how well their website ranks in search.
Let’s take a look at some basic steps to secure your WordPress site:
Get an SSL certificate
Having HTTPS encryption on your website is a must.
It has been a ranking factor in Google since 2014. Luckily, getting an SSL certificate today is a matter of a few clicks.
What exactly is it?
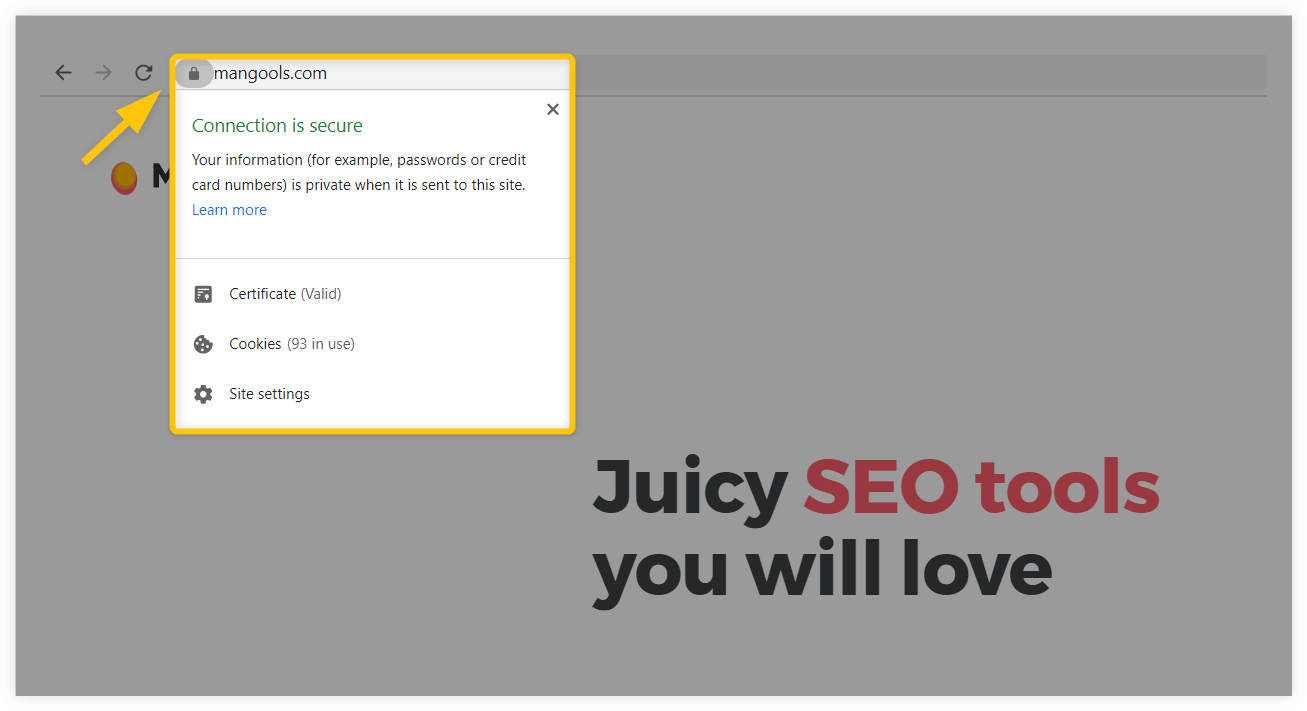
An SSL certificate is a type of data encryption for a website. Chances are good that most sites you visit have one installed. You can tell by the address bar.
The address is: https://www.mangools.com
The easiest way to find out whether the website is encrypted or not is to look for a closed padlock symbol next to the URL:
The easiest way to get an SSL certificate is through your web hosting provider as they’ll take care of installing it for you.
Let’s use the example of SiteGround again:
In the settings for your website, go to Security > SSL Manager > Install New SSL.
Select the domain and the type of the SSL certificate – in most cases, the free Let’s Encrypt certificate will be just fine for you.

Now you need to configure your website to work via an encrypted connection.
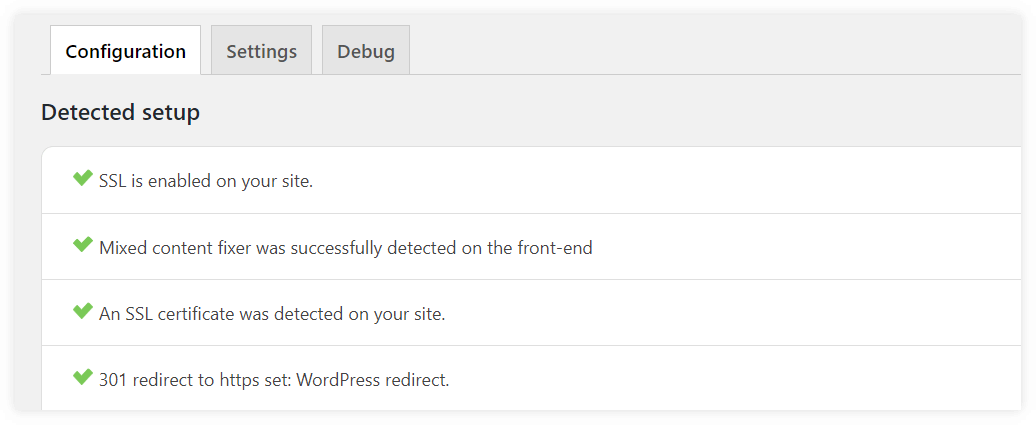
Again, it’s super easy. Install the Really Simple SSL plugin, activate it and enable SSL.
Once the plugin detects the SSL certificate you have activated through your hosting provider, it will take care of the rest.
The result will look something like this:
There are other security measures you need to take to protect all the SEO work you’ve done:
- Be careful about plugins you install – make sure the plugins you use are reliable (check how many people use them, what ratings they have, what was the last update, what company or developer created the plugin, etc.)
- Install a security plugin – the plugin will protect you from possible threads and detect any security issues. We recommend (WordFence or iThemes Security)
- Update regularly – this applies to both WordPress, your theme and all your plugins – there may be security breaches and incompatibilities in older versions
- Backup your website regularly – this is something that should be taken care of by your web hosting (make sure it is); alternatively, you can use a plugin (e. g. UpdraftPlus)
- Use a safe username and password – avoid using “admin” as your username and make sure your password is safe and unique enough
- Monitor your uptime – every website goes down sometimes so it is good to use an uptime monitoring service (UptimeRobot offers 50 monitors for free) to make sure the possible error is fixed as quickly as possible
You may ask: How does all of this affect SEO?
Well, do you think you’ll keep your rankings if your website gets hacked and doesn’t work for a couple of days?
6. Speed up your WordPress website
Google has used page speed as a ranking signal for years.
However, it made a change back in 2018 when mobile loading times began to affect how a website ranked.
This is really important as mobile sites are notoriously slower than desktop. So, extra care has to be taken to optimize your mobile-responsive website.
Use fast web hosting and a CDN
Just as your choice of web hosting plan affects the security of your website, so too does it impact its loading speeds.
While some hosting plans come with “speed-up” features, you want to first find a web host that does a good job of making your website fast straight out the gate.
Look for the following features:
- Server caching
- NGINX
- SSD storage
- Load balancing
- HTTP/2
- PHP 7.4 or later
It doesn’t need to have all these features, but it should have most of them.
You should also look for a web hosting plan that comes with a free CDN or gives you the option to upgrade to one. Here’s why:
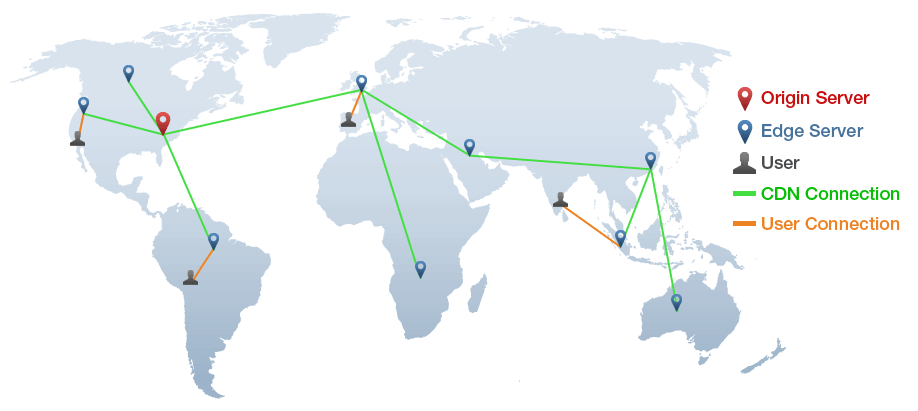
Let’s say your website is hosted at the North American server. If someone in South America or Africa visits your website, the physical distance between the server and the visitor is going to greatly slow down the loading times.
The Content Delivery Network solves this issue by caching your content on various servers across the world – thus, reducing the physical gap between your website and its visitors.
Install a WordPress caching plugin
Browser caching is a real lifesaver when it comes to increasing page speeds.
It works like this:
The process of loading the whole page only takes place the first time someone visits your website. Every other time the same visitor returns, the cached version of the website is loaded, which makes the whole process much faster.
Here are 3 popular WordPress caching plugins:
Tip: If you’re not sure how to set up a caching plugin and a CDN for your WordPress website, you have two options:
- finding someone who will help you with that (it is a question of a one time setup)
- following a detailed guide (like this step-by-step guide on speeding up the website using W3 Total Cache caching plugin and the free Cloudflare CDN service)
Optimize your images
While a caching plugin saves copies of your images along with the rest of the files it caches, it won’t optimize your image assets for you.
There are three main things you need to be careful about:
- using the right image file type – knowing when to use PNG, JPEG or SVG can save you a lot of loading time
- using the right image file size – you don’t need to use an image that is 2500px wide if the content width of your blog is 800px
- compressing the images – you can save a lot by compressing the image file size (we recommend ShortPixel)
We deal with all of these aspects in our detailed guide to image SEO.
Note: We recommend installing the image compression plugin as one of the first things to do when setting up your WordPress SEO. This way, all the images you upload will be compressed from the very beginning.
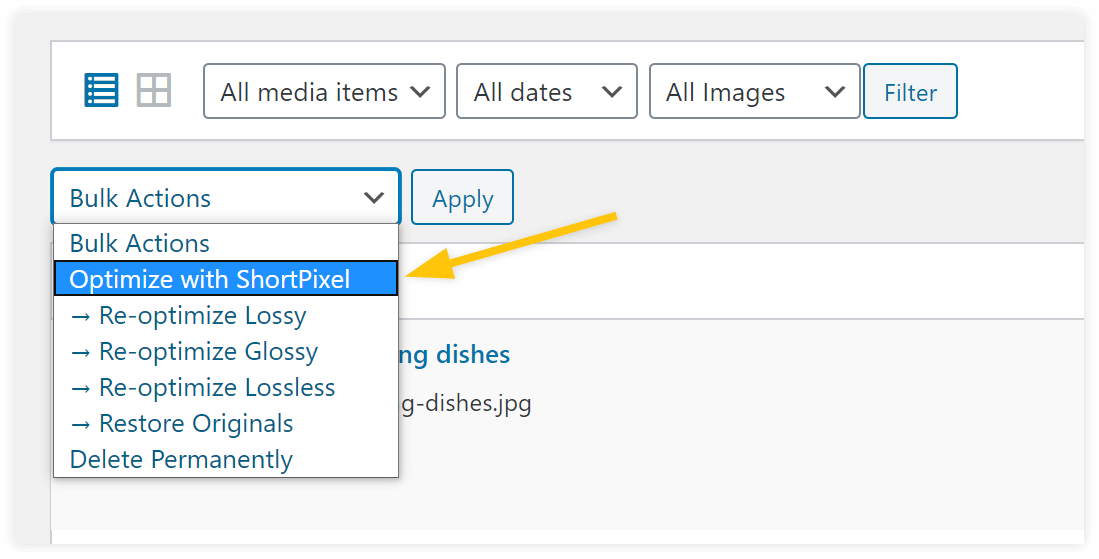
If you haven’t used a compression plugin yet, most of them will allow you to bulk optimize all your images.
With ShortPixel, all you need to do is to go to your Media library, select all the images and compress them at once:
Don’t go crazy with the plugins
Plugins are basically mini-applications that run on top of your WordPress. So they require resources to run properly.
In other words, every plugin you install can slow down your website a little more.
There’s no ideal number of plugins you should use, just remember:
- The fewer plugins you use, the better for the performance and security of your website
- You don’t have to use a plugin for every single little change on your website – always consider whether you REALLY need it
- Use only plugins from trusted developers
- Always check the rating, number of downloads and the date of the last update before installing a plugin

Expert insight
Marko Saric, markosaric.com
I love making websites lightweight, fast-loading and beautiful at the same time. There are so many wins in doing this from better user-experience, getting higher search rankings to reducing the carbon footprint of a site.
I always start this process by looking at elements a website tries to load and then work backward to decide which unnecessary elements can be removed completely and which can be replaced with more lightweight alternatives.
Some of the elements that most frequently slow down websites are:
- Images and videos: Do not use auto-play on videos. Make sure to compress all the images and lazy load them. This way only those elements a visitor scrolls down to will be loaded and not everything.
- Social media sharing buttons: First consider whether you need them in the first place as not many people click on them. If you do need them then use a lightweight, non-official solution.
- Live chat: That button that pops up in the bottom right corner of many sites is in many cases heavier than the site itself loading several scripts from multiple domains. Test some of the solutions to see how they affect your site.
- Analytics and tracking scripts: These are invisible to your visitors but can slow down a site. Consider whether they’re useful or look for lightweight alternatives (like Plausible that’s 45 times lighter than Google Analytics).
7. Create a clear structure
Now, we’re going to zoom out and focus on the structure of the website.
Nest your pages
Your website structure should be logical and there should be a clear hierarchy of pages.
For example, this is URL structure with no nesting:
- https://yourcompany.com/service-1
- https://yourcompany.com/service-2
- https://yourcompany.com/about
- https://yourcompany.com/what-we-do
- https://yourcompany.com/team
- https://yourcompany.com/blog
- https://yourcompany.com/blog-post
While this is not a catastrophe, the more logical URL structure would look like this:
- https://yourcompany.com/services
- https://yourcompany.com/services/service-1
- https://yourcompany.com/services/service-2
- https://yourcompany.com/about
- https://yourcompany.com/about/what-we-do
- https://yourcompany.com/about/team
- https://yourcompany.com/blog
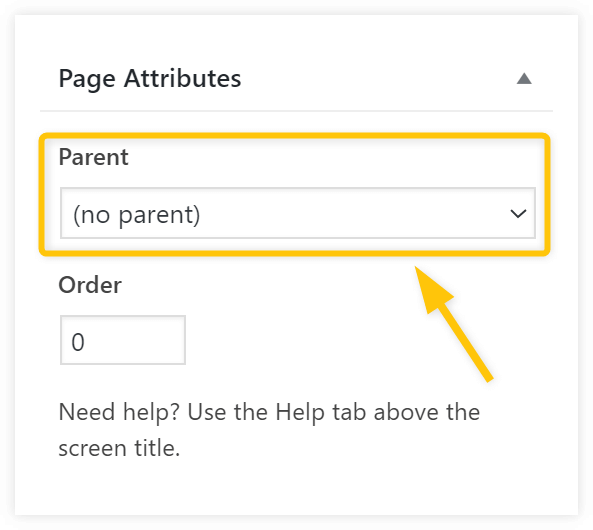
- https://yourcompany.com/blog/blog-post
To set up a parent page for a certain page, select one in the WordPress page attributes settings:
Set up your navigation
When it comes to navigation, you should follow similar principles.
To update your navigation go to Appearance > Menus:
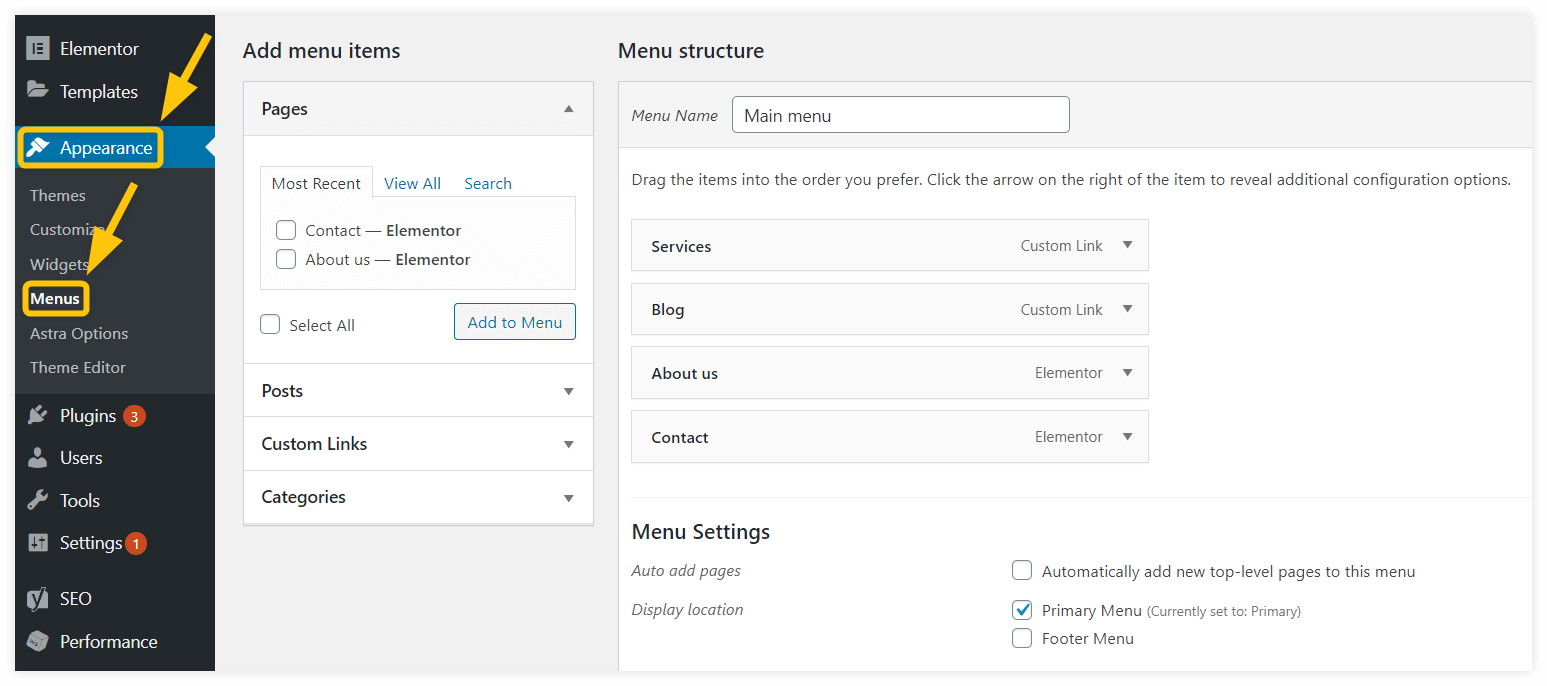
Here are some things to keep in mind as you create the pages for your site and organize them into a navigation menu:
- Create only one navigation for the header of your website – keep the navigation simple
- Don’t include the “Home” button – everyone knows the logo will take them to the home page
- Keep the top-level menu structure simple – don’t have 15 links in your menu
- Give each page a short but descriptive name – the menu is not a place to be creative with the names of the pages
- Place your links in a logical order – order your navigation pages based on popularity and importance
- Don’t go too deep with the menu – rather than overwhelm visitors by presenting them with every category and sub-category in the menu, simplify it
Use internal links
The pages on your website should never be like islands that stand all on their own.
They should naturally connect to one another:
- giving visitors a reason to further explore what you have to offer
- making it easier for crawlers to explore your content
The rule of thumb is: A user of your website should be able to find any information with no more than three mouse clicks from the homepage.
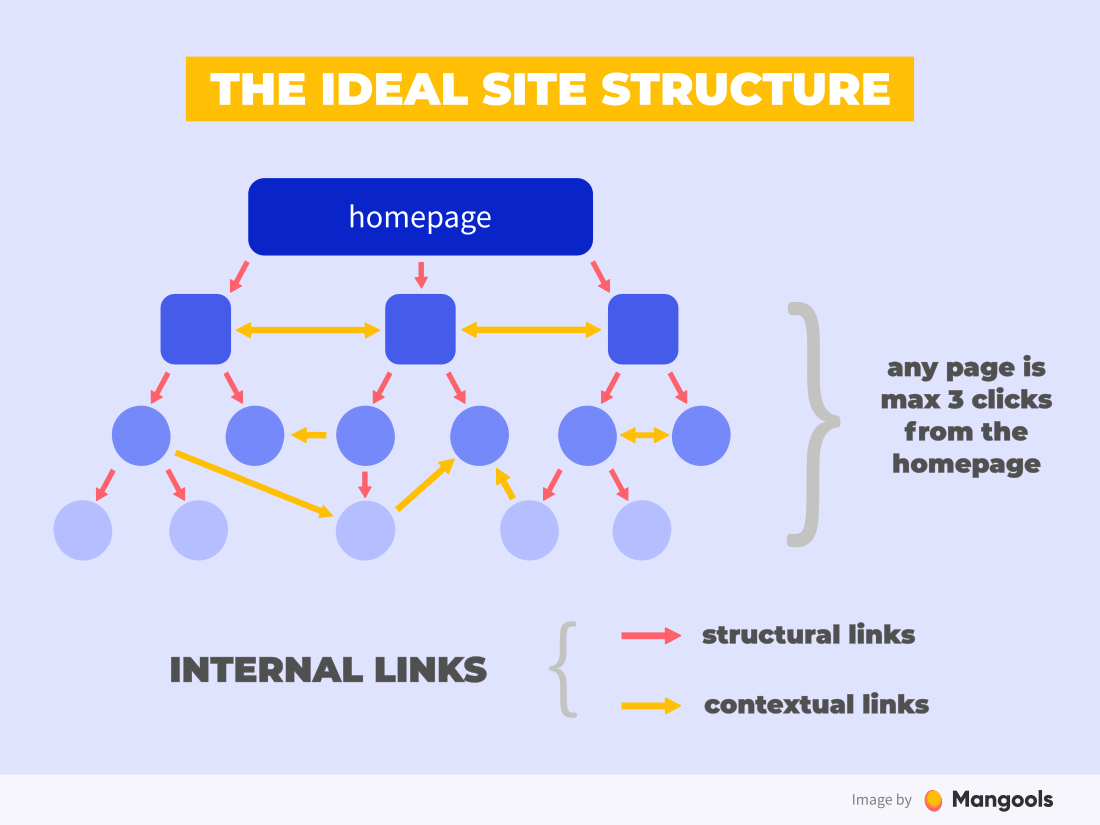
Besides the navigation, there are other ways to create internal links on your website.
Anytime you publish a new piece of content:
- link to other relevant articles on your blog
- find older posts that can link to your new piece of content
Make internal linking part of your content strategy.
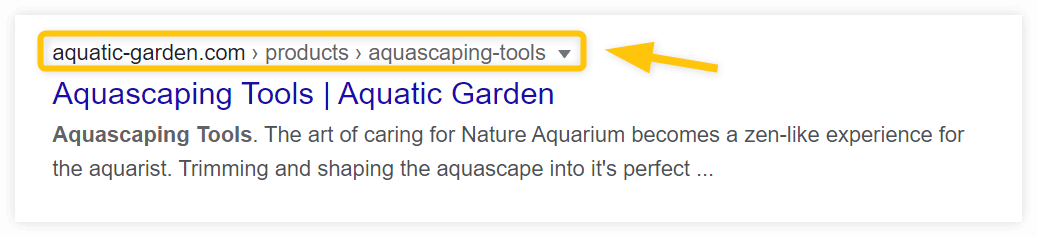
Use breadcrumbs
If the navigation is the primary menu visitors use to get around your site, think of breadcrumbs as the secondary navigation.
This is what breadcrumbs look like:

Using breadcrumbs has many advantages:
- it gives your visitors a quick look at where they are on your website.
- it gives them an easy way to backtrack if they want to go back more than one level
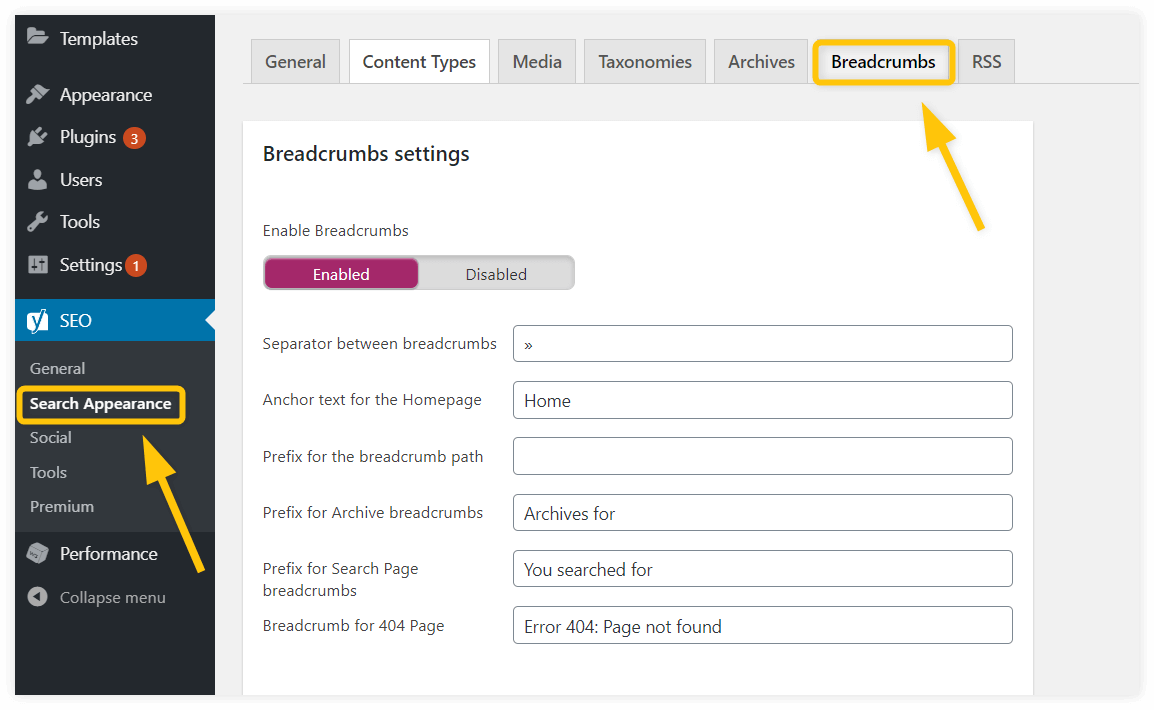
They can even appear in your SERP snippet:
To enable breadcrumbs in SERP, go to your Yoast plugin. You’ll find them under Search Appearance > Breadcrumbs:
Use categories to organize your blog
If you have a blog or store on your website, it’s very important that you use categories. They act like the navigation for your blog.
So, really, the same rules should apply:
- Keep categories to a minimum
- Label them clearly
- Don’t include vague or useless categories (like the default “Uncategorized”)
To build out your categories, go to Posts > Categories and add them there. Or, if you have an e-commerce site, go to Products > Categories:
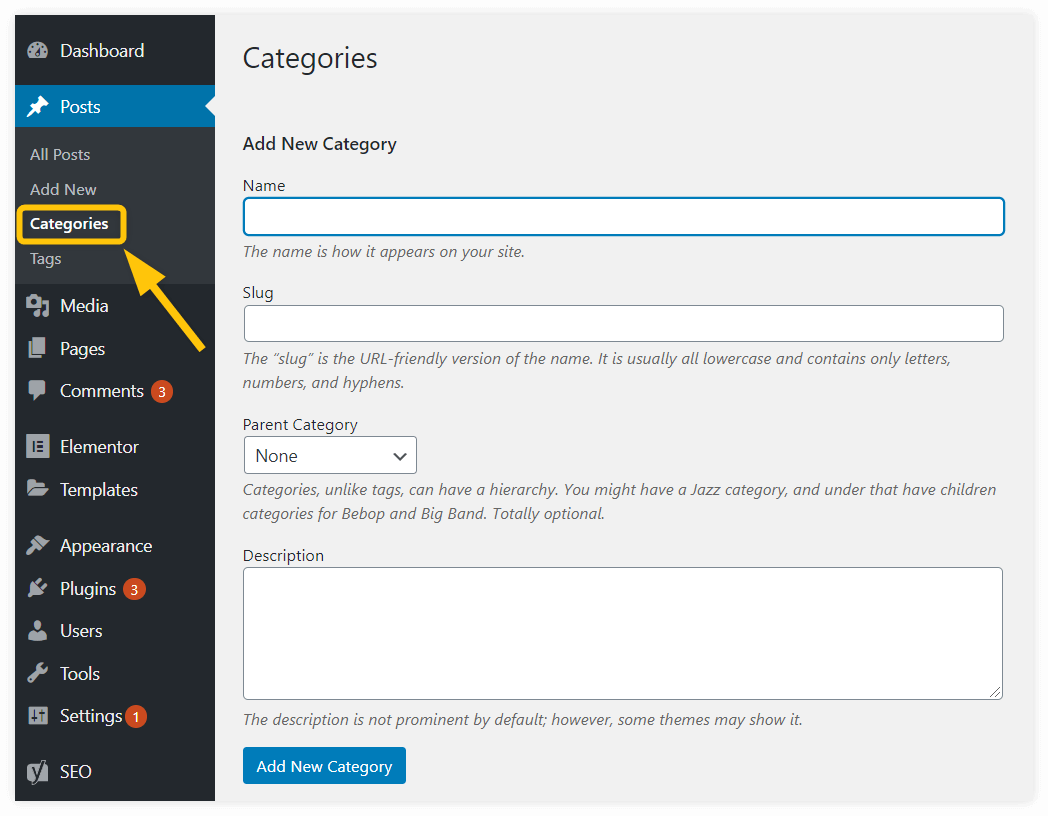
Just like the pages of your website or the individual blog posts themselves, your blog categories can rank in search.
So, take some time to build out the category pages:
- Create categories that you know people actively search for and need information on.
- Write a slug that echoes the category name and is easy to recall.
- Click into each category and fill in the corresponding metadata for each to improve their chances of ranking.
Once your categories have been created, you can start applying your blog posts to them in the editor.
What about tags?
Tags are similar to categories in that they give you a chance to better organize your blog content. But they’re not meant to cover the broad topics of the site.
They’re more like smaller topics and keywords found within each post. You create them in the same way you do with categories.
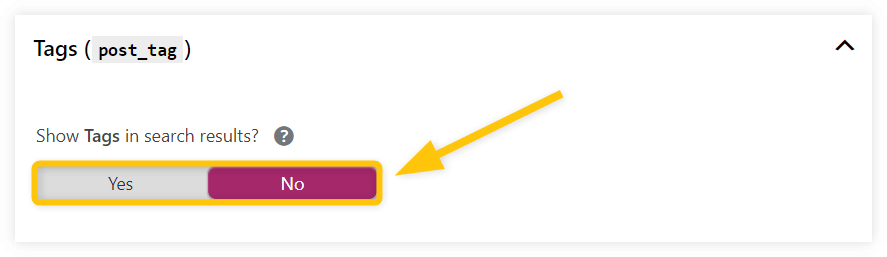
We have two recommendations when it comes to tags:
- Use them only if you have a content-rich website with hundreds of posts on various topics
- No-index your tags pages as they are a low-value content
You can do the latter in Yoast SEO settings: Search Appearance > Taxonomies > Tags > Show tags in search results? No.
8. Optimize your content
Most of the previous tips were about things you need to set up once when creating a new WordPress website.
Now it’s time to take a quick look at content optimization principles you need to apply every time you create a new piece of content.
Let’s dive in.
Select a focus keyword
Each page of your website should be targeted at 1 focus keyword.
The focus keyword represents the topic of the page and the main phrase you want to rank for with that page.
When it comes to picking the focus keyword, you should always care about 3 aspects:
- Popularity – What is the search volume and overall search trend of the keyword?
- Difficulty – Will you be able to rank for the keyword?
- Relevance – Is your content in accordance with the search intent behind the keyword?
If you want to learn more about keywords and how to find them, we strongly recommend our Ultimate guide to keyword research.

Expert insight
Pam Neely
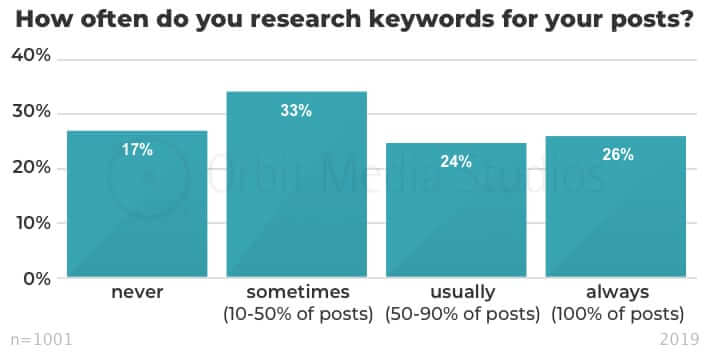
Picking a focus keyword makes a huge contribution to the success of your content. But only half of the bloggers research keywords when they write their posts.
That’s according to a recent survey of over 1,000 bloggers from Orbit Media.
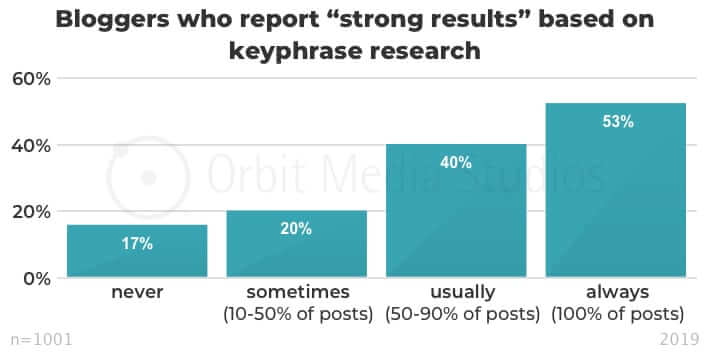
We aren’t recommending keyword research just to give you something extra to do, either. Bloggers who report “strong results” from their blogs tend to do keyword research. In fact, there seems to be a direct correlation between successful bloggers and keyword research.
If just the term “keyword research” sounds kind of tedious, take heart: Keyword research really isn’t all that hard. There are a bunch of great tools that make it really easy.
Also, don’t shy away from keyword research because you think it will limit your creativity or your content development. Sure, keywords do provide some guardrails for what a piece of content will be about, but those guardrails can help you focus on what’s important to your readers.
Keyword research is also a terrific way to develop new content ideas. I don’t know of any blogger who doesn’t get at least a couple of content ideas every time they play around with a keyword tool.
Have a clear structure
Your content should be structured clearly.
Every time you start writing a new article, prepare an outline that makes sense on its own.
Then use headings to reflect the outline in your content.
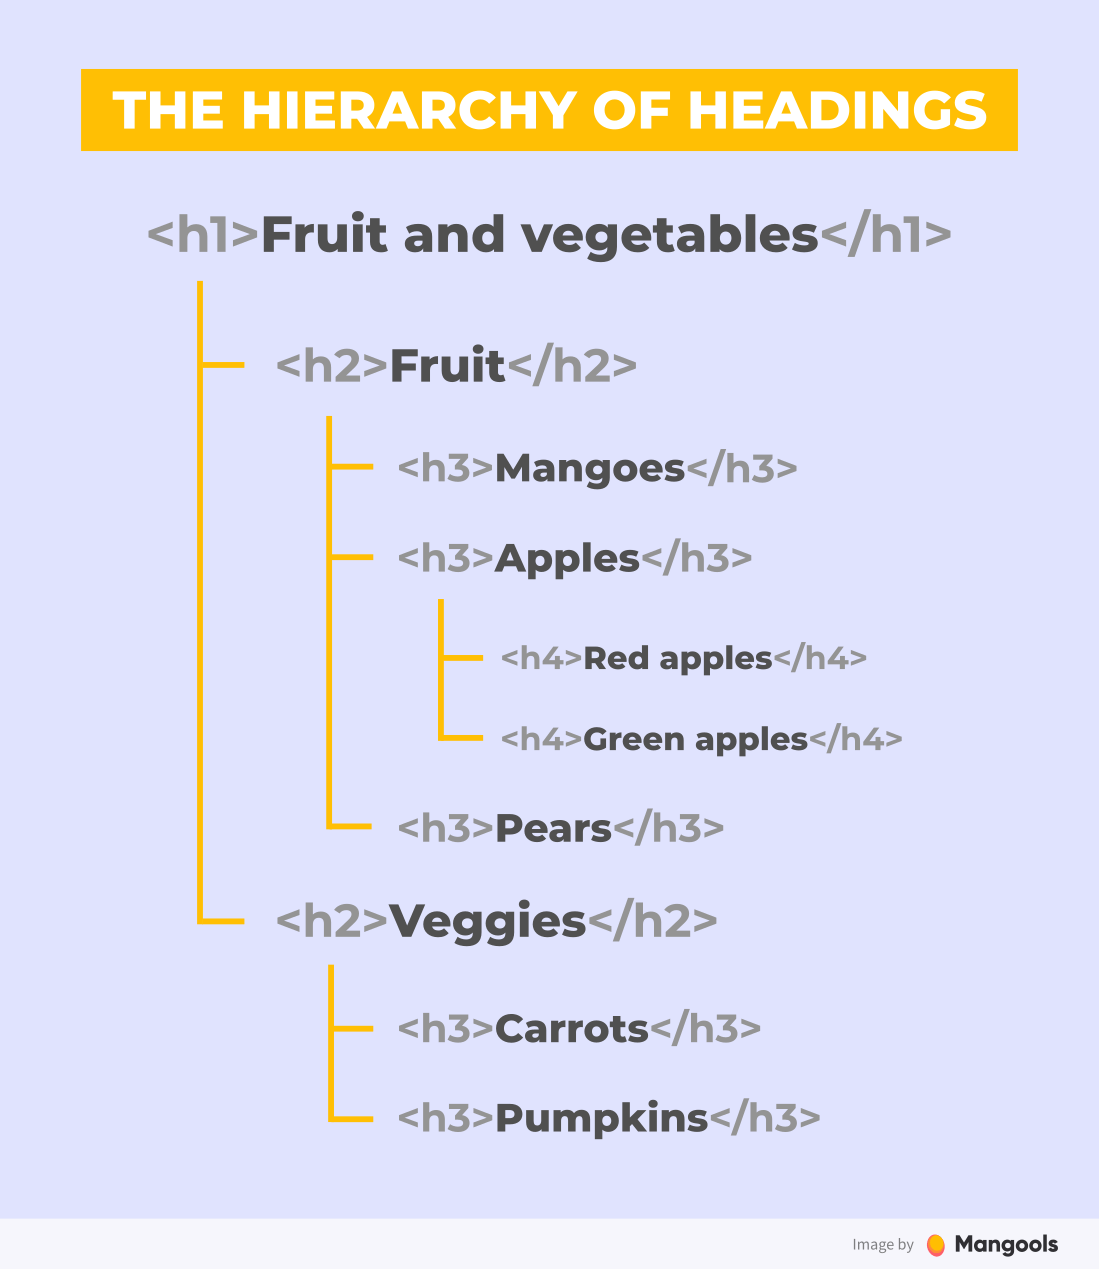
Don’t forget that the H1 – H6 headings are not made for stylistic purposes. They’re semantic tags that help your visitors and Google understand the hierarchy and the structure of the ideas in your post.
Tip: When you open a page or post in WordPress, click on the “Content structure” icon in the top-left part of the editor. (It’s the circled “i” icon.)
This is what you’ll see:
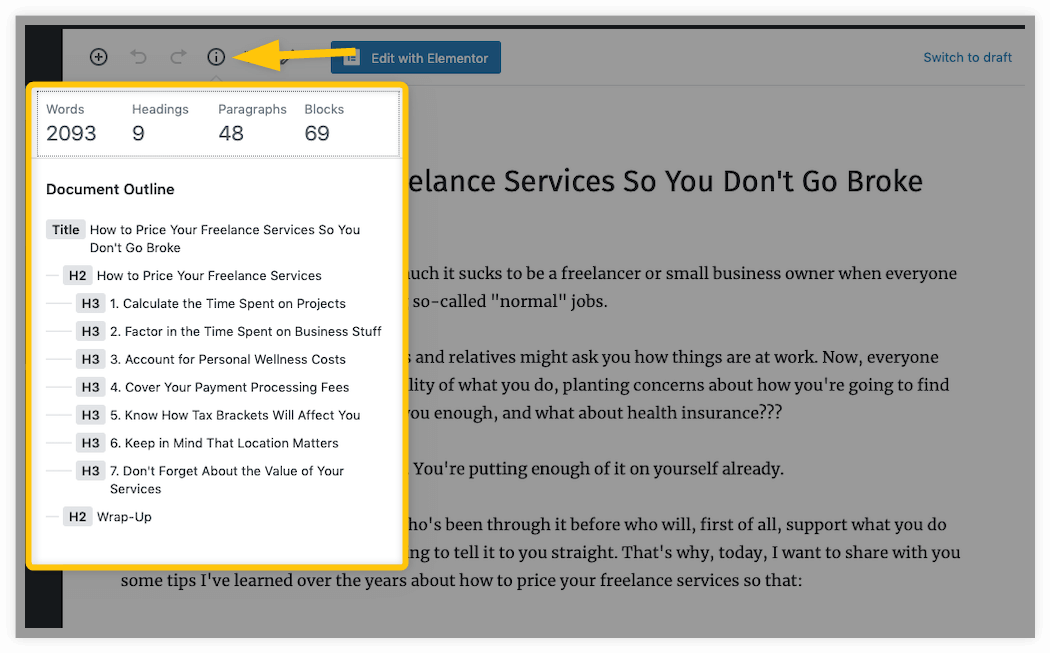
Make sure the outline has a logical structure and makes sense.
Write scannable content
When you create content for your site, you’re creating it for two parties:
- Your target audience
- Google’s bots
As a result, you need to write your content in a way so that both can easily “read” it. To do this, pay attention to both the quality of the content as well as how you structure it.
The Nielsen Norman Group has conducted eye-tracking studies for decades. The purpose of these studies is to figure out which parts of web pages people actually pay attention to.
For example, this is the F-pattern:
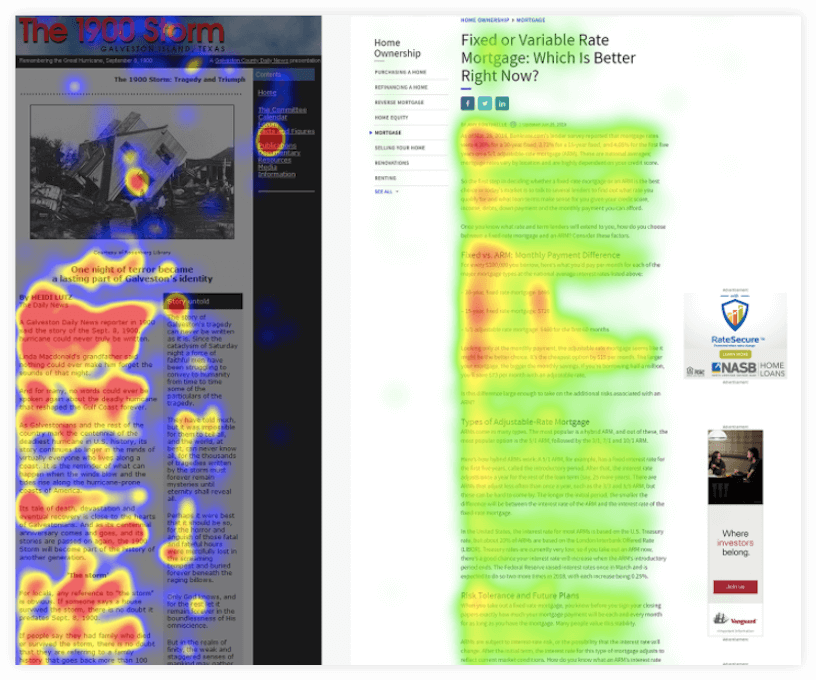
Notice how users’ attention is very strong around the first paragraph on the page? This is the top of the “F”.
Their attention wanes a little bit as their eyes scan downwards. They refocus upon reaching the first bolded header. This is the second horizontal arm of the “F”.
What does it mean for you?
- You need to catch the readers’ attention as soon as possible
- You need to engage them with various elements to keep their attention for as long as possible
Nobody likes walls of text.
Use these elements to break the text and make the text scannable:
- headers and subheaders
- bolded text
- images
- quote blocks
- highlighted text or callouts
- bulleted or numbered lists
- table of contents
- relevant links
Pages also become less intimidating to tackle when you use shorter sentences and paragraphs. Typically, you may want to keep each paragraph under three lines.
Note: All these tips focus on the formal aspect of creating content. Of course, SEO is much more than that.
If you want to learn more about creating an SEO strategy that revolves around quality content, read our post on a 7-step SEO strategy to get more organic traffic.
Write image alt texts
All your images that carry some important information should have a descriptive alt text (alternative text).
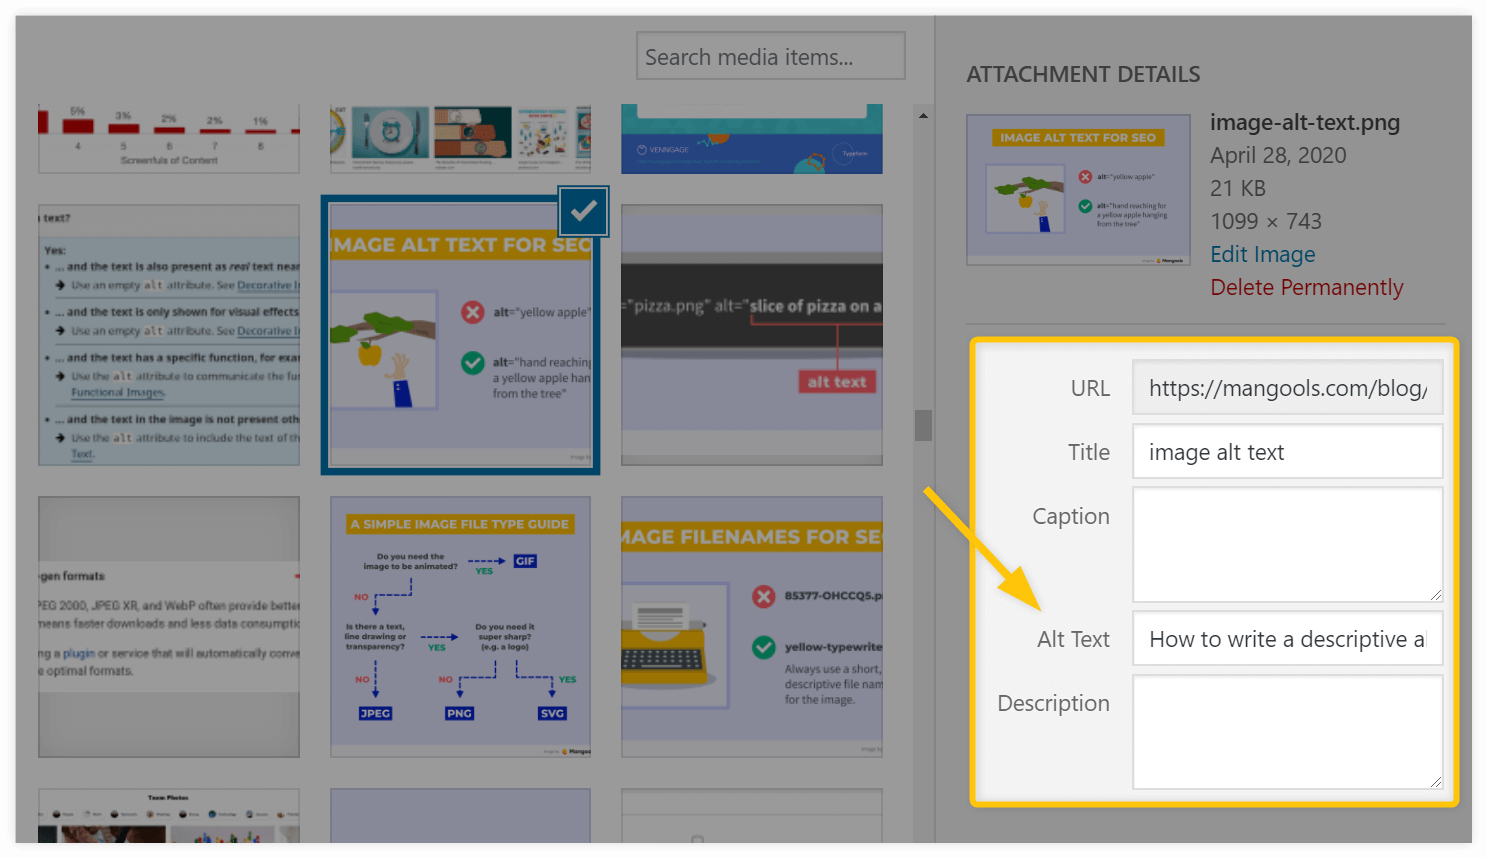
To add alt text, just click on the image in the WordPress Media gallery and fill in the field under “Alternative Text”.
Besides alt text, you should also:
- use descriptive file names
- provide title and description
- use captions (optional)
Note: Despite the common practice, alt text is not a place for unnatural keyword stuffing with the goal of “improving” your rankings. Use keywords in alt texts only if it makes sense for the user.
Optimize your titles and descriptions
Title tag and meta description are very important elements. They determine what your page will look like in search results.
Which snippet looks better?
The unoptimized one, with all the elements being truncated at the end…
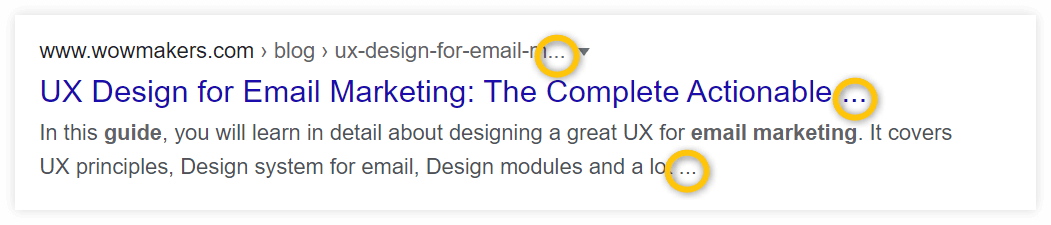
…or the neat, optimized one:
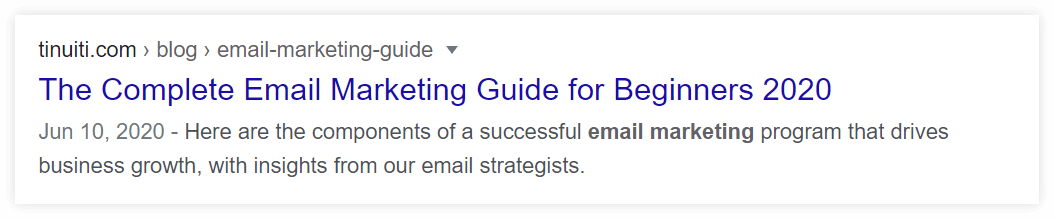
The answer is clear.
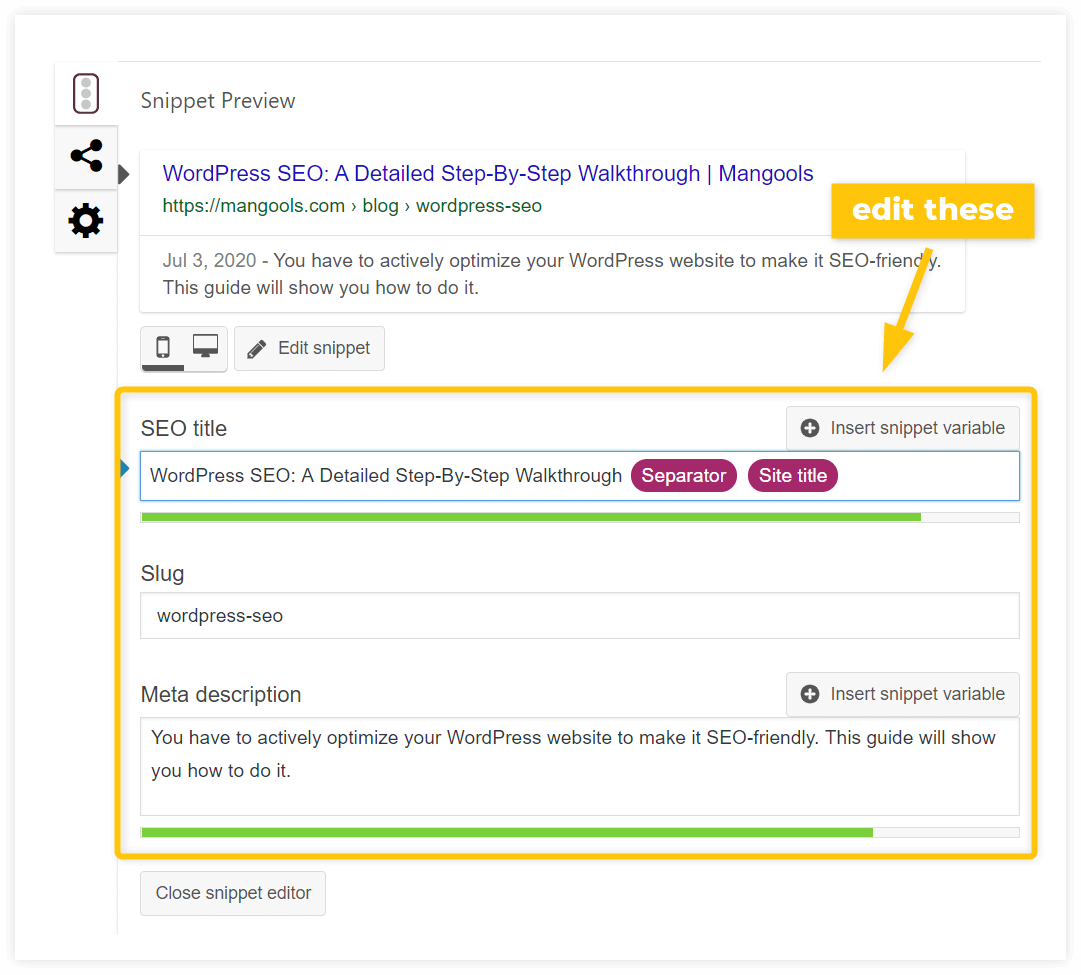
To optimize your SERP snippet appearance, you need to optimize your HTML metadata at the end of each page or post, namely:
- Title tag: This is the title that will appear when your page shows up in search results.
- Meta description: This is the page description that Google will show beneath the page’s title in search results.
- URL slug: This is the part of your permalink that describes the page that visitors are on.
Here, the Yoast SEO plugin comes to the rescue again.
Just scroll down to the Snippet Preview, click on it and you’ll be able to edit each field:
Writing the ideal title tag and meta description can be tricky sometimes as there’s a limited number of characters you can use.
To make sure your snippet won’t get truncated, use our free tool called SERPSimulator – this tool makes it much easier to edit and optimize your search data:
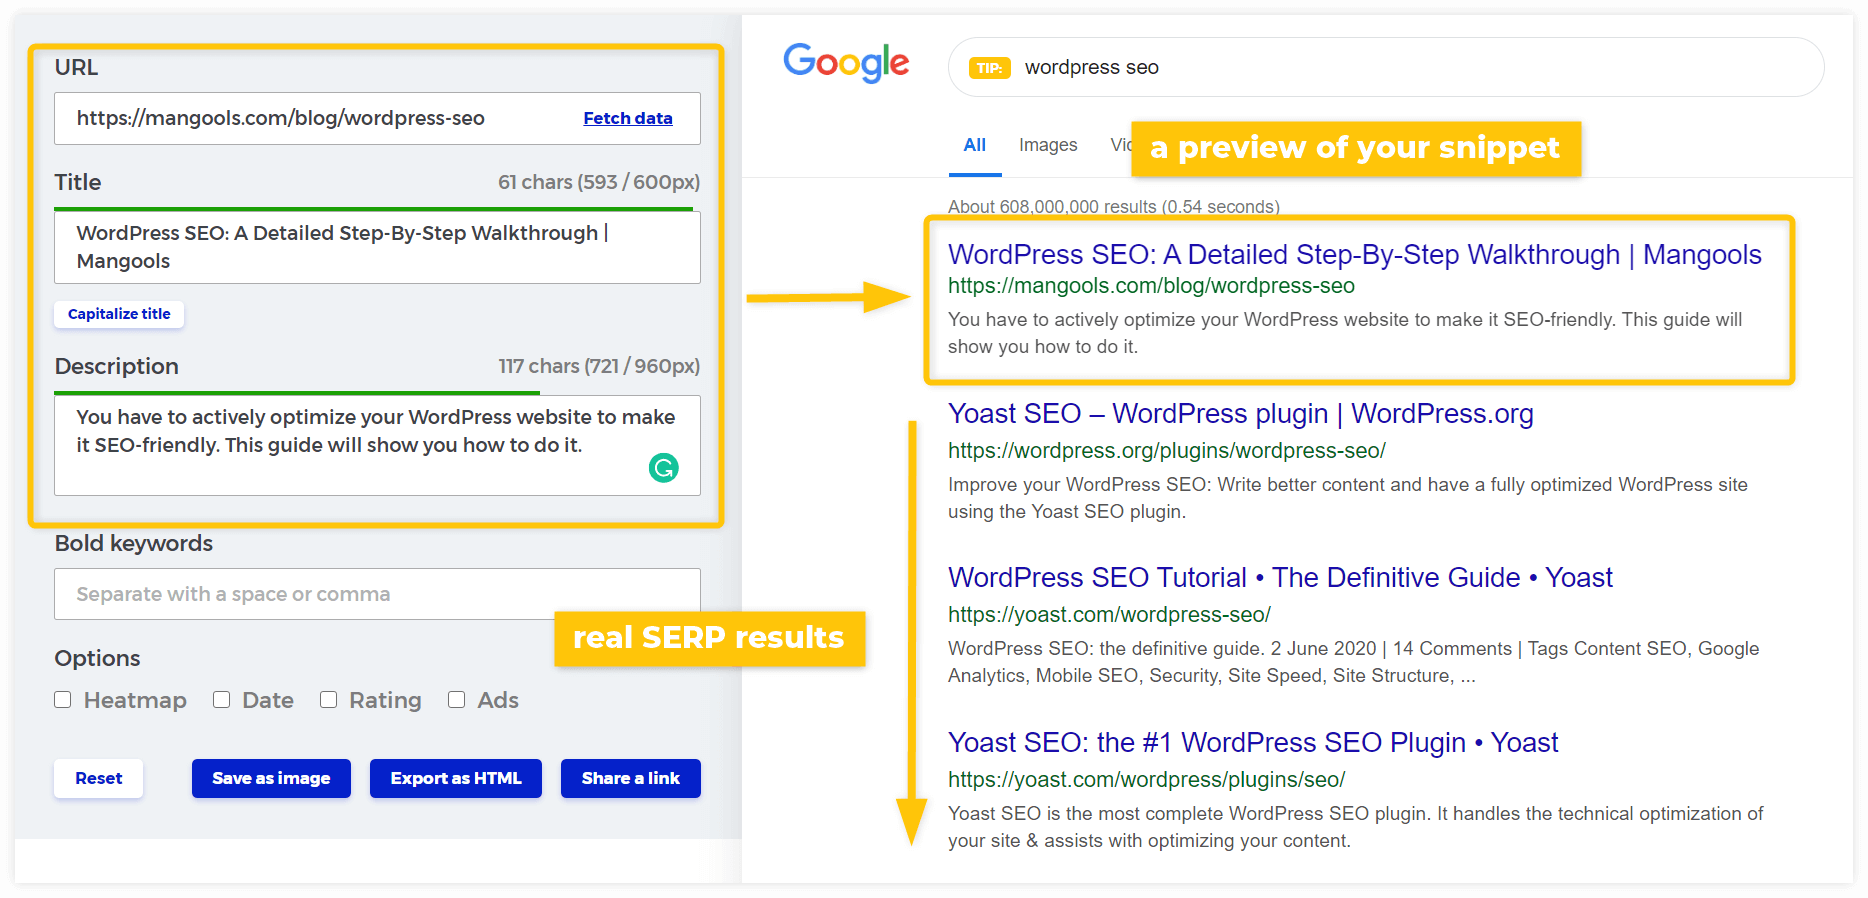
- you can see exactly how many characters you need to write to get a good score
- you can see the preview of your snippet
- you can enter your focus keyword and see the real SERP results to compare with your snippet
- you can switch between desktop and mobile view
- you can simulate other elements like date, bold words, rating, etc…
Yoast scores
Yoast will provide you with two sets of tips at the bottom of each page or post:
- SEO analysis
- Readability analysis
If you scroll beneath the search preview, you’ll find your SEO analysis. It will look something like this:
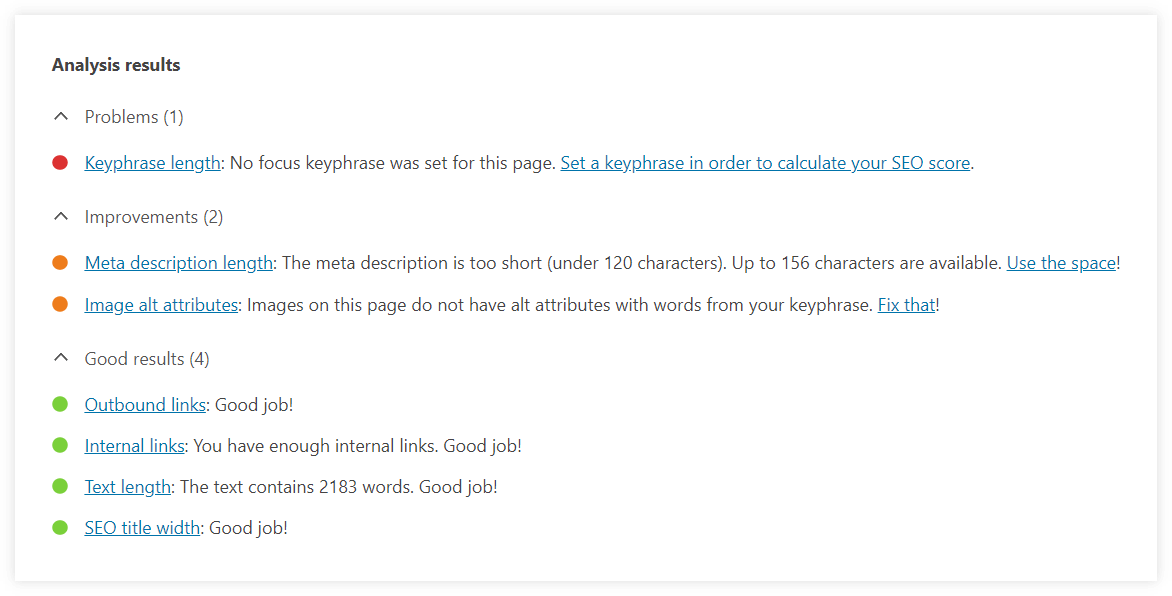
It can be a useful guide but don’t try to have all the circles “green” at any cost.
For example: if you set a “focus keyphrase”, the tool will suggest to you how many times it should be used in the text.
It can be tricky because it can lead you to over-optimizing the text and can do more harm than good.
So go through the points but never forget that no tool can ever analyze your text in the same way a human can. Write for people, not for tools.
When it comes to the readability score, it works on a similar principle:
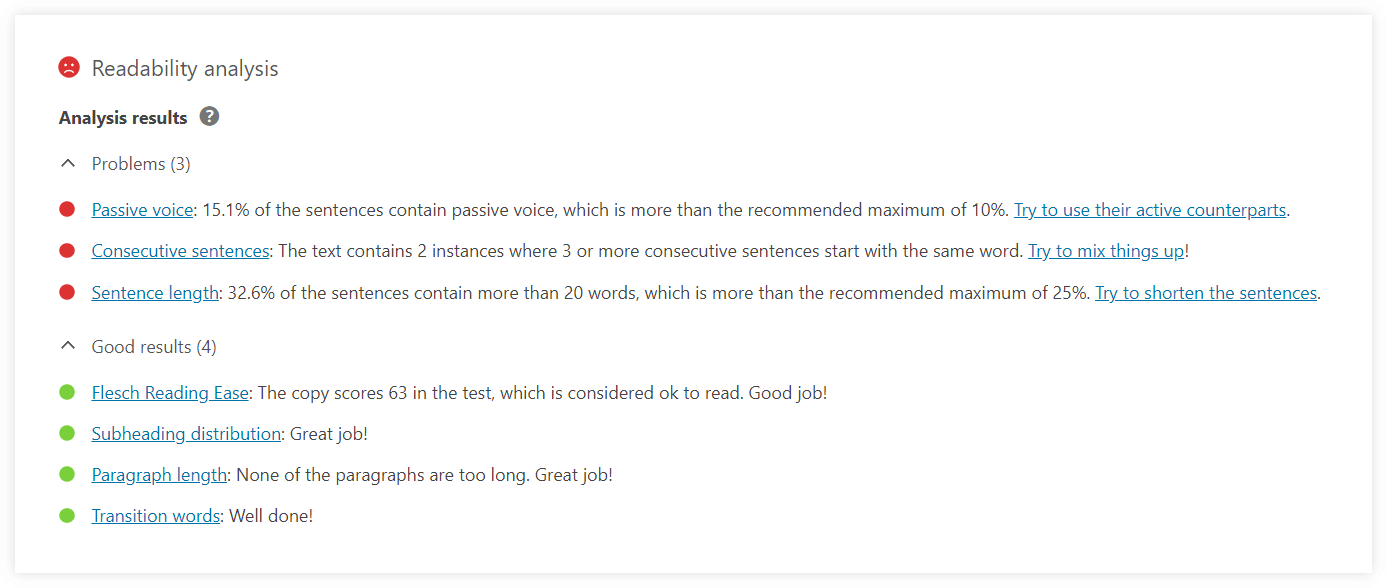
It will give you some insights into things like:
- your usage of passive voice
- sentence length
- the ease of reading
- length of the paragraphs
These are very useful and there’s a high chance you’ll improve the quality of your text if you follow the recommendations.
Conclusion
WordPress is a great CMS.
And as you can see, when it comes to WordPress SEO, the possibilities are endless.
You just need to roll up your sleeves and do some hard work optimizing and setting up the basic stuff.
We’ll be more than happy to hear about your experience, questions or tips in the comments.
