

Image optimization is a critical part of SEO.
Just as the content you write for your site needs to speak to both your audience and Google, so do your images.
Image SEO is more than just getting your images to rank. It’s about optimizing your images so they:
- Keep your web pages loading quickly
- Make your website and content more visually appealing
- Strengthen the image (literally and figuratively) of your brand
In the following guide to SEO for images, we’re going to look at all the things you can do to optimize your images for better results.
1. Choose images that send the right message
When asked what high-quality content looks like in Google’s eyes, this is what John Mueller from Google had to say:
“I wouldn’t worry too much about what Google thinks about quality content. But rather you need to show that you really have something that’s unique and compelling and of high quality.”
When it comes to sourcing and creating regular or AI images for your site, it would be a good idea to follow these same rules.
Create unique images (when possible)
Think about how many times you’ve seen corporate websites use the same photos of slick-looking business people shaking hands and smiling at one another.
That’s no surprise given that these are the top search results on Pexels for “team”:
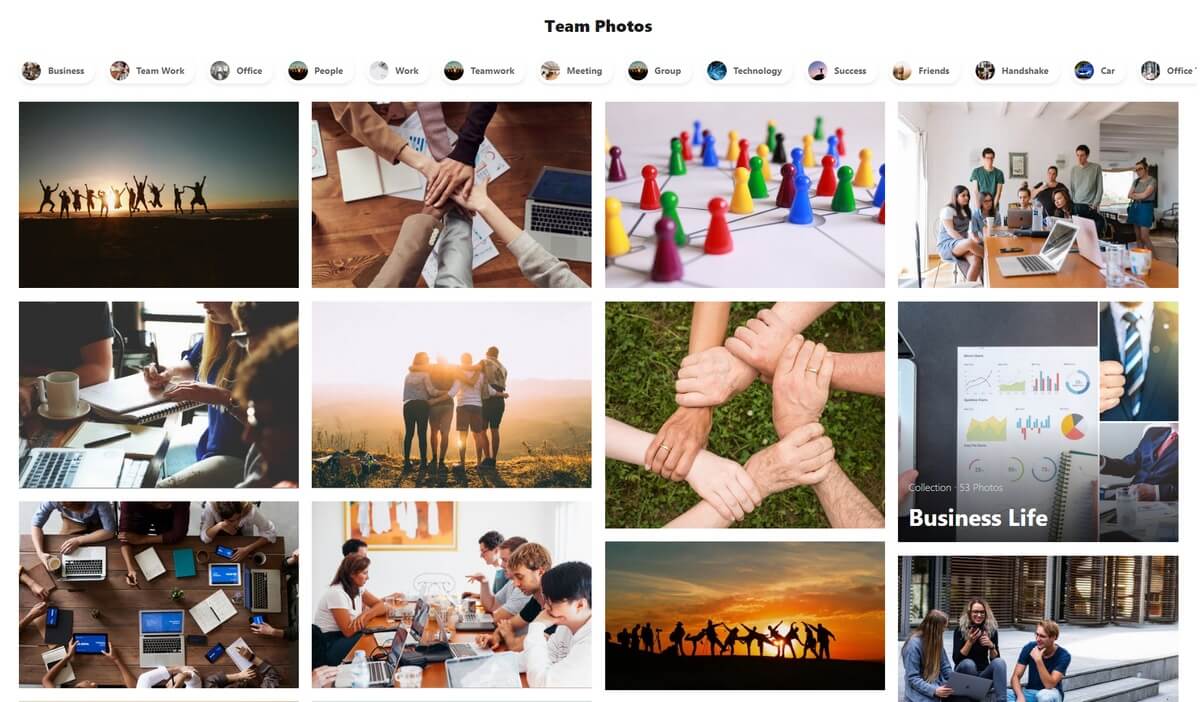
You’ve seen these kinds of images millions of times — and so has your target audience.
To escape from the sea of lookalikes, use your own images, photos, and illustrations when you can.
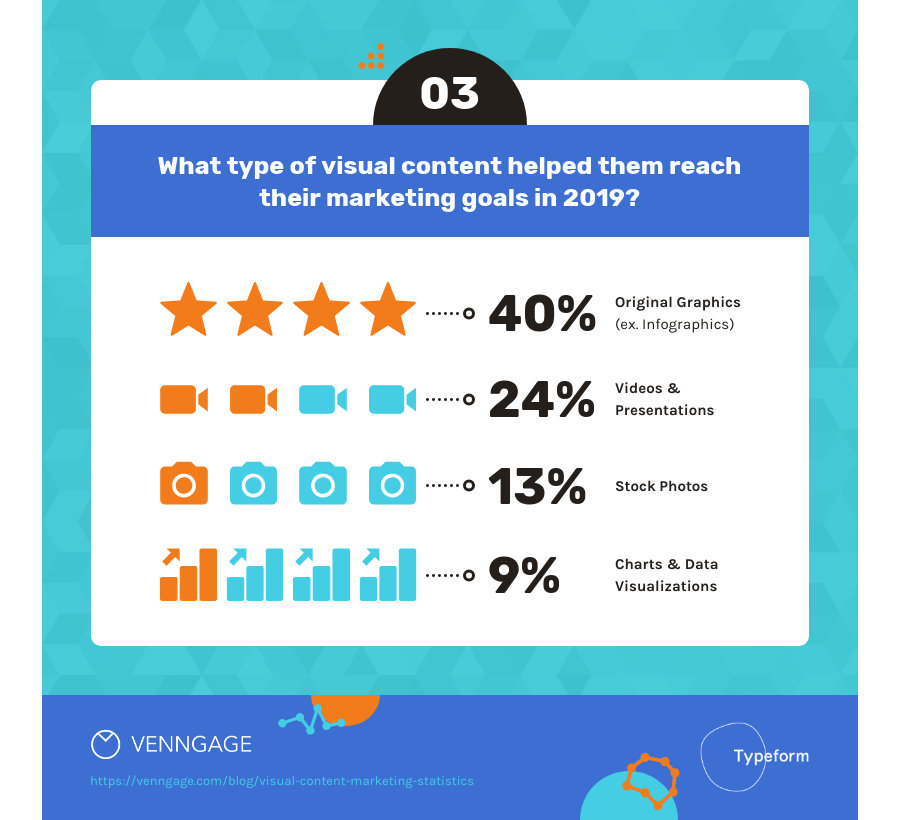
Venngage and Typeform conducted a survey on visual content marketing and found out that although more companies use stock photography in their digital marketing efforts, marketers believe that original graphics are more valuable in reaching their goals:
Bottom line:
Stock photos might be easier and quicker to source, but when they make your website look like everyone else’s.
What to use instead of cliché stock photos:
- Your own illustrations and graphics
- Unique/edited stock images
- Screenshots of graphics from other sites (with the proper citation, of course)
- Your own camera or smartphone!
Make sure each image has a purpose
Given the fact that too many images slow down your website, it is no surprise that according to Google, there is a correlation between fewer images and higher conversion rate:
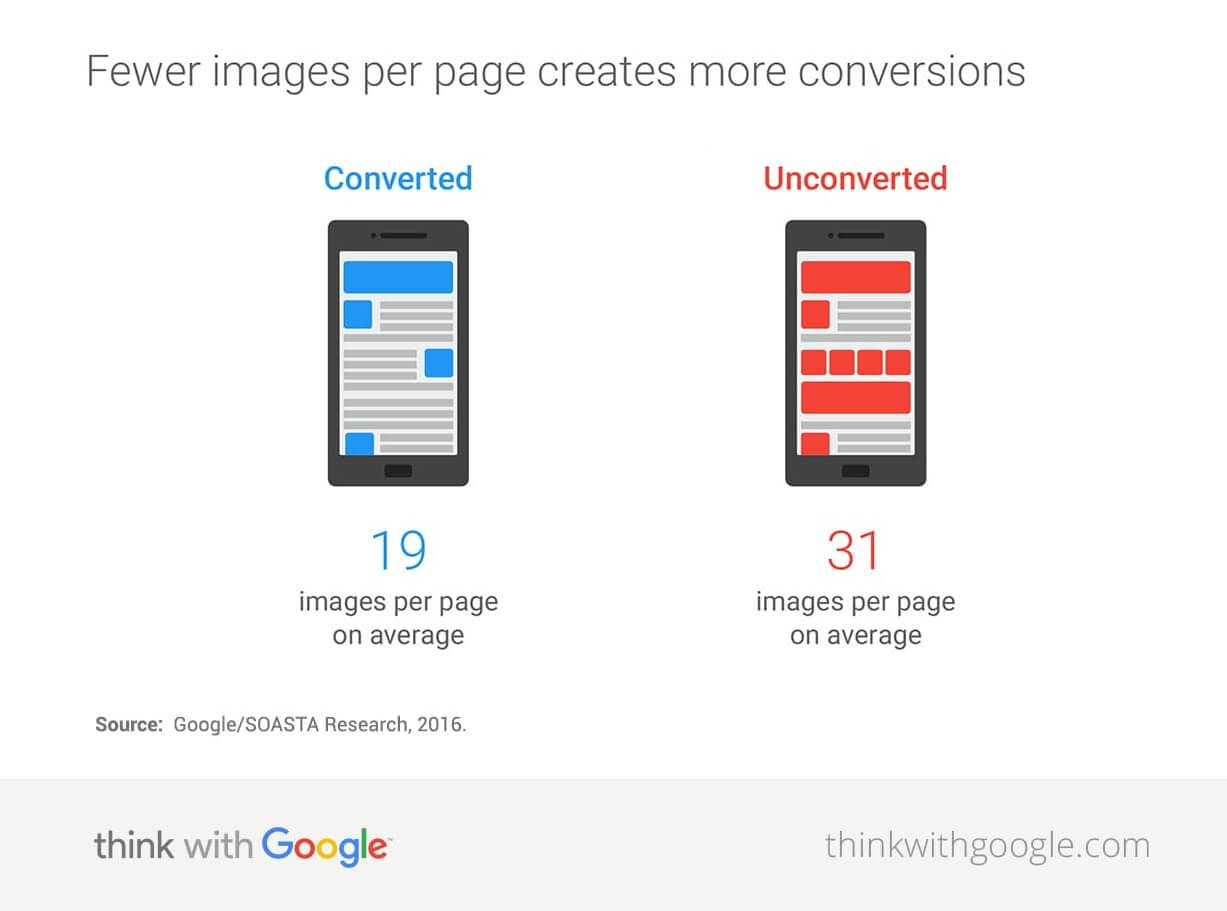
One of the image SEO tips might as well be: Remove all the unnecessary images on your website.
Images are not filler content — or, at least, they shouldn’t be. Every image on your page should have a purpose.
When an image is relevant to the content of the page, it can improve the visitor’s experience by:
- Providing additional context,
- Clarifying complex topics,
- Making a lengthy argument easier to get through.
What’s more, images that have a clear purpose are more likely to rank on their own.
Let’s say you have a post about intermittent fasting. If you were to include an image of an empty plate, what purpose does it serve other than aesthetics?
On the other hand, let’s say you create an image that actually demonstrates how intermittent fasting works. Users looking for “intermittent fasting” or “what is intermittent fasting” would probably find a detailed table or a scheme to be more valuable.
Here’s a proof – the vast majority of images ranking for “intermittent fasting” are information-rich graphics rather than stock photos or illustrations:
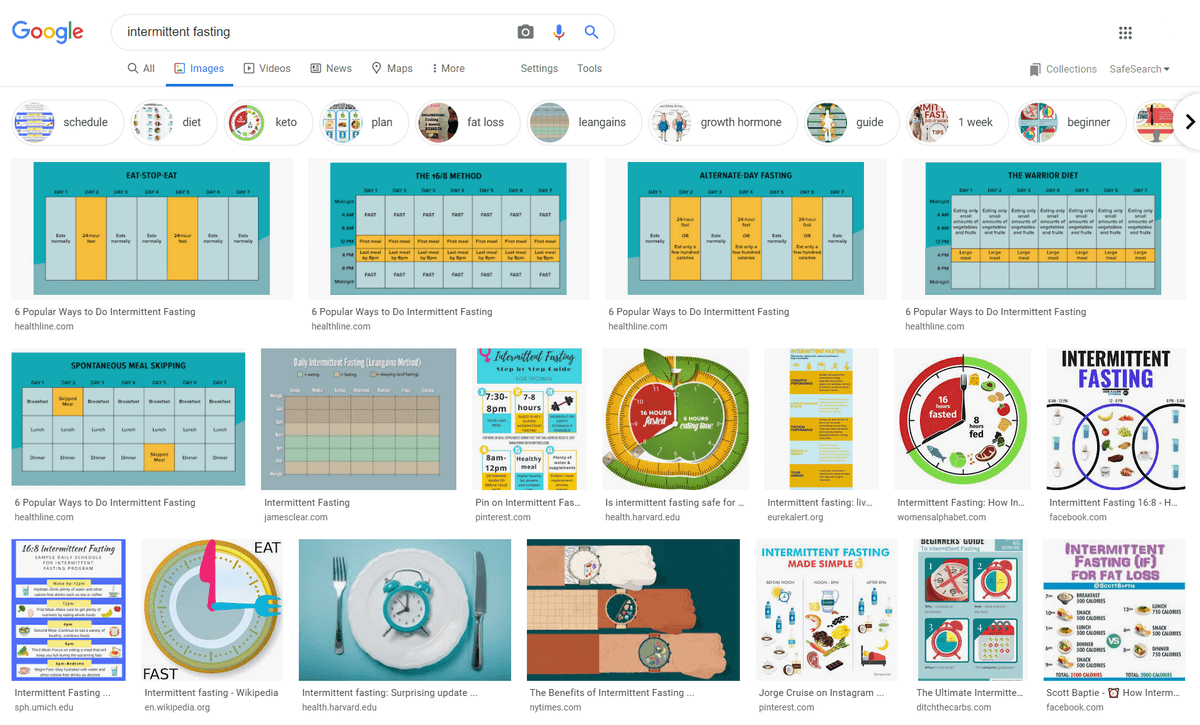
This kind of unique imagery can do wonders for boosting the authority of a web page and the overall trust in a brand.
Always use the highest quality images
As for what makes an image better than another, there are certain qualities to consider:
- The sharpness of the image
- Relevance to your industry, the page’s content, and your audience
- Age/modernness of the image
- Consistency of style with the rest of the site
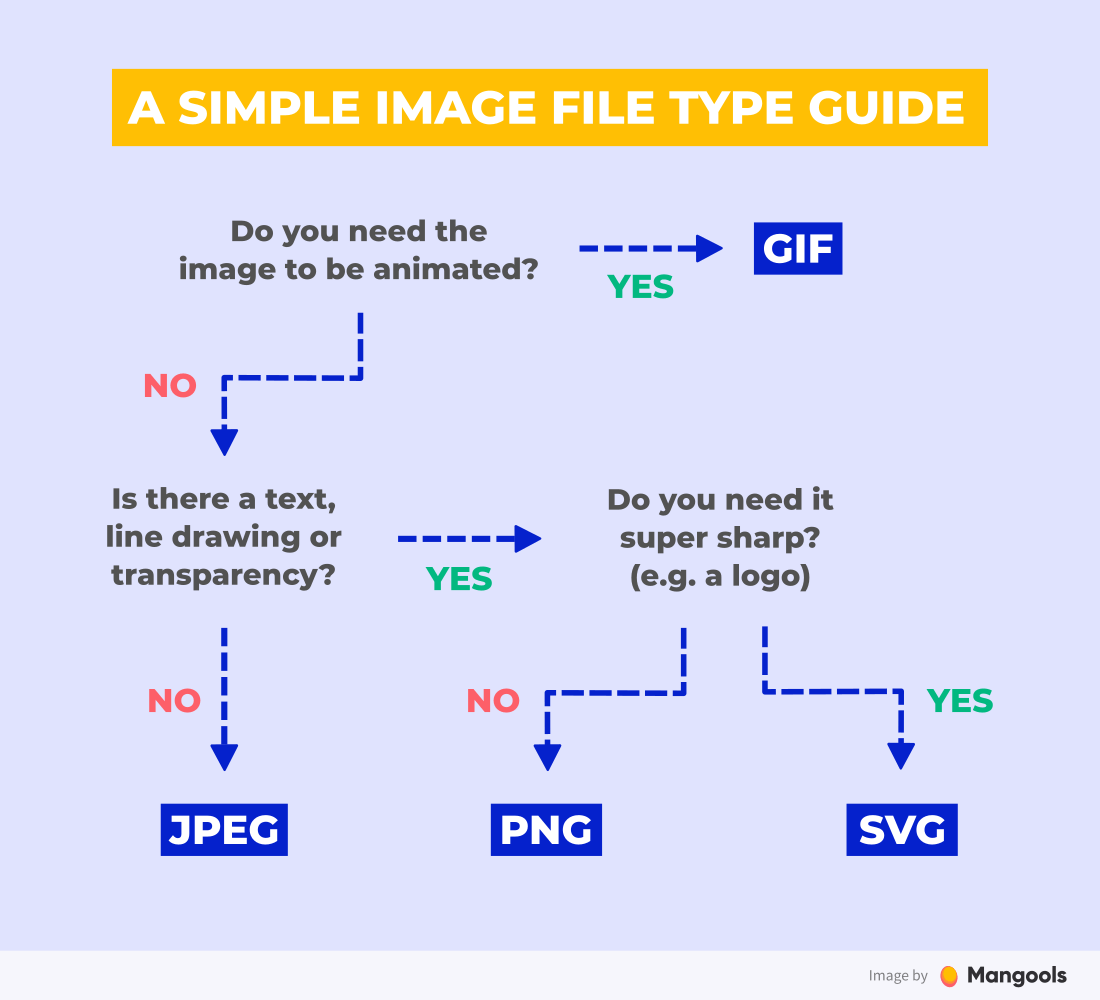
2. Use the right image file format
Using the appropriate image format can save you from a lot of trouble – both in terms of image quality and file size.
There are three most commonly used image file types: JPEG, PNG and GIF.
- JPEG – lossy compressed file format, usually the smallest file size; ideal for photos
- PNG – usually larger file size than JPEGs; ideal for line drawings, screenshots, images that contain text or transparent backgrounds
- GIF – limited number of colors; ideal for animated images
All these formats are used for raster images (consisting of pixels). But then we have vector images, with the most popular format being:
- SVG – scalable format (it doesn’t pixelate), usually smaller than JPEGs, PNGs or GIFs; great for logos, icons, simple illustrations
Due to security concerns, the vector images are not supported in WordPress by default. You can solve this problem by following this simple guide by Kinsta.
If you’re still not sure what file type is best for your image, here’s a simple guide:
The next-gen formats
Besides the standard formats, you can also come across the so-called next-gen image formats like WebP, JPEG 2000, and JPEG XR.
They are even recommended as go-to formats in Google PageSpeed Insights:

WebP, in particular, is one to pay close attention to as it was developed by Google for the purposes of serving high-quality images in smaller sizes.
Google studies have shown that WebP images can save websites more space and resources than their traditional JPEG and PNG counterparts. Specifically:
“WebP lossless images are 26% smaller in size compared to PNGs. WebP lossy images are 25-34% smaller than comparable JPEG images at equivalent SSIM quality index.”
The only problem is that the WebP and other next-gen formats don’t have 100% browser support yet (and they’re not supported in WordPress either). So for now, we’ll have to wait until they’re used across all platforms (or find ways to use them selectively in the browsers that support them.)
Why do we care about image sizes?
According to data on the State of the Web, the average transfer size of a page is 2080 KB on desktop and 1885 KB on mobile.
Now, let’s compare that to the average transfer size of images:
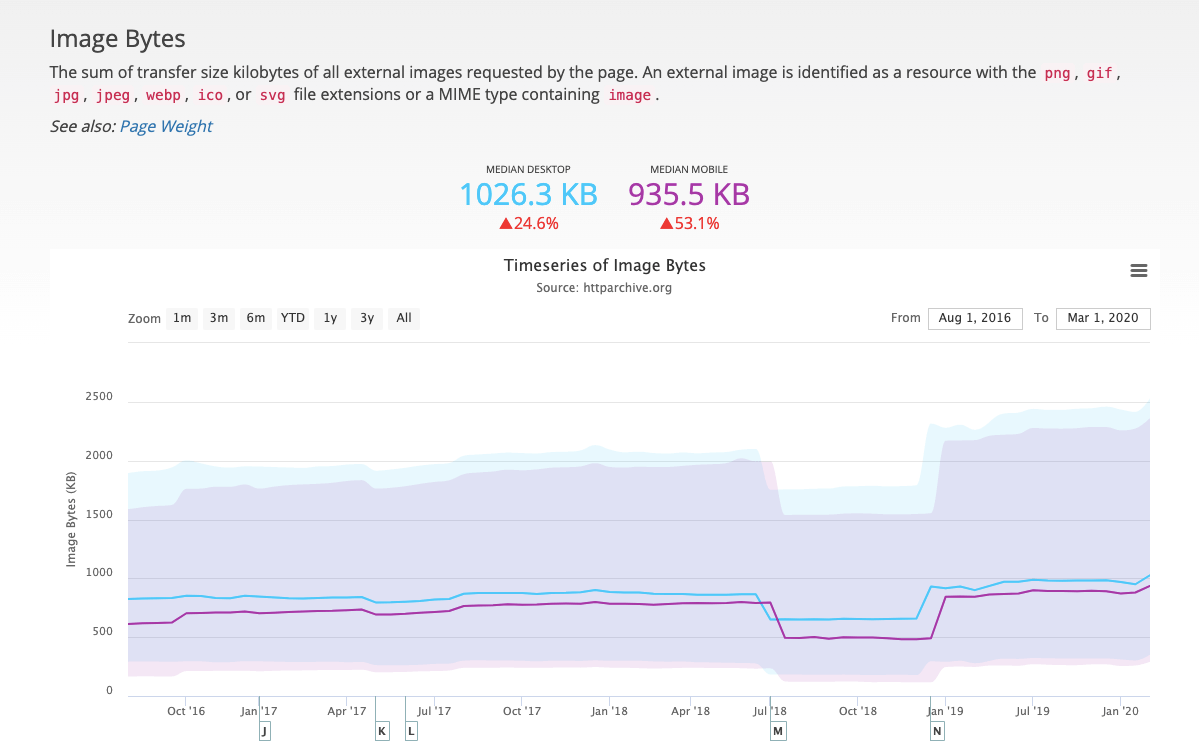
The average transfer size of images is 1026 KB on desktop and 935 KB on mobile — that’s half of the weight of a web page!
In other words, the size of your images is one of the most important factors impacting your page speed.
And page speed is a confirmed ranking factor.
3. Resize images that are too large
We’ve already covered how to choose the right file format. The next step is to resize your images to fit your page dimensions.
There’s a simple rule of thumb – use dimensions appropriate for your page width (or just slightly bigger). If your blog content has a width of 800px, there is no real reason to use 2500px-wide images.
What about smaller screens?
Of course, there are devices like mobile or tablet, with even smaller screen sizes. So serving an image for desktop would be an unnecessary slow-down of the page.
Luckily, if you use WordPress 4.4 or higher, it takes care of the whole process and resizes the images automatically for smaller devices. All you need to do is to upload the right size in the first place.
Also, you should resize the image before uploading it. Storing a 3 MB photo on your website makes no sense even if you resize it afterward (unless you want it to be downloadable in full size). You will prevent them from eating up your web hosts’ disk space too fast.
Resizing the images is no rocket science. You can use professional design software (like Adobe Photoshop or Gimp), your computer’s default image editor, or an online resize.
4. Compress your images
Compression is a process that strips away inessential data and file bytes while (mostly) preserving the quality of your image.
According to Think With Google, compression is an essential process for performance optimization and image SEO:
“Simply compressing images and text can be a game changer—25% of pages could save more than 250KB and 10% can save more than 1MB that way.”
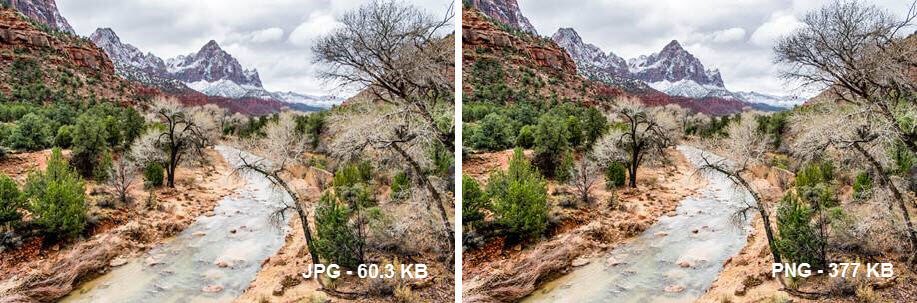
Generally, JPEGs are smaller in size than PNGs. So one of the ways to decrease the file size is to convert the photos from a PNG to a JPEG.
There are two types of compression:
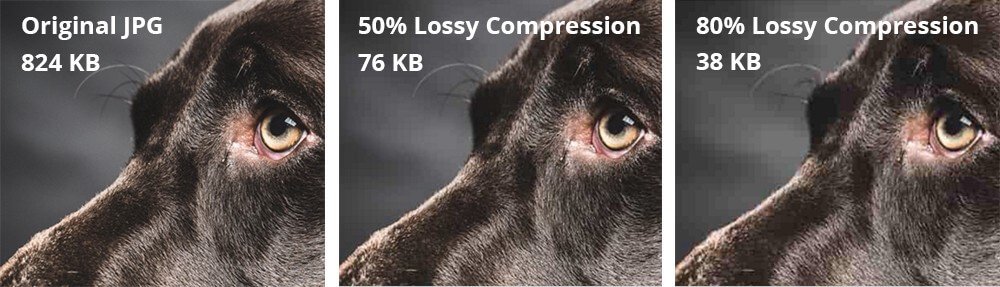
- Lossy compression is the process of removing small bits from a JPEG or GIF file. After it’s been applied, though, it cannot be reversed. Because of this and because of the type of data loss, image quality can seriously degrade if you apply too much compression.
- Lossless compression is the process of removing extraneous metadata from a PNG file. This process is not as severe or permanent as lossy compression. Because of this, image integrity mostly remains intact. However, file sizes are still relatively large.
Here’s an example of JPEG image quality using different degrees of compression. Again, you should experiment with various settings to find the best file size/quality ratio.
If the tool has the save image for the web option, make sure to use it.
According to the WordPress support forum, you should aim for the following image sizes:
- Large images: 60 KB – 100 KB
- Small images: Less than 30 KB
Unlike image resizing, you can handle image compression from within WordPress and you can automate the process using a plugin.
Which WordPress image compression plugin should you use?
There are many quality WordPress plugins for image compression and most of them will do the job.
The most popular ones are Imagify, Smush, EWWW, TinyPNG and ShortPixel.
It seems the latter is quite popular these days. We ran a mini expert survey on Twitter, asking WordPress SEO experts about their favorite image compression plugin. Here are the answers:
“I’ve used Imagify for years and it has always worked great. The reasons would simply be ease of use, WebP, and happy with the image compression quality.”
– Brian Jackson from Woorkup
“ShortPixel – easy to use and they keep innovating.”
– Harsh Agrawal from ShoutMeLoud
“We use ShortPixel as well. Works well and fair pricing.”
– Gael Breton from AuthorityHacker
“Different companies of mine use different tools. Some are using Imagify by WP Rocket, others are using TinyPNG, some are using EWWW. I personally prefer to optimize before I upload (but I’m old school that way).”
– Syed Balkhi from WPBeginner
“Another recommendation for ShortPixel. Not sure what magic they use, but the images get compressed a lot while the quality doesn’t change. I purchased the one-time plan of 10,000 images for $10 and have been using it for all images since.”
– Marko Saric from MarkoSaric.com
You can check the full thread with all the answers here:
Just a QUICK expert survey for the next Mangools blog post. @brianleejackson, @MariekeRakt, @syedbalkhi, @GaelBreton, @denharsh – what WP image optimization plugin would you personally recommend to an SEO beginner and why?
— Vlado Pavlik (@vladopavlik) April 28, 2020
5. Use descriptive and distinct metadata
Even if you have no intention of trying to rank your images in Google Image Search, there are benefits to spending time on image metadata.
They are useful for helping visitors understand what the visual content on a page looks like without being able to see it. Also, they serve as an important piece of information Google pays attention to when trying to gather what a page is about.
Tips for writing image metadata
Image SEO metadata needs to be:
-
-
- Descriptive so it takes the mystery out of what’s contained within an image and how it relates to the content of a page.
- Distinctive so it keeps your images from cannibalizing one another. By giving them unique descriptors, your images will never have to compete for attention as they rank for different keywords and scenarios.
-
Here’s a list of the most common image metadata:
- image file name
- alt text
- image caption
- title and description
File Name
You should always give your file a descriptive name before uploading it. This way, your data will better reflect the actual content within the image.
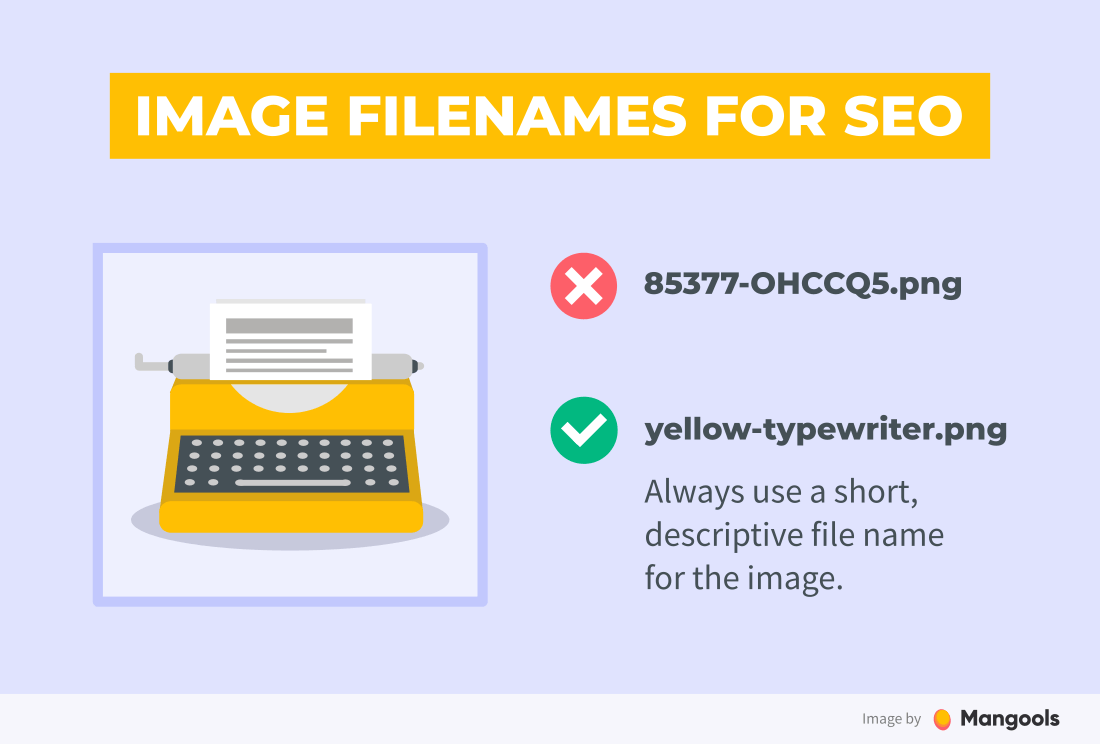
If you’re using WordPress, you can’t edit the permalink for your image once you upload it, so this is another reason why it’s important to use a descriptive file name.
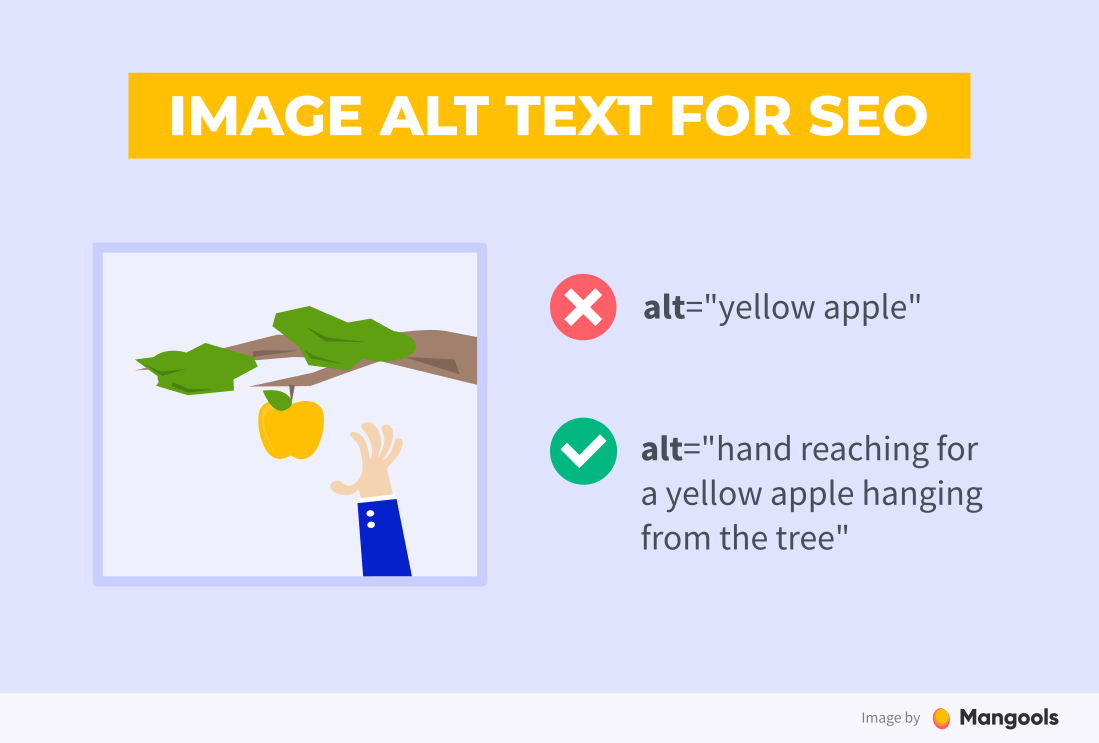
Alt text
Alt text (alternative text) is a critical piece to fill in from the SEO point of view. It is located in a simple alt tag within the image HTML code:
<img data-src="colosseum.jpeg" alt="aerial view of the Colloseum in Rome"/>
The main purpose is to describe the image so that visually impaired visitors don’t have to miss out on information provided by your images. The same goes for Google bots who can’t “see” your images.
Therefore, the alt text should be as descriptive as possible.
However, alt text is not always necessary. For example, if the image has only a decorative purpose, there is no reason to inform the reader or Google about its content.
Text images and alt text
If you’re unsure whether an image that contains a lot of text needs alt text or not, you can follow this Alt Decision Tree by World Wide Web Consortium.
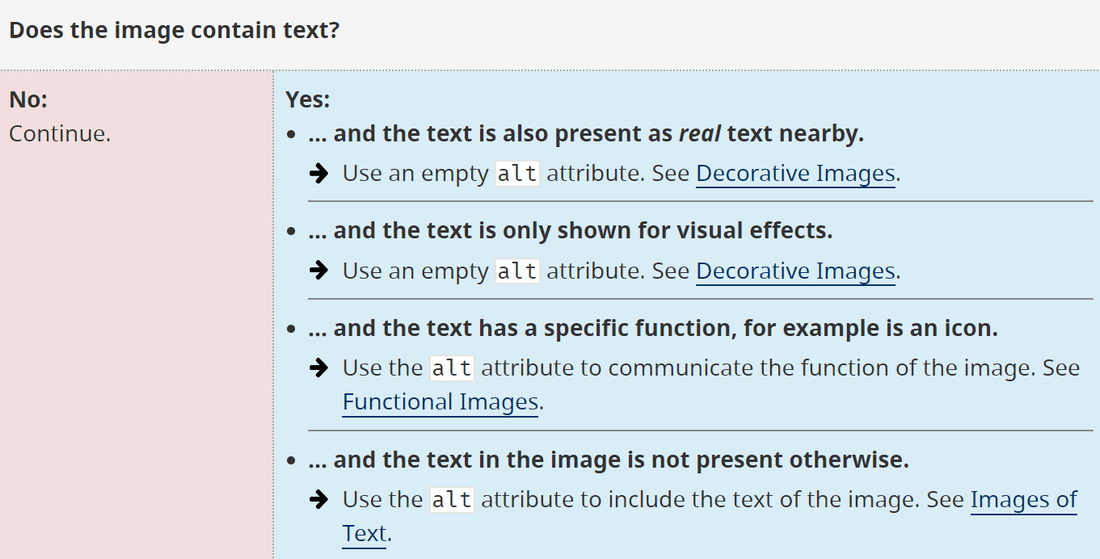
To sum it up:
- You don’t have to use alt text if the text from the image is also present near the image or if the image has a decorative purpose
- You should always include a descriptive alt text if the text from the image is not present in another way, or if it’s an image with a specific purpose (logo, icon, etc.)
Alt text and keywords
Image alt text is one of those fields Google pays attention to when trying to gather what a page is about.
Does it mean you should put your focus keyword in the alt attribute at any cost?
Definitely not.
Despite the common practice, alt text is not a place for unnatural keyword stuffing in order to “improve” your rankings. Use keywords only when it makes sense for the user.
Caption (optional)
The image caption is necessary when you want to provide additional context or information about the image. Unlike other metadata, it is actually visible for the user right below the image. It can help keep readers engaged with the content and your story.
Title and description
Although title and description don’t appear on the front-end of your site, they help speed up internal image searches (if you or other WordPress users need to track down an image). The image title and description are also important elements in search metadata — just like the title tag and meta description for your pages and posts.
6. Cache your web pages
Caching is a process that enables servers to deliver your site to visitors’ browsers more efficiently. Think about it like this:
You’re at a professional conference and someone asks to see your business card. The only problem is, you don’t have a business card, so you have to write down all your contact details for them. No big deal.
But then someone else asks for your contact details. You repeat the task, jotting down your information for the prospect. It’s a few seconds here and there, but it quickly adds up.
This is what your server has to do without caching in place.
Now, let’s say you have your business cards on you. This time, it takes a mere second to hand them out.
This is how caching works.
Your server makes a copy of your web page and all its content — including images — so that it doesn’t have to recreate the page every time someone requests to see it.
Considering how infrequently you’re likely to change images on your web pages, caching is a great way to minimize the stress they put on your server.
Which WordPress caching plugin should you use?
There are a few clear frontrunners when it comes to caching plugins:
- W3 Total Cache gives users advanced optimization capabilities. Lazy loading can also be enabled with this plugin.
- WP Fastest Cache is a more user-friendly caching plugin and comes with a variety of speed-up capabilities. Image optimization is only available with an upgrade though.
- WP Super Cache is the simplest of the leading plugins as it only does caching. If you don’t need the other optimizations, this is a good choice.
7. Consider a CDN
Moving your images to a content delivery network (CDN) might also be helpful.
A CDN is a network of servers that sits above your main hosting server. When activated, your site is cached and sent to those remote servers with the aim of reducing the physical gap between your website and its visitors.
Here’s a simple illustration by GTMetrix explaining the whole process:
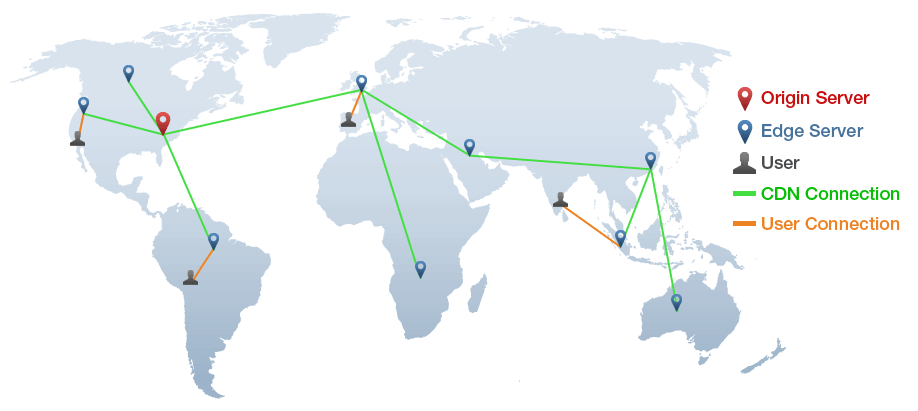
The popular CDN services you can use are Cloudflare, KeyCDN, StackPath or Amazon CloudFront.
Tip: Setting up a caching plugin and a CDN for your WordPress website may need some expertise, but it is not super difficult. I can recommend this step-by-step guide on speeding up the website using W3 Total Cache caching plugin and Cloudflare (free) CDN service.
If you’re really not sure what’s going on, there is no shame in asking for help from an expert. It is a matter of a one-time setup.
8. Include image structured data
Structured data allow you to mark up the information about the web page. This also includes information like recipe image or product images.
Here’s what Google has to say about structured data for images:
If you have images on your site, you can help users identify the type of content associated with the image by using appropriate structured data on your pages. This helps users find relevant content quickly, and sends better targeted traffic to your site.
For example, this is a search for “how to bake blueberry muffins”:
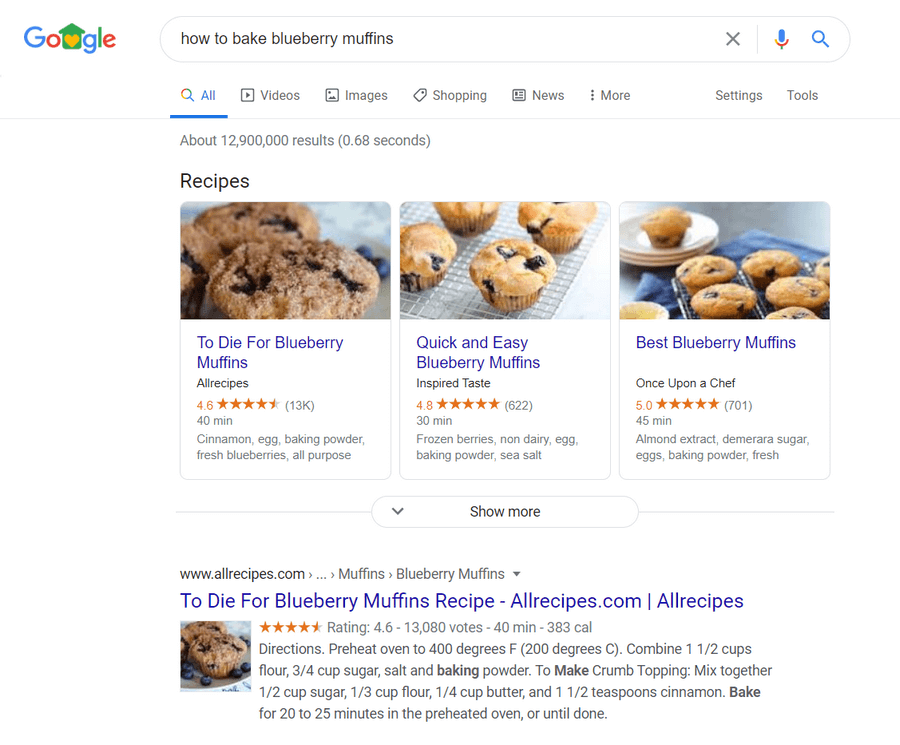
Every single result on this search results page (not just in the screenshot) contains a complementary image. Google knew to associate these recipe pages with images based on the structured data provided.
But it’s not just recipe pages that can benefit from image structured data.
Schema.org is the body that manages structured data (schema markup) that we use on the web. These are some of the recommendations it provides on how to use image markup:
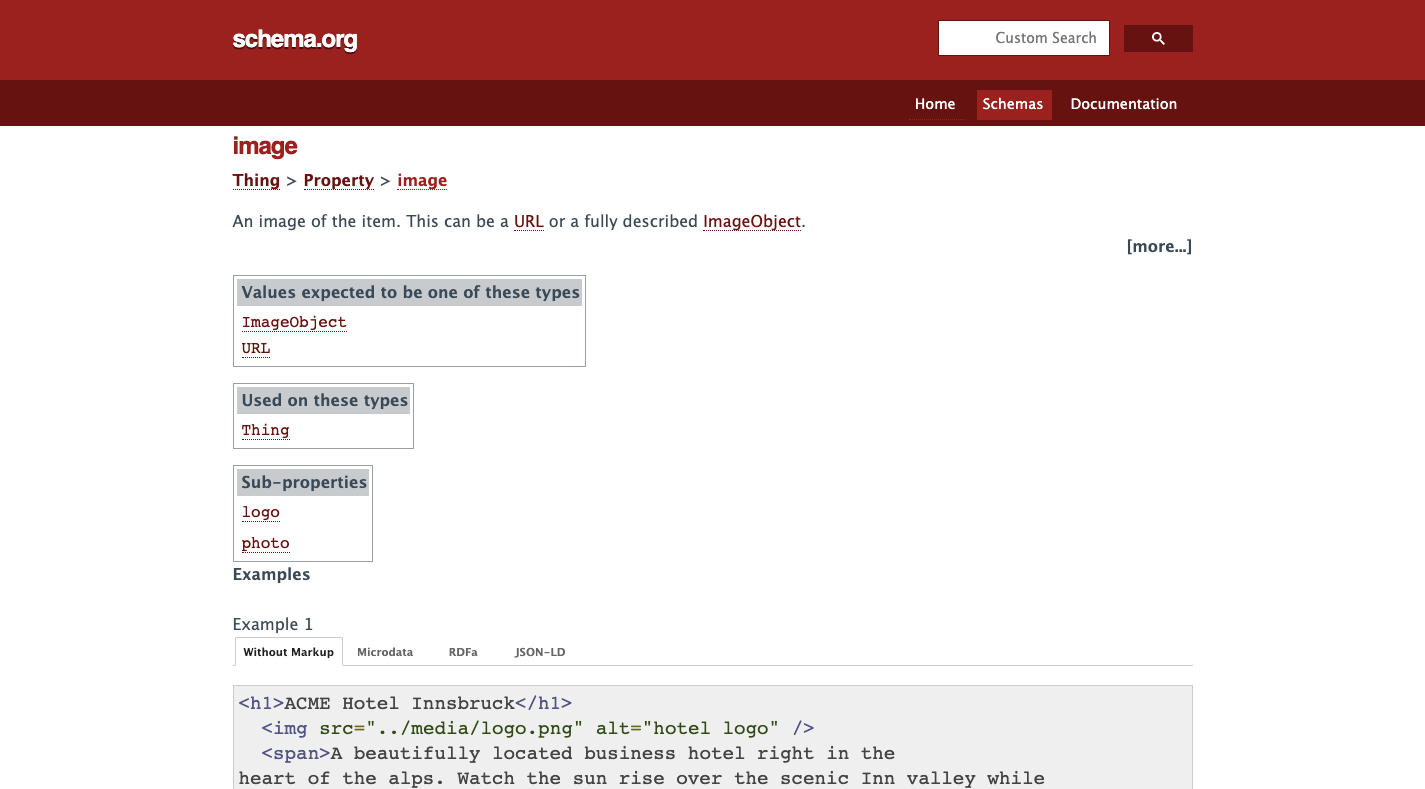
Three examples are provided:
- A hotel logo
- A computer product photo
- A finished recipe photo
Another great resource for getting ideas on how to use structured data and add images to your search results is Google Search Reference (you can jump between various file types in the menu).
You can attach things like author photos, company logos, and story-driven images. And all it takes is some additional markup on the page:
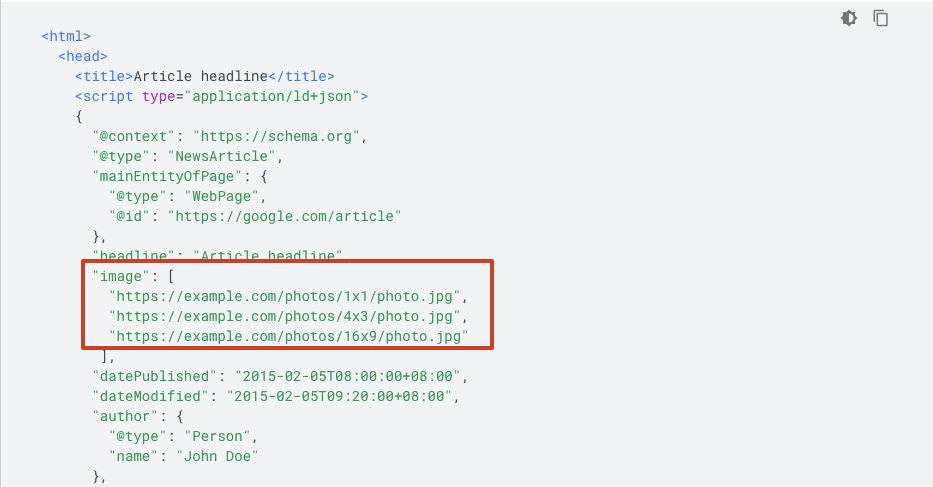
If you feel that an image can add value and more context to a web page, then using structured data to add it to search would be a good idea.
What WordPress structured data plugin should you use?
SEO plugins can automatically add structured data to your site, but you’d be better off using one of these dedicated solutions:
- WP SEO Structured Data Schema makes it easy to attach relevant data and images to different content types on your site.
- Schema & Structured Data for WP & AMP simplifies schema setup. Instead of asking you to choose from a list of schema types for each page, you create only the types you need.
9. Use lazy loading
When looking at the analysis Google PageSpeed Insights performs on loading speeds, you’ll see that it’s broken up into several milestones:
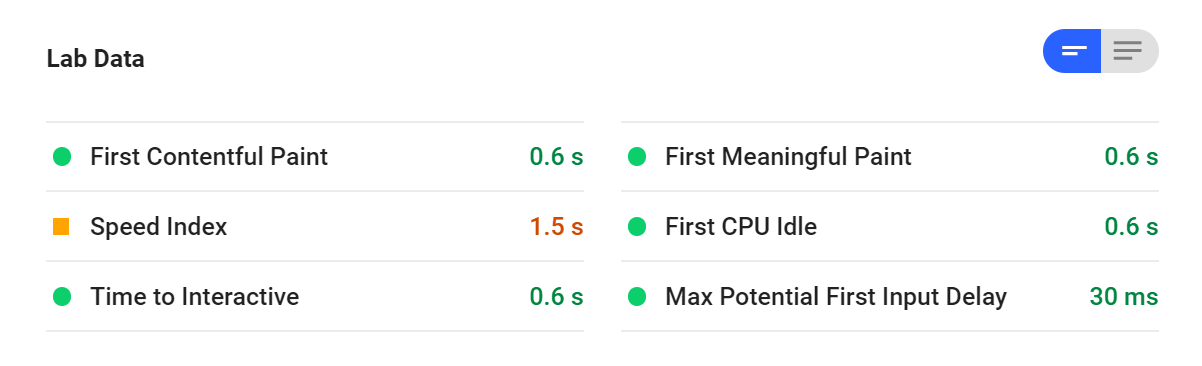
The first two — First Contentful Paint and First Meaningful Paint — are especially important as they indicate how long it takes for above-the-fold content to fully load.
Obviously, you want the entire page to be loaded and interactive as quickly as possible. However, that’s not always easy, which is why you should prioritize.
A 2018 eye-tracking study from Nielsen Norman Group came to the same conclusion: Content above the fold receives by far the highest share of the viewing time.
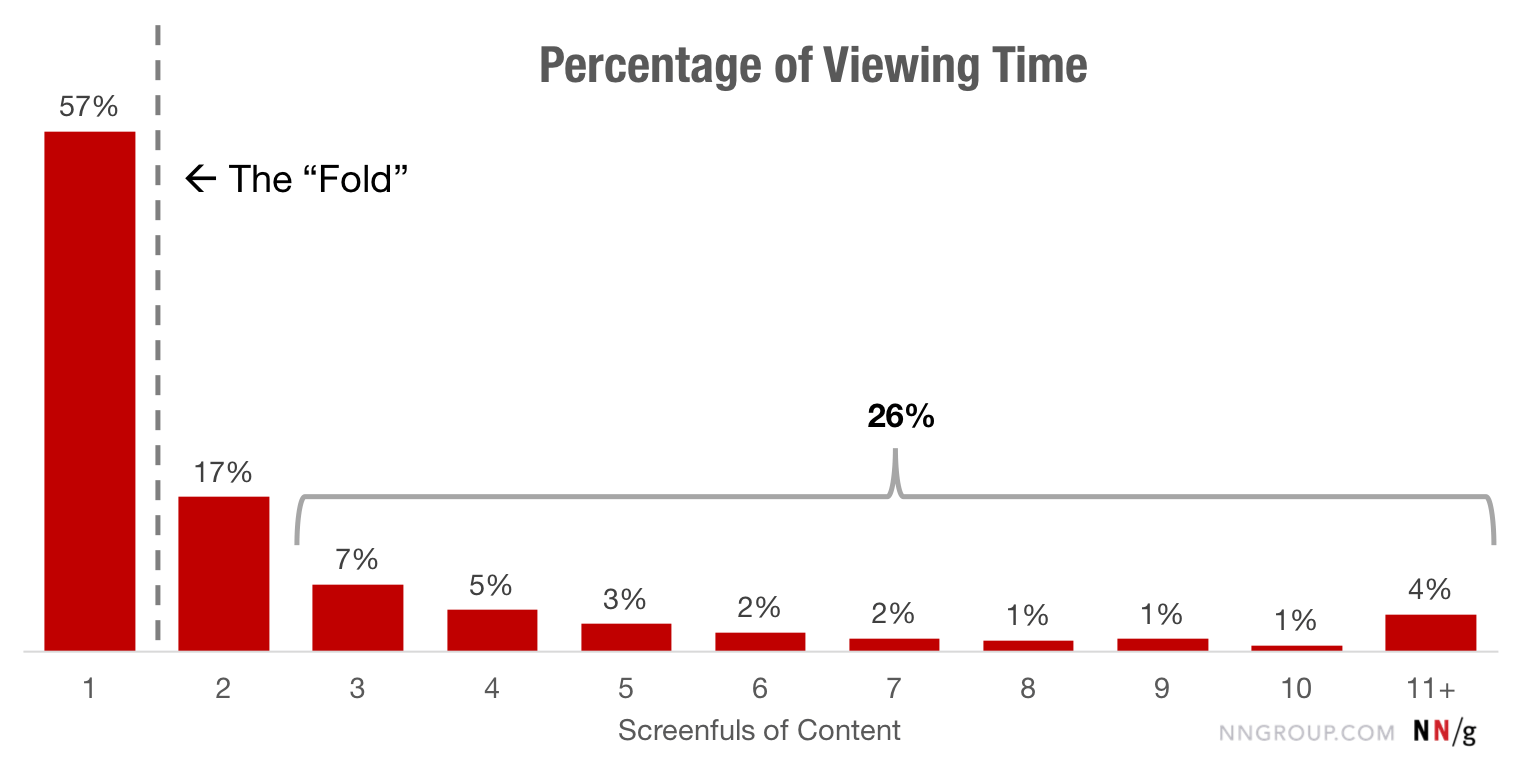
If 57% of the time spent on a page is above-the-fold, lazy loading becomes a useful tool in conserving your server’s energy.
The process works like this:
- Someone visits your website.
- Your server receives the request.
- Rather than process the entire web page and make the visitor wait, the server only processes the visible part of the page so they can see the content more quickly.
Here’s a great graphic by Imperva that explains the process:
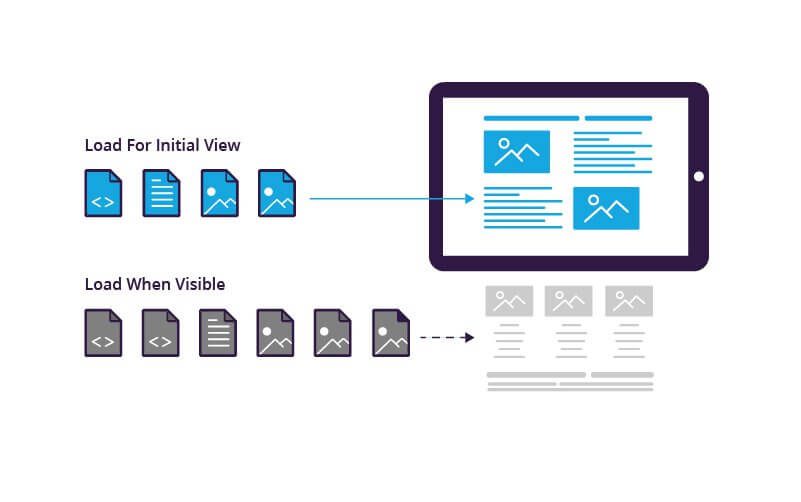
When lazy loading is enabled, your server can dedicate its energy and resources to processing the above-the-fold data first.
It means the loading time will decrease for the benefit of your visitors.
Tip: There are several lazy loading plugins for WordPress. Also, don’t forget to check out Google’s recommendations for image lazy loading.
10. Create an image sitemap
According to data from Jumpshot and SparkToro, Google Images own a good part of the search engine market share:
Considering about a quarter of all web searches take place on Google Image Search, it would be beneficial to generate an image sitemap apart from your regular XML sitemap.
This way, you can ensure that Google has a list of all the images that are rank-worthy along with the image SEO data you so carefully attached to each.
As for creating your image sitemap, you have two options:
a) Update your XML sitemap manually
If you have a smaller website (10 pages or less), it wouldn’t take long to manually update your main sitemap with image data.
Google provides an example on how to do this:
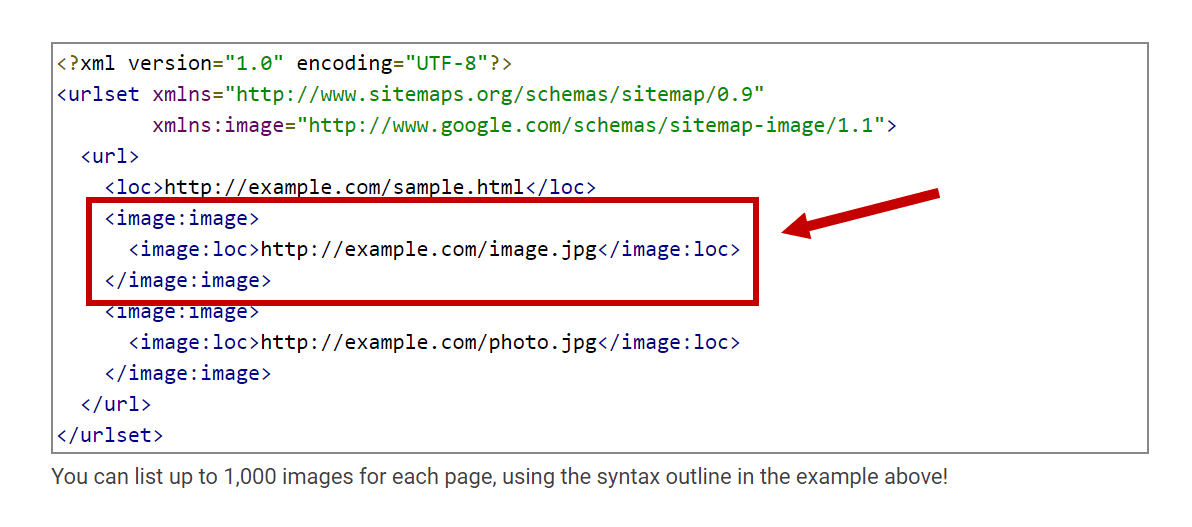
While this snippet only shows the image and location tags, you can include additional details like:
- Titles
- Captions
- Geographic locations
However, there are a couple of issues with this option.
The first is that you have to remember to update your sitemap every time a new image is added to your site. The second is that you have to upload the file to your server and then share the link to it with Google Search Console.
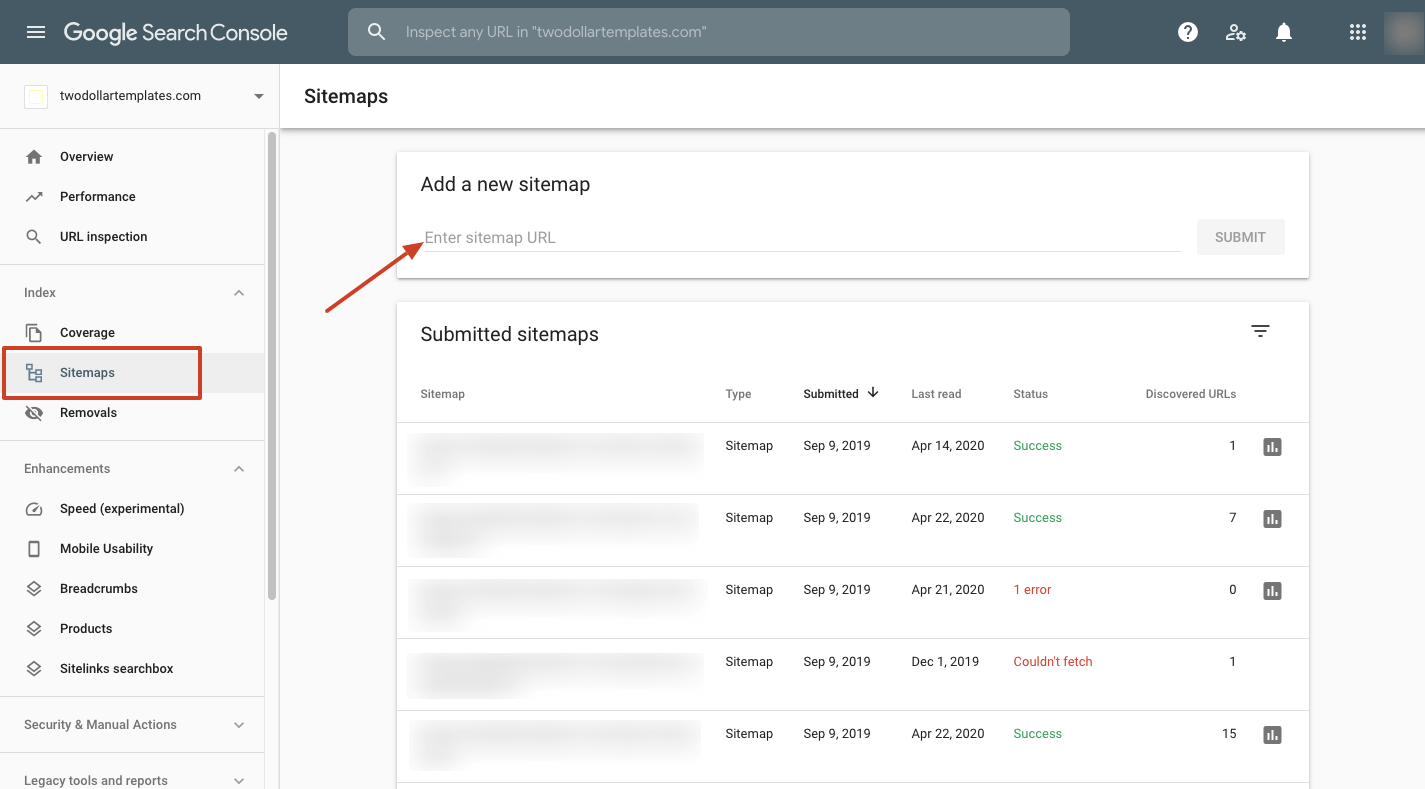
It’s not difficult to do, but it would be better if you could automate it.
b) Generate and upload your image sitemap automatically
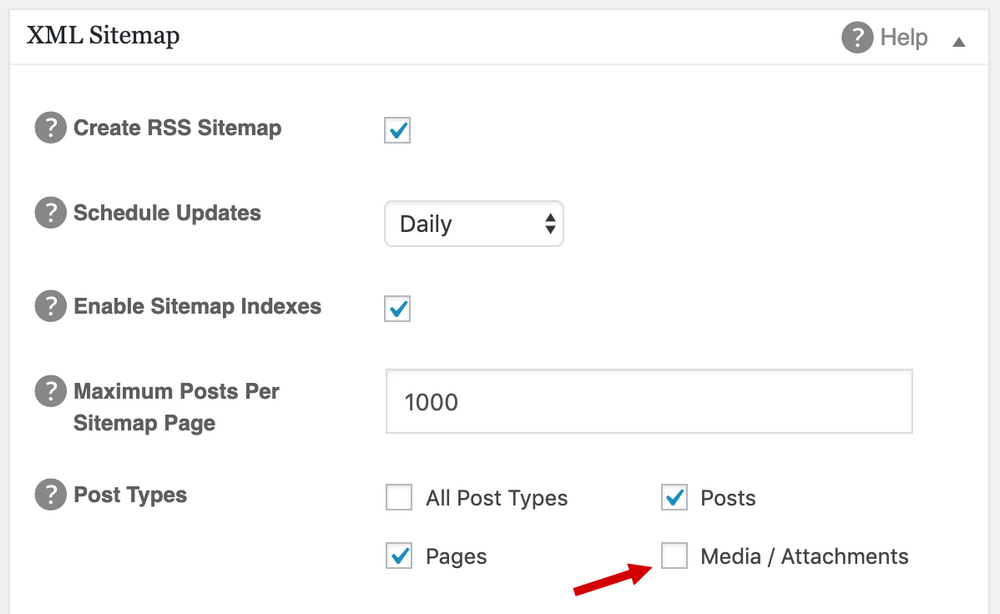
If you run on WordPress, the best way to automatically generate an image sitemap is with a plugin.
In All in One SEO Pack, for example, you just need to select the “Media/Attachments” option, which will generate a separate image sitemap for your site.
Key takeaways (TL;DR)
As images play a greater role in web design, they play a greater role in search engine optimization, too.
But as you can see here, image SEO is a multi-layered task.
Key takeaways:
- Avoid cliché stock photo; instead, use/create images that bring added value
- Don’t use too many images – every image should have a purpose
- Always pick the right format – GIF for animations, JPEG for photos and PNG for illustrations, screenshots or images with text
- Use vectors for detailed graphics that need to be super sharp on any device (e.g. logo)
- Consider using the next-gen formats (like WebP) for browsers that already support them
- Don’t use images that are too big for your website’s layout
- Compress your images (use lossy compression when possible – saves up more data)
- Experiment and find the best ratio between quality and file size
- Use descriptive metadata – especially file names, alt texts and captions (if needed)
- Cache your pages and use a CDN to serve your images faster across the globe
- If appropriate, include image structured data (great for recipes, product images, logos, etc.)
- For bigger pages, use image lazy loading – it will speed up the loading time
- If you have a lot of images, consider using an image sitemap
Thankfully, a lot of this work can be automated, so you won’t have to spend too much time working on it.
That said, SEO is never done.
So, as you work on analyzing your website’s overall performance in search, make sure your images factor into the equation.
